solution Contentsolution Content

HP Scanjet Flatbed Scanners - Clear paper jams in the Automatic Document Feeder

Introduction

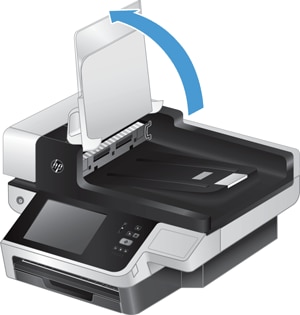
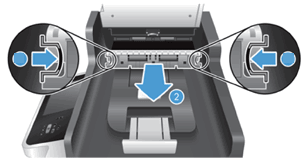
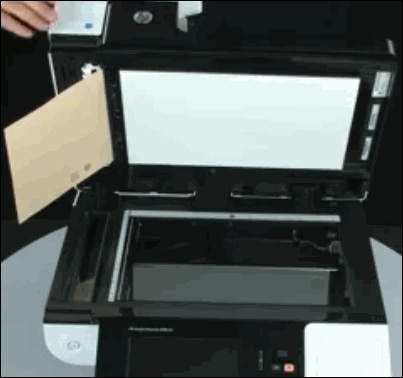
This document provides instructions to resolvepaper jams in the automatic document feeder (ADF) of HP Scanjet Flatbedscanners. It also provides the procedure of flossing the ADF to preventrepeated jams.
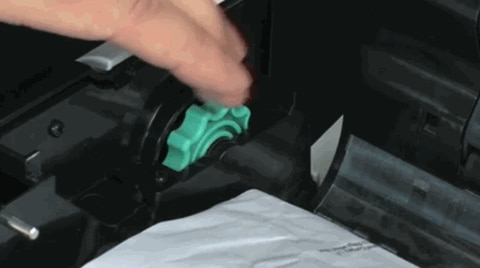
Flossing is effective in clearing staples, paperclips, small bits of paper, or other objects stuck in areas that arenot accessible or hard to find.
Some of the causes for paper jams in a scannerare the following:
  • Overloading of pages in the input oroutput tray.
  • Loading pages with staples, paper clips,and sticky notes.
  • Misalignment of paper.
  • Scanning damp or wet pages.
  • The need to clean or replace the rollers.
The procedure in this document applies to mostScanjet Flatbed scanners but the steps might vary depending on thetype of the scanner. The following are the list of HP Scanjet Flatbedscanners:
  • HP Scanjet 5590 Digital Flatbed Scannerseries
  • HP Scanjet Enterprise 7000n DocumentCapture Workstation series
  • HP Scanjet Enterprise 7500 FlatbedScanner
  • HP Scanjet Enterprise Flow 7500 FlatbedScanner
  • HP Scanjet 8270 Document Flatbed Scanner
  • HP Scanjet Enterprise 8500 fn1 DocumentCapture Workstation
  • HP Scanjet N6310 Document Flatbed Scanner
  • HP Scanjet N6350 Networked DocumentFlatbed Scanner
  • HP Scanjet N8420 Document Flatbed Scanner
  • HP Scanjet N8460 Document Flatbed Scanner
  • HP Scanjet N9120 Document Flatbed Scanner
  • HP Scanjet Enterprise Flow N9120 FlatbedScanner
Follow the instructions in this document or watchthe following video:
Fixing Paper Jams on HP Scanjet Flatbed Scanners with an ADF
Learn how to resolve a paper jam in the automatic document feeder (ADF) on HP Scanjet Flatbed Scanners with an ADF. An optional process called flossing the ADF will also be demonstrated.
If the video does not play, click here to view the videoin YouTube.

Overview of the procedure

The procedure to clear the paper jam consistsof the following steps:
注意:
Step 2 and Step 4 are not applicable forscanners that do not have an ADF duplex background unit.
The following scanners do not have an ADF duplexbackground unit:
  • HP Scanjet 5590 Digital Flatbed Scannerseries
  • HP Scanjet 8270 Document Flatbed Scanner
  • HP Scanjet N6310 Document Flatbed Scanner
  • HP Scanjet N6350 Networked DocumentFlatbed Scanner
  • HP Scanjet N8420 Document Flatbed Scanner
  • HP Scanjet N8460 Document Flatbed Scanner
  • HP Scanjet N9120 Document Flatbed Scanner
  • HP Scanjet Enterprise Flow N9120 FlatbedScanner

Step 1: Remove the paper in the ADF hatch

Follow these steps to remove any paper stuck inthe ADF hatch:
  1. Turn off the scanner and disconnectthe power cable.
  2. Remove all paper from the inputand output trays.
  3. Lift up the ADF latch locatedon the front of the scanner to open the ADF hatch.
    注意:
    If the scanner does not have an ADF latch,lift up the ADF hatch.
    描述 : Location of the latch to open theADF hatch
  4. Rotate the green thumb wheellocated on the left side of the open ADF to remove the paper stuckin the paper path.
    Make sureto remove any torn pieces of paper and obstructions from the paperpath.
    注意:
    If a green lever is present in the openADF, lift up the green lever, gently pull the jammed page, and thenlower the green lever.
    ForHP Scanjet N6350, click HP Scanjet N6350 Networked Document Flatbed Scanner - ADF Paper Jam (c03638149) (in English).
    For HP Scanjet N9120, click HP ScanJet N9120 - Clear a jam from the automatic document feeder (c01449546) (in English).
    描述 : Location of the green thumb wheel
  5. Close the ADF hatch until itclicks into place.
    The clicksound indicates the ADF hatch is closed properly.
注意:
For scanners that do not have an ADF duplexbackground unit, connect the power cable, turn on the scanner, andthen use the flatbed scanner to scan the damaged documents. If experiencingrepeated document jams, go to Step 3: Flossing the ADF hatch

Step 2: Remove the paper in the ADF duplexbackground

To remove paper or debris for scanners with anADF duplex background unit, follow these steps:
  1. Lift up the ADF input tray inan upright position to locate the ADF duplex background unit.
    描述 : ADF input tray in an upright position
  2. Press in on the ADF duplex backgroundtabs on either side, and then slide the ADF duplex background unitforward to remove it from its slot.
    描述 : Remove the ADF duplex backgroundunit
  3. Remove any loose paper or debristhat is found inside the ADF duplex background unit slot.
  4. Check the ADF duplex backgroundunit for any small pieces of paper or debris and remove it.
  5. Slide the ADF duplex backgroundunit into its slot until it clicks into place.
  6. Pull down the input tray, andthen close the ADF hatch until it clicks into place.
    注意:
    Failure to close the ADF hatch completelycan cause repeated jams.
  7. Reconnect the power cord andturn on the scanner.
    注意:
    To prevent further jams, use the flatbedscanner to scan the damaged documents.

Step 3: Flossing the ADF hatch

注意:
This is an optional step used when experiencingrepeated jams after removing any paper or debris from the ADF hatch.
  1. Turn off the scanner and disconnectthe power cord.
  2. Cut a manila folder to the followingletter-size dimensions: 8.5inches by 11 inches
  3. Use the ADF latch to lift upthe ADF hatch.
    注意:
    If the scanner does not have an ADF latch,lift up the ADF hatch.
  4. Insert the flossing paper (theletter-size manila folder) into the paper path and push it throughapproximately 11/2 inch.
    注意:
    If required, wiggle the flossing paper tomake sure it is inserted in the paper path.
    描述 : Flossing paper in the paper path
  5. To check for any loose debris,determine your scanner and use one of the following methods:
    • Lift up the flatbed scanner lid, removeany loose debris that is found, and then close the flatbed scannerlid.
    • For scanners that do not have an ADFduplex background unit, check for any loose debris under the inputtray, and then remove it.
    注意:
    The flossing sheet emerges from the upperfeed path and forces out any objects stuck in the ADF.
  6. Pull the flossing sheet to removeit from the paper path.
  7. Close the ADF hatch until itclicks into place.
注意:
For scanners that do not have an ADF duplexbackground unit, reconnect the power cord and turn on the scannerto resume scanning.

Step 4: Flossing the ADF duplex background

To floss scanners with an ADF duplex backgroundunit, follow these steps:
  1. Lift up the input tray in a verticalposition.
  2. Remove the ADF duplex backgroundunit from its slot and set it aside carefully.
  3. Lift up the flatbed scanner lidand locate the duplex paper path.
  4. Insert the flossing paper intothe duplex paper path and push it until it emerges from the topside.
    注意:
    If required, wiggle the flossing paper tomake sure it is inserted in the duplex paper path.
    描述 : Flossing paper in the duplex paperpath
  5. Open the flatbed scanner lid.
  6. Check for any debris in the outputtray and remove it.
  7. Pull the flossing sheet to removeit from the paper path.
  8. Close the flatbed scanner lid.
  9. Slide the ADF duplex backgroundunit back into its slot until it clicks into place.
  10. Lower the input tray back intoposition.
  11. Clean the scanning glass andthe scanning strip.
    For thecleaning instructions, click HP Scanjet Flatbed Scanners - Clean the scanning glass and the scanningstrips (c04386465) (in English).
  12. Reconnect the power cord andturn on the scanner to resume scanning.