note:The figures in this section show the M506. However, the procedure is correct for the M501 and M527 printers.
HP LaserJet Pro M501, M506, MFP M527, HP LaserJet Managed E50045, E52545 - Removal and replacement: Multipurpose tray (Tray 1) pickup roller and separation pad
Introduction
This document provides the procedures to remove and replace the Multipurpose (MP) tray (Tray 1) roller, pickup and separation pad.
How to Replace the Multipurpose Tray (Tray 1) Pickup Roller and Separation Pad for HP LaserJet Pro M501, Enterprise M50x, MFP/Flow M52x, Managed E50145, E52645
No audio. Learn how to replace the multipurpose tray (tray 1) pickup roller and separation pad for HP LaserJet Pro M501, Enterprise M50x, MFP/Flow M52x, Managed E50145, E52645.
Before performing service
Turn the printer power off
-
Disconnect the power cable.
warning:
To avoid damage to the printer, turn the printer off, wait 30 seconds, and then remove the power cable before attempting to service the printer.
note:The figures in this procedure show the toner cartridge removed. While not necessary, it might be easier to replace the rollers and separation pad with the toner cartridge removed.
Use the table below to identify the correct part number for your printer. To order the part, go to www.hp.com/buy/parts.
|
MP tray (Tray 1) roller, pickup and separation pad part number
|
|
|
F2A68-67914
|
Tray 1 pickup roller, separation pad, and spring kit with instruction guide
|
Required tools
-
No special tools are required to remove these parts.
After performing service
Turn the printer power on
-
Connect the power cable.
-
Use the power switch to turn the power on.
Post service test
Make sure that the printer initializes to a Ready state.
Print a page from Tray 1 to make sure that the printer is functioning correctly.
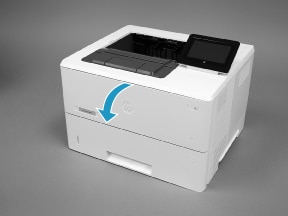
Step 1: Remove the roller
-
Open the toner-cartridge door.Figure : Open the toner-cartridge door
-
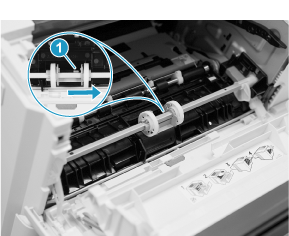
Release two tabs between the roller collar and roller (callout 1), and then rotate the top of the roller out and away from the printer (callout 2).
note:
Pushing down on the top of the roller might make it easier to release the tabs.Figure : Release two tabs
-
Remove the roller.Figure : Remove the roller

Step 2: Remove the separation pad assembly
-
Locate the tab on the back-side of the roller holder (callout 1), push down on the tab, and then move the roller holder to the right to release it.Figure : Release one tab
-
Open the registration-jam access plate (callout 1), depress the separation pad holder (callout 2), and then to slide the roller holder all the way to the right (callout 3).
note:
After moving the roller out of the way, release the registration-jam access plate. The roller holds the plate out of the way.Figure : Move the roller carriage out of the way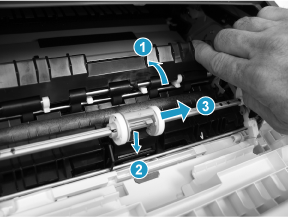
-
Remove the separation pad assembly.
note:
The spring under the assembly is not captive and can be easily lost.Figure : Remove the separation pad assembly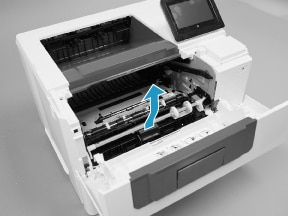
-
Remove the spring (callout 1) from the separation pad assembly (callout 2).
note:
Retain this spring. It must be installed on the replacement separation pad.note:
If the spring is damaged or lost, a replacement spring is included in the kit.Figure : Remove the spring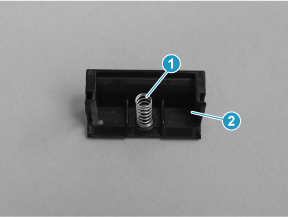
Step 3: Unpack the replacement roller and pad
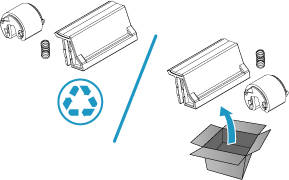
Unpack the replacement part from the packaging.
caution:Do not touch the gray spongy portion of the replacement roller or the black rubber portion of the pad assembly. Skin oils on the roller can cause paper handling problems.
note:HP recommends responsible disposal of the defective part.
Recycle and unpack
Figure : Recycle and unpack
Step 4: Install the separation pad assembly
caution:Do not touch the black rubber portion of the pad assembly. Skin oils on the pad can cause paper handling problems. HP recommends washing your hands before handling the assembly.
-
Install the spring (callout 1) from the discarded separation pad assembly (or use the one supplied in this kit) on to the replacement assembly (callout 2).Figure : Install the spring
-
Align the slots in the assembly (callout 1) with the rails on the holder (callout 2).Figure : Align the assembly with the holder

-
Install the pad assembly into the holder.
note:
The separation pad should freely move up and down on the spring when correctly installed. If the pad does not freely move, remove it, check the spring, and then reinstall it.Figure : Install the pad assembly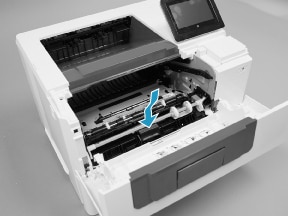
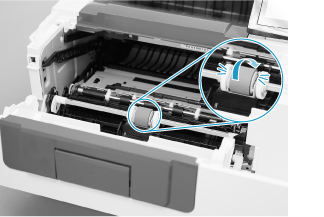
-
Slide the roller carriage back to the center of the shaft (the locking tab snaps into place).
note:
Slightly depress the separation pad so that the roller carriage can slide over it.Figure : Slide the roller carriage to the left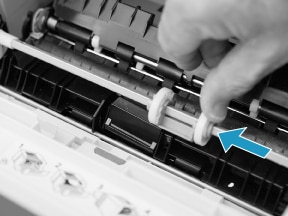
Step 5: Install the roller
caution:Do not touch the gray spongy portion of the replacement roller. Skin oils on the roller can cause paper handling problems. HP recommends washing your hands before handling the assembly.
-
Place the pins on the under-side of the pickup roller in the slots on the holder, and then rotate the top of the roller up and toward the printer.
note:
In this step, you start with the roller upside down, and then rotate it up and into its final installed position.Figure : Install the roller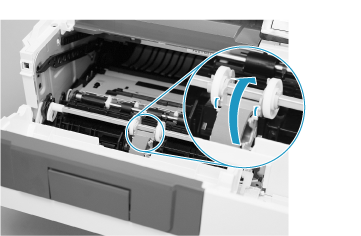
-
Continue to rotate the top of the roller toward the printer until two tabs snap into place.Figure : Engage two tabs
-
Close the toner-cartridge door.
note:
If the toner cartridge was removed, do not forget to reinstall it.Figure : Close the toner-cartridge door
Enter a topic to search our knowledge library
What can we help you with?

Need Help?