The printer is working, but the printed output is in black and white when it should be in color.
HP Deskjet F4100 All-in-One Series - Color Image Prints in Black and White
Issue
Solution
Step one: Check the Print in Grayscale setting
Check for and remove any grayscale settings. Use the following steps to check this setting.
-
In the program being printed from, click File and then click Print. The Print dialog box appears.
-
Select the correct product and then click Properties. The Properties dialog box appears.
-
Click the Color tab.
-
Look at the Print in Grayscale setting. If the checkbox is selected, click to clear it.
-
Click OK to save the settings.
Step two: Check the ink levels
huomautus:If you have installed a refilled or remanufactured print cartridge, or a cartridge that has been used in another printer, the ink level indicator will be inaccurate or unavailable.
-
Open the Printer Toolbox.
-
Open HP Solution Center.
-
Click Settings.
-
Click Print Settings.
-
Click Printer Toolbox.
huomautus:
You can also open the Printer Toolbox from the Print Properties dialog box. In the Print Properties dialog box, select Printing Preferences, click the Features tab, and then click Printer Services. -
-
Click the Estimated Ink Levels tab.Kuva : Estimated ink levels - both cartridges low

huomautus:
A cartridge might be running out of ink even if the graphic shows that there is ink remaining in the cartridge. Lines or streaks always appear in printouts when the cartridges begin to run out of ink. Replace print cartridges that are out of ink or low on ink.
Step three: Print a self-test page
If the Print in grayscale option is not the problem and the print cartridges are not low on ink, print and evaluate a self-test page to determine if the cartridges or printer is causing the problem.
-
Load the input tray with unused plain white paper.
-
Press and hold the Cancel (
 ) button and then press the Start Copy Color (
 ) button.
-
Release both buttons. The self-test page prints.Kuva : HP Deskjet F4100 series self-test page

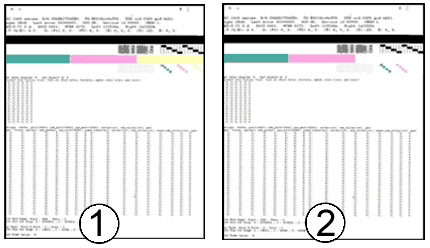
Step four: Note which cartridges printed which areas of the self-test page
You must identify which cartridge printed which part of the self-test page, so that if you find defects on the page, you will know which cartridge is the problem.
However, you can install different combinations of print cartridges in your printer, and different cartridge combinations print different self-test page patterns. Your self-test page may not look exactly like the picture below, but the right and left cartridges will print in the same areas of the page no matter which cartridges are installed.
-
Printed by the right cartridge
-
Printed by the left cartridge
Kuva : Self-test page layout

Step five: Look for defects
In general, if the printer and print cartridges are working properly, the patterns (which look like grids of lines) should contain few or no missing lines. None of the colors should be missing. Also, there should be no streaks of ink on the report.
Missing lines or streaked bars
If a pattern shows more than a few missing lines, or a bar is streaked, that print cartridge is not functioning properly.
Kuva : The magenta pattern shows missing lines and the bar is streaked
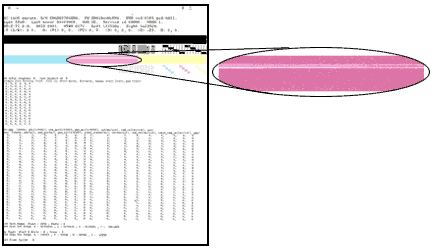
If the self-test page shows missing lines or streaked bars, click here to continue troubleshooting.
Color mix
If any of the colors of the bars are very different from the color dots on the cartridge label, the cartridge is not functioning properly.
Kuva : One of the bar colors is very different from the color dot on the cartridge

If your self-test page shows colors that are very different from the colors on the cartridge label, click here to continue troubleshooting.
Missing colors
If any of the color patterns or bars are entirely missing, the cartridge is not functioning properly.
huomautus:If you are printing in reserve mode, without all the cartridges installed, the patterns associated with the missing cartridge will also be missing.
-
All colors printed - no missing colors
-
Yellow missing - the tri-color (left-side) cartridge is not printing properly
Kuva : Missing colors
If any of the patterns or bars are entirely missing, click here to continue troubleshooting.
Ink smears
If the self-test report shows smeared ink, you might need to clean your cartridges.
Kuva : Smeared ink

If the self-test report shows smeared ink, click here to continue troubleshooting.
Step six: If you saw no defects
If no defects appear on the diagnostic page, the cartridges and product are probably working correctly. Click here to continue troubleshooting (c00635950) (in English).
Muita tukivaihtoehtoja
Kirjoita aihe etsittäväksi tietokannastamme
Kerro miten voimme auttaa sinua?

Tarvitsetko apua?