The following information describes how to load paper into Trays 2 and 3.
HP LaserJet Managed MFP E82540-E82560, HP Color LaserJet Managed MFP E87640-E87660 - Load paper to Trays 2 and 3
caution:Do not extend more than one paper tray at a time.
Load Trays 2 and 3
These trays hold up to 520 sheets of 75 g/m2 paper.
note:The procedure to load paper to Tray 2 and Tray 3 is the same. Only Tray 2 is shown here.
-
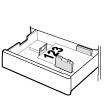
Open the tray.
note:
Do not open this tray while it is in use.Figure : Open the tray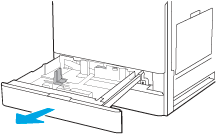
-
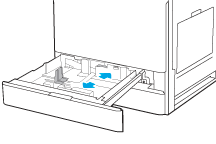
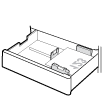
Before loading paper, adjust the paper-width guides by holding down the blue lock/unlock toggle switch on the rear paper-width guide, pinching the blue adjustment latch on the front paper-width guide, and then sliding the guides to the fully open position.Figure : Adjust the guides
-
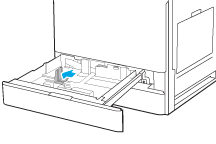
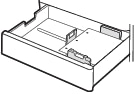
Adjust the paper-length guide by pushing in at the bottom of the blue adjustment latch while sliding the guide to the size of the paper being used.Figure : Adjust the guides
-
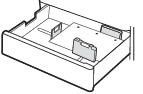
Load paper into the tray.Figure : Load paper

-
Adjust the paper-length and paper-width guides to the size of the paper being used. Check the paper to verify the guides lightly touch the stack, but do not bend it.
note:
Do not adjust the paper guides tightly against the paper stack. Adjust them to the indentations or markings in the tray.note:
To prevent jams, adjust the paper guides to the correct size and do not overfill the tray. Be sure that the top of the stack is below the tray full indicator.Figure : Adjust the guides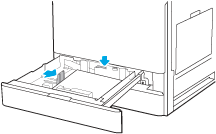
-
Close the tray.Figure : Close the tray

-
The tray configuration message displays on the printer control panel.
-
Select OK to accept the detected type and size, or select Modify to choose a different paper size or type.For custom-size paper, specify the X and Y dimensions for the paper when the prompt displays on the printer control panel.
Trays 2 and 3 paper orientation
Position paper correctly in Trays 2 and 3 to ensure the best print quality.
|
Duplex mode
|
How to load paper
|
|
1-sided printing
|
Face-up
Top edge at the back of the tray

Top edge at the left side of the tray
|
|
Automatic 2-sided printing or with Alternative Letterhead Mode enabled
|
Face-down
Top edge at the back of the tray
note: 
Top edge at the right side of the tray

|
|
Duplex mode
|
How to load paper
|
|
1-sided printing
|
Face-up
Top edge at the left side of the tray

Top edge at the back of the tray

|
|
Automatic 2-sided printing or with Alternative Letterhead Mode enabled
|
Face-down
Top edge at the right side of the tray
Top edge at the back of the tray

|
|
Duplex mode
|
How to load paper
|
|
1-sided printing
|
Face-up
Holes at the left side of the tray, with the top of the form at the rear of the printer
Holes at the back of the tray
|
|
Automatic 2-sided printing or with Alternative Letterhead Mode enabled
|
Face-down
Holes at the right side of the tray

Holes at the back of the tray
|
Use alternative letterhead mode
Use the Alternative Letterhead Mode feature to load letterhead or preprinted paper into the tray the same way for all jobs, whether printing to one side of the sheet of paper or to both sides. When using this mode, load paper as for automatic duplex printing.
Enable Alternative Letterhead Mode by using the printer control-panel menus
Use the Settings menu to set the Alternative Letterhead Mode setting.
-
From the Home screen on the printer control panel, navigate to and open the Settings menu.
-
Open the following menus:
-
Copy/Print or Print
-
Manage Trays
-
Alternative Letterhead Mode
-
-
Select On.
Enter a topic to search our knowledge library
What can we help you with?

Need Help?