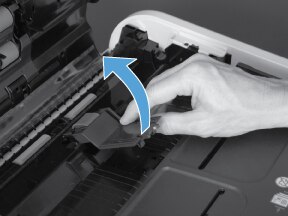
solution Contentsolution Content

HP LaserJet Enterprise M712 and HP LaserJet Enterprise MFP M725 - Replace the Document Feeder Separation Pad Spring

Introduction

note:
To see a short video demonstrating this procedure, click here.
Before you begin
  • Use the table below to identify the correct kit part number for your product, and then go to www.hp.com/buy/parts to order the kit.
    Kit part number
    Description
    5851-4879
    Document feeder separation spring kit
Required tools
  • No special tools are required to install this kit.

Step 1 - Remove the Document Feeder Separation Pad Spring

  1. Do the following:
    1. Turn off the product.
    2. Disconnect the power cable.
        warning:
      To avoid damage to the product, turn the product off, wait five seconds, and then remove the power cord before attempting to service the product.
  2. Open the document feeder cover and locate the document feeder separation pad.
  3. Press the tab (callout 1) toward the separation pad.
  4. Rotate the separation pad assembly up and away from the document feeder, and then remove the assembly.
  5. Remove the separation pad spring (callout 1).

Step 2 - Unpack the Replacement Document Feeder Separation Pad Spring

Unpack the replacement from the packaging.
If your part requires return or recycling, go to Product return and recycling
note:
HP recommends responsible disposal of the duplex reverse guide.

Step 3 - Install the Replacement Document Feeder Separation Pad Spring

  1. Seat the spring on the spring pedestal (callout 1) under the separation pad.
  2. Position the two tabs (callout 1) on the assembly in the holes provided in the document feeder chassis.
  3. Rotate the assembly down and into the document feeder.
  4. Insert the tab (callout 1).
  5. Close the document feeder cover.
  6. Do the following:
    1. Connect the power cable.
    2. Turn on the product.