This document is for the HP Scitex FB500 and FB700 printers.
HP Scitex FB500 and HP Scitex FB700 Series - Printer Initialization Stops on HP Logo Splash Screen or 'Keyboard Error' Displays on the Control Panel
Issue
When the HP Scitex FB500 or FB700 printer is powered on, there is normally a short display of low-level computer information before the printer software starts to load and the control panel displays the HP logo on a black background. After showing the logo alone for a number of seconds, the logo then appears on a colored or gray background, depending on software version. In addition to the background change, status messages begin to appear at the bottom of the screen.
Figure : Example of a normal initialization screen with the status stripe and text across the bottom of the screen for software version 3.05. Software version 3.06 has a gray color scheme instead of blue

If the printer fails to initialize normally, one of the following situations might appear:
-
The initialization screen will stall at the HP logo splash screen.Figure : Example of initialization stalled with HP logo splash screen with a black background for software version 3.06. Older software versions have a blue color scheme.

-
The error 'Keyboard Error' will display on the control panel, and the HP logo splash screen will not appear.
Cause
The BIOS settings stored on the motherboard have changed from the customized settings to a different setting or to the default settings. An unexpected power event, such as a spike, a surge, or a loss of power; or battery failure due to age or deliberate removal from the motherboard will reset the BIOS settings to the default values.
Solution
To reset the BIOS settings the following equipment is required:
-
#2 Phillips screwdriver, to remove the metal enclosure from the printer (optional)
-
Standard USB or PS/2 computer keyboard
-
External VGA monitor with VGA cable and AC power cord
note:Changing the BIOS does not require any special skills or knowledge, but navigating through the screens of the Setup Utility may be unfamiliar to some printer operators. If a qualified person who is knowledgeable and experienced with BIOS configuration of standard desktop PCs is available, that person may be able to perform the required configuration more quickly.
-
Turn the printer off.
-
If desired, remove the user-end enclosure by using a #2 Phillips screwdriver on the fasteners. Removal of the user-end enclosure is not required to reach the VGA and USB ports, but removal will allow greater access and visibility.
note:
Do NOT remove the service-end enclosure for this procedure.-
Service-end fasteners. Do Not remove this enclosure.
-
User-end fasteners.
Figure : Location of user-end and service-end enclosure fasteners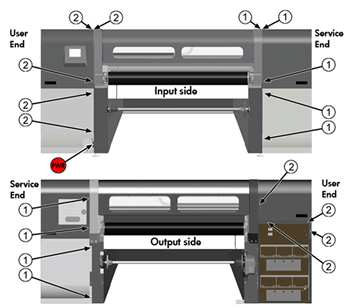
-
-
Locate the VGA connector on the motherboard, disconnect the cable for the control panel, and then attach the VGA cable for the external monitor.
-
Control panel VGA connection
-
USB ports
-
PS/2 keyboard port
Figure : Ports and control panel cable connection, shown with user-end enclosure removed
-
-
Connect the keyboard to the motherboard using either the USB or PS/2 port.
-
Turn on the printer and the external VGA monitor.
-
Use the connected keyboard, press the Delete key at one-second intervals to enter the BIOS setup utility. If the BIOS utility does not appear and the monitor displays the HP splash screen, turn the printer off using the power switch. Wait for 30 seconds and try this step again.
-
When the BIOS utility appears, use the list of settings to make the necessary changes. Navigate through the setup utility using the arrow keys on the keyboard. Press the Enter key to select an item, and the Esc key to exit an item and/or to go back to the previous screen.
caution:
The preceding table lists only the settings in the BIOS setup that require changes. Settings that are not listed should be left at their default setting. HP recommends that no other changes be made that are NOT specified in the table.changes may have occurred in the BIOS supplied motherboard manufacturer since the publication of this document. If a line item is listed in the table, but cannot be found in the BIOS setup utility, disregard that item and continue to the next item.BIOS Setup FeatureCustom Setting (change BIOS to this)CMOS Features > Halt OnNo ErrorsAdvanced BIOS Features > CPU Features > PPM ModeSMMAdvanced BIOS Features > CPU Features > C1E FunctionDisabledAdvanced BIOS Features > CPU Features > Execute Disable BitDisabledAdvanced BIOS Features > CPU Features > Core Multi-ProcessingDisabledAdvanced BIOS Features > Second Boot DeviceDisabledAdvanced BIOS Features > Third Boot DeviceDisabledAdvanced BIOS Features > Boot Other DeviceDisabledAdvanced BIOS Features > APIC ModeDisabledAdvanced BIOS Features > ASF SupportDisabledAdvanced BIOS Features > DMI Event LogDisabledAdvanced Chipset Features > System BIOS CacheableDisabledAdvanced Chipset Features > PCI Express Root Port Func > PCI Express Port 1DisabledAdvanced Chipset Features > PCI Express Root Port Func > PCI Express Port 2DisabledAdvanced Chipset Features > PCI Express Root Port Func > PCI Express Port 3DisabledAdvanced Chipset Features > PCI Express Root Port Func > PCI Express Port 4DisabledAdvanced Chipset Features > PCI Express Root Port Func > PCI Express Port 5DisabledAdvanced Chipset Features > PCI Express Root Port Func > PCI Express Port 6DisabledAdvanced Chipset Configuration > On- Chip Frame Buffer Size32MBAdvanced Chipset Configuration > Total GFX Memory128MB*Integrated Peripherals > OnChip IDE Device > On-Chip Secondary PCI IDEDisabledIntegrated Peripherals > Onboard Device > Audio AmplifierDisabledIntegrated Peripherals > Onboard Device > Azalia ControllerDisabledIntegrated Peripherals > Super IO Device > Onboard FDC ControllerDisabledIntegrated Peripherals > Super IO Device > Onboard Serial Port 2DisabledIntegrated Peripherals > Super IO Device > Onboard Parallel PortDisabledIntegrated Peripherals > Super IO Device > PWRON After PWR-FailOnIntegrated Peripherals > USB Device Setting > USB 1.0 ControllerDisabledIntegrated Peripherals > USB Device Setting > USB 2.0 ControllerDisabledIntegrated Peripherals > USB Device Setting > USB Operation ModeDisabledIntegrated Peripherals > USB Device Setting > USB Keyboard FunctionDisabledIntegrated Peripherals > USB Device Setting > USB Mouse FunctionDisabledIntegrated Peripherals > USB Device Setting > USB Storage FunctionDisabledPower Management Setup > Modem Use IRQNAPnP/PCI Configurations > Init DisplayOnboardPnP/PCI Configurations > Resources Controlled ByManualPnP/PCI Configurations > IRQ Resources > IRQ-7 assigned toReservedPnP/PCI Configurations > IRQ Resources > IRQ-9 assigned toReservedFrequency/Voltage Control > Auto Detect PCI ClkDisabled*Some operators have notes that the Total GFX memory settings cannot be changed to 128, only 256 is available as a selection. In this case, leave the setting as it is and continue to next item. -
Press the F10 key to save and exit the utility. Confirm that you are saving the changes and exiting. The printer will restart.
- Once the printer initializes, turn the printer off.
-
Disconnect the keyboard and external VGA monitor and reconnect the control panel to the VGA port on the motherboard.
-
Reinstall the user-end enclosure, if removed.
-
Turn the printer on and resume normal operation.
For additional questions or further assistance, contact an authorized HP reseller or the regional HP Customer Care Center.
Enter a topic to search our knowledge library
What can we help you with?

Need Help?