This document is for the HP Photosmart 6510, 6512, and 6515 e-All-in-One printers.
HP Photosmart 6510 Printers - Printer Prints a Blank Page or Does Not Print Black or Color Ink
The printer is working, but the printed output is missing black or color ink, or the printed page is blank or has very little ink.
Step 1: Use genuine HP ink cartridges
HP recommends that you use genuine HP ink or toner supplies. HP cannot guarantee the quality or reliability of non-HP or refilled cartridges. If you do not use genuine HP cartridges, the steps in this document might not resolve the issue. To check the authenticity of your cartridges, go to the HP anti-counterfeit webpage (in English).
Purchase replacement cartridges and other supplies from the HP Store or local retailers.
If using genuine HP ink cartridges resolved the issue, you do not need to continue troubleshooting.
Step 2: Check estimated ink levels
Low ink can contribute to poor print quality. Use the control panel to check the estimated ink levels.
note:Ink level warnings and indicators provide estimates for planning purposes only. When an indicator shows low ink levels, consider having a replacement ink cartridge available to avoid possible printing delays. You do not need to replace ink cartridges until print quality becomes unacceptable.
From the home screen of the printer control panel, touch the Ink icon  .
.
 .
.
The current ink levels display.
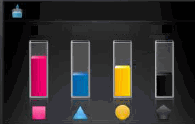
If none of the ink cartridges are critically low or empty and the issue persists, continue to the step to make sure the ink cartridges are properly vented and seated correctly.
If there are any empty or critically low ink cartridges, continue to the next step.
Step 3: Replace any empty or low ink cartridges
Watch a video or use the following steps to replace any empty or critically low ink cartridges.

Replacing a Cartridge - HP Photosmart 5510 e-All-in-One Printer (B111a)
Learn how to replace a cartridge on an HP printer. Applies to the PS 5510 B111a,B111b,B111g; 5511 B111j;5512 B111a, B111e,B111f;5514 B111c;5514 B111d,B111h;5515 B111a, B111h, B111j; 6510 B211a, B211b, B211e;6512 B211a;6515 B211a.
-
Press the Power button to turn on the printer, if it is not already turned on. Wait until the printer is idle and silent before you continue.
-
Open the ink cartridge access door. The carriage moves to the access area.Figure : Open the ink cartridge access door

-
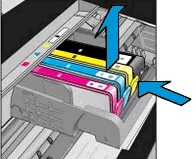
Press the tab on the front of the ink cartridge inward to release it, and then pull up on the ink cartridge to remove it from the slot.Figure : Remove the ink cartridge from the slot
-
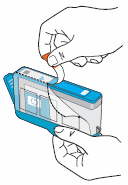
Pull the orange tab to remove the new ink cartridge from the plastic wrap.Figure : Remove the new ink cartridge from the plastic wrap
-
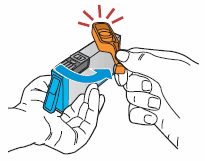
Twist the orange cap counter clockwise until it snaps off the new ink cartridge.Figure : Remove the orange cap from the new ink cartridge
-
With the nozzle and contacts facing down, slide the ink cartridge into its slot. Press down on the ink cartridge until it is firmly seated.Figure : Insert the ink cartridge

-
Make sure each cartridge is firmly installed in its slot. Run your finger along the top of the cartridges to feel for any that are protruding, and if any are, press down firmly until each cartridge snaps into place.
-
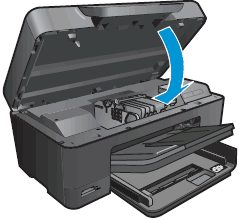
Close the ink cartridge access door.Figure : Close the ink cartridge access door
-
When you insert a new ink cartridge, the printer automatically prompts you to align the ink cartridges. Touch OK on the control panel to complete the alignment.
-
If the printer control panel states that the alignment has failed, repeat the steps to Clean the Cartridge contacts.
If replacing the ink cartridges resolved the issue, you do not need to continue troubleshooting.
Step 4: Make sure the ink cartridges are properly vented and seated correctly
If the vent on the top of the ink cartridge is clogged or obstructed, the ink cartridge might not work properly.
-
Press the Power button to turn on the printer, if it is not already on. Wait until the printer is idle and silent before you continue.
-
Open the ink cartridge access door. The carriage moves to the access area.Figure : Open the ink cartridge access door

-
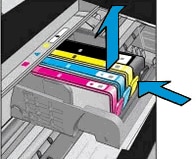
Press the tab on the front of the black ink cartridge inward to release it, and then pull up on the ink cartridge to remove it from its slot.Figure : Remove the ink cartridge from the slot
-
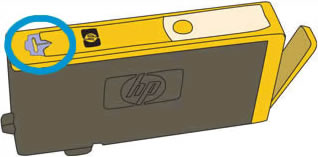
Examine the vent area above the HP logo on the top of the ink cartridge.Figure : Vent area on the ink cartridge
-
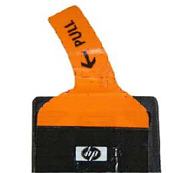
If the ink cartridge still has the orange pull-tab attached, pull to remove it.Figure : Orange pull tab
-
If the vent is clogged, use a straight pin to gently remove excess adhesive from the vent.
-
Clogged vent
-
With a straight pin, gently remove excess adhesive from the vent
-
Unclogged vent
Figure : Clean the clogged vent with a pin
-
-
With the nozzle and contacts facing down, slide the ink cartridge into its slot. Press down on the ink cartridge until it clicks into place.
note:
Make sure that each ink cartridge is installed in the correct slot. Match the shape of the icon and the color of the ink cartridge with the slot that has the same shaped icon and color.Figure : Insert the ink cartridge.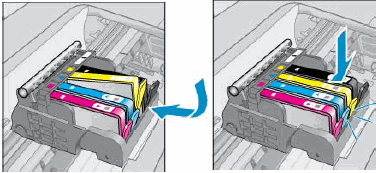
-
Repeat these steps to inspect the vents on each of the ink cartridges.
-
Make sure that each ink cartridge is firmly in place in its slot. Run your finger along the top of the ink cartridges to feel for any that are protruding, and if any are, press down firmly until each ink cartridge snaps into place.
-
Close the ink cartridge access door.Figure : Close the ink cartridge access door

-
Try the print job again.
If making sure the ink cartridges are vented and seated correctly resolved the issue, you do not need to continue troubleshooting.
Step 5: Clean the printhead
Some print quality issues are caused by clogged printheads. Use an automated tool to clean the printhead.
If the printhead is badly clogged, you might need to clean the printhead several times to restore normal print quality. After cleaning the printhead, wait 30 minutes before cleaning the printhead again.
-
Make sure that plain white U.S. letter or A4 size paper is loaded in the tray.
-
From the control panel home screen, touch the Setup icon (
 ).
).
-
Touch Tools, and then touch Clean Printhead. The product cleans the printheads, and then prints a test page.
-
Review the print quality on the test page.
-
If the print quality is still poor, repeat previous steps for cleaning the printhead.
caution:Never turn off the printer when ink cartridges are not installed. To avoid issues that require cleaning the printhead or that can damage the ink system, always replace ink cartridges as soon as possible, and always turn off the printer using the Power button.
If cleaning the printhead resolved the issue, you do not need to continue troubleshooting.
Step 6: Service the printer
If the previous steps did not resolve the issue, service the printer.
Service or replace your HP product if the issue persists after completing all the preceding steps.
Go to Contact HP Customer Support to schedule a product repair or replacement. If you are in Asia Pacific, you will be directed to a local service center in your area.
To confirm your warranty status, go to HP Product Warranty Check. Repair fees might apply for out-of-warranty products.
note:Keep a print sample that shows the problem. If the ink cartridges, printhead, or printer is replaced under warranty, the support agent will request the print sample. If the printer is returned to HP, the print sample must be returned with the printer. Place the sample in the output tray when you package your printer for shipping.
Enter a topic to search our knowledge library
What can we help you with?
Need Help?
