solution Contentsolution Content

A 'Carriage Jam,' '0x61000008,' '0x6100000B,' or '0x6100001D' Message Displays for HP Officejet 4610 All-in-One, Officejet 4620, Deskjet Ink Advantage 4610, and Deskjet Ink Advantage 4620 e-All-in-One Printer Series

Issue

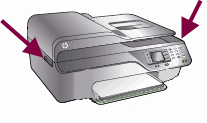
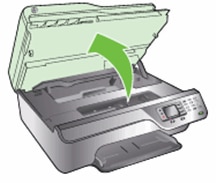
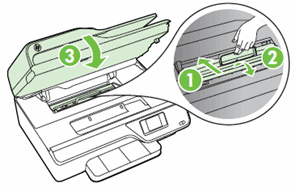
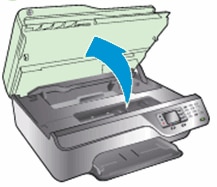
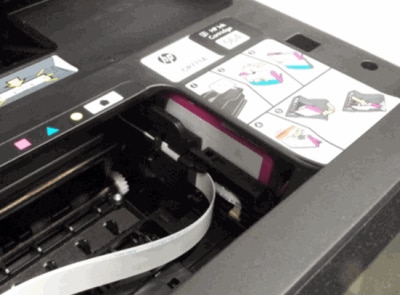
A 'Carriage Jam. The print carriage cannot move. Open the ink cartridge access door, clear any paper jam or obstruction, and select OK' message displays on the printer control panel.
One of the following error codes might display with the message:
  • 0x61000008
  • 0x6100000B
  • 0x6100001D
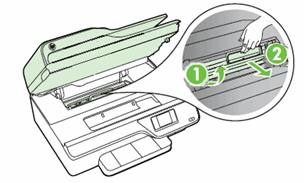
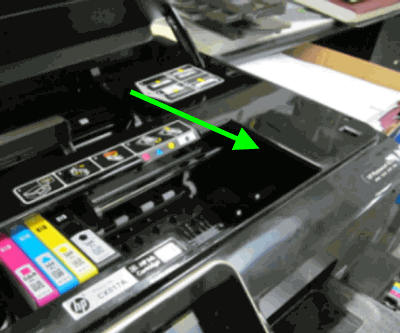
The carriage, which holds the cartridges, stalls in the printer. A paper jam might have occurred previously.
You might also experience the following symptoms:
  • The printer does not print.
  • The print job stops unexpectedly.

Solution one: Restart the printer

Follow these steps to restart the printer, and then try to print a test page.

Step one: Restart the printer

  1. Press the Power button to turn off the printer.
  2. Wait 60 seconds.
  3. Press the Power button to turn on the printer.
    note:
    The printer might go through a warm-up period which can last several minutes. Wait until the printer is idle and silent before continuing.

Step two: Print a Printer Status Report

Video on printing a test page

The following video demonstrates how to print a printer status report.
note:
This video shows the HP Officejet 4620 e-All-in-One Printer series, but the steps are the same for your printer.
If you have trouble viewing the video or to view the video in a different size, click here to play the video on YouTube.
Print a test page to make sure that the hardware functions correctly.
  1. Load plain white U.S. letter or A4 size paper in the tray.
  2. On the product control panel, press the Setup button ().
  3. Press the button () next to the Down Arrow ( ) until Reports displays next to OK, and then press the button next to OK.
  4. Press the button next to the Down Arrow () until Printer Status Report displays next to OK, and then press the button next to OK again. The test page prints.
  • If these steps resolved the issue, and the test page prints, there is no need to continue troubleshooting.
  • If the issue persists, continue with the next solution.
  • If the test page does not print, continue with the next solution.

Solution two: Clear the jam from inside the printer

Follow these steps to clear the jam from the cartridge access area, the cleanout area, and from underneath the printer.
note:
Use a flashlight to complete these steps.

Video on clearing a carriage jam

The following video demonstrates how to clear a carriage jam.
note:
This video shows the HP Officejet 4620 e-All-in-One Printer series, but the steps are the same for your printer.
If you have trouble viewing the video or to view the video in a different size, click here to play the video on YouTube.

Step one: Clear the jam from the cartridge access area

Follow these steps to remove jammed paper from inside the cartridge access area.
  1. Press the Power button to turn on the printer, if it is not already turned on.
  2. Locate the slots on the sides of the printer.
    Figure : Locate the slots on the sides of the printer
    Image: Locate the slots on the sides of the printer
  3. Place your fingers in the two slots on the sides of the printer, and then lift the cartridge access door. The carriage moves into the cartridge access area.
    Figure : Open the cartridge access door
    Image: Open the cartridge access door
  4. Disconnect the power cord from the rear of the printer.
      warning:
    Do not reach into the cartridge access area when the printer is plugged into an electrical outlet.
  5. Disconnect the USB cable from the rear of the printer if you have a USB connection to the computer.
  6. Gently remove any jammed paper from the cartridge access area. To avoid tearing any whole sheets of paper, pull the paper with both hands.
  7. Use a flashlight to thoroughly check for torn pieces of paper that might remain in the cartridge access area. If any torn pieces of paper remain inside the printer, more jams are likely to occur.
    Use a flashlight
    Paper jammed in carriage path
    Image: Use a flashlight
    Image: Paper jammed in carriage path
  8. Slide the carriage to the right side of the cartridge access area, and then inspect the left side of the cartridge access area for torn pieces of paper that might remain inside the printer.
  9. Remove any torn pieces of paper you find.
  10. Slide the carriage to the left side of the cartridge access area, and then inspect the right side of the cartridge access area for torn pieces of paper that might remain inside the printer.
  11. Remove any torn pieces of paper you find.

Step two: Clear the jam from inside the cleanout door

Follow these steps to remove any jammed paper from the cleanout door.
  1. Make sure that the power is off and that the power cord is disconnected from the rear of the printer.
      warning:
    Do not reach into the cartridge access area when the printer is plugged into an electrical outlet.
  2. Make sure the USB cable is disconnected from the rear of the printer, if you have a USB connection to the computer.
  3. With the cartridge access door open, locate the cleanout door. The door is behind the cartridge access area towards the rear of the printer.
    Figure : The cleanout door
    Image: The cleanout door
  4. Pull the cleanout door up and then out to remove it from the printer.
    Figure : Remove the cleanout door
    Image: Remove the cleanout door.
  5. Gently remove any jammed paper. To avoid tearing any whole sheets of paper, pull the paper with both hands.
    Figure : Remove any jammed paper
    Image: Remove any jammed paper
  6. Use a flashlight to thoroughly check for torn pieces of paper that might remain in the cleanout area. If any torn pieces of paper remain inside the printer, more jams are likely to occur.
    Figure : Use a flashlight
    Image: Use a flashlight
  7. Remove any torn pieces of paper you find.
  8. Gently reinsert the cleanout door into the cleanout area, and then press down on the handle until the door snaps into place.
  9. Close the cartridge access door.
      Figure : Reinsert the cleanout door and close the cartridge access door
      Image: Reinsert the cleanout door, and then close the cartridge access door
    1. Insert the cleanout door into the cleanout area
    2. Push down on the door handle until the door snaps into place
    3. Close the cartridge access door

Step three: Clear the jam from underneath the Printer

If you are unable to remove jammed paper from the cartridge access area or from inside the cleanout door, follow these steps to clear the jam from underneath the printer.
  1. Press the Power button to turn off the printer, if it is not off already.
  2. Disconnect the power cord from the rear of the printer, if it is not disconnected already.
  3. Turn the printer onto its right side so that you can access its underside.
      caution:
    Before turning the printer, use your hand to secure the scanner lid.
  4. Slide the paper tray out until it stops.
  5. Gently remove any jammed paper and bits of torn paper from the input tray area and from underneath the printer. To avoid tearing any whole sheets of paper, pull the paper with both hands.
    Figure : Remove paper from underneath the printer
    Image: Remove paper from  underneath the printer
  6. Use a flashlight to thoroughly check for torn pieces of paper that might remain inside the printer. If any torn pieces of paper remain inside the printer, more jams are likely to occur.
    Figure : Use a flashlight
    Image: Use a flashlight
  7. Remove any torn pieces of paper you find.
  8. Slide the paper tray back in until it stops.
  9. Return the printer to its normal position.
  10. Open the cartridge access door, and then look inside the printer for any loose objects that might have shifted when you turned the printer over. Remove any loose objects you find.
  11. Close the cartridge access door.
    Figure : Close the cartridge access door
    Image: Close the cartridge access door
  12. Reconnect the power cord to the rear of the printer.
  13. Press the Power button to turn on the printer.

Step four: Print a Printer Status Report

Print a test page to make sure that the hardware functions correctly.
  • If these steps resolved the issue, and the test page prints, there is no need to continue troubleshooting.
  • If the issue persists, continue with the next solution.
  • If the test page does not print, continue with the next solution.

Solution three: Remove and reinsert the cartridges

Improper placement or installation of the cartridges can cause the printer to indicate a carriage jam error. Follow these steps to remove and then reinsert the cartridges.

Step one: Remove and reinsert the cartridges

Follow these steps to remove and then reinsert the cartridges.
  1. Press the Power button to turn on the printer, if it is not already on.
  2. Locate the two slots on the sides of the printer.
    Figure : Slots on the sides of the printer
    Image:  Slots on the side of the printer
  3. Place your fingers in the slots on the right and left sides of the printer, and then lift to open the cartridge access door. The carriage moves into the carriage access area.
    Figure : Open the cartridge access door
    Image: Open the cartridge access door
  4. Wait until the carriage is idle and silent before proceeding.
  5. Press in the tab on the front of a cartridge to release it, and then pull up on the cartridge to remove it from the slot.
    Figure : Remove the cartridge from its slot
    Image: Remove the cartridge from its slot
  6. Repeat these steps to remove the other cartridges.
  7. To reinsert a cartridge, hold the cartridge so that the cartridge contacts are facing toward the printer.
  8. Match the colored dot on the cartridge with the dot of the same color on the carriage.
  9. Slide the cartridge into its slot, and then gently press the cartridge down until it clicks into place.
    note:
    Make sure that the colored dot on the cartridge label matches the colored dot on the slot.
    Figure : Install the cartridge
    Image: Install the cartridge
  10. Repeat these steps to reinsert the other cartridges.
  11. Close the cartridge access door.
    Figure : Close the cartridge access door
    Image: Close the cartridge access door

Step two: Print a Printer Status Report

Print a test page to make sure that the hardware functions correctly.
  • If these steps resolved the issue, and the test page prints, there is no need to continue troubleshooting.
  • If the issue persists, continue with the next solution.
  • If the test page does not print, continue with the next solution.

Solution four: Make sure that the posts in the cartridge parking area are not blocking the carriage

The carriage might move freely to the left and right even though the error displays on the control panel. Follow these steps to check if the posts are blocking the carriage.

Step one: Make sure that the posts in the cartridge parking area are not blocking the carriage

note:
Consider using gloves to perform these steps.
  1. Unplug the power cord from the power source or electrical outlet.
  2. Open the cartridge access door.
    Figure : Open the cartridge access door
    Image: Open the cartridge access door.
  3. Reach into the cartridge access area, and then manually move the carriage to the left of the printer and then the right. The carriage should move completely underneath the cover on the right side of the printer.
    • If you cannot move the carriage completely underneath the cover on the right side of the printer, continue with these steps.
      Figure : Example of the carriage partially under the cover on the right side of the printer
      Image: Example of the carriage partially under the cover on the right side of the printer.
    • If you can move the carriage underneath the cover on the right side of the printer, skip to the next step to print a status report.
      Figure : Example of the carriage resting underneath the cover on the right side of the printer
      Image: Example of the carriage resting under the cover.
  4. Move the carriage to the left side of the printer, and then use a flashlight to look inside the printer under the right cover.
    Figure : Example showing where to look under the printer cover
    Image: Example showing where to look under the printer cover.
  5. Make sure that the posts are not blocking the carriage from moving all the way to the right.
    Figure : Example of posts that might be blocking the carriage
    Image: Example of the posts blocking the carriage.
  6. Use a long, slim object (such as the eraser-end of a pencil) to gently push in the post.
    Figure : Example of pushing in the post with a pencil
    Image: Example of pushing in the post with a pencil.
  7. Reach into the cartridge access area, and then manually move the carriage to the right of the printer. The carriage should move under the printer cover.
      warning:
    Do not lift up on the carriage.
    Figure : Push the carriage to the right
    Image: Push the carriage to the right.
    Figure : Example of the carriage resting under the cover
    Image: Example of the carriage resting under the cover.
  8. Close the cartridge access door.
    Figure : Close the cartridge access door
    Image: Close the cartridge access door.
  9. Reconnect the power cord to the rear of the printer.
  10. Plug the power cord back into the power source or electrical outlet.
  11. If the printer does not turn on automatically, press the Power button to turn it on.

Step two: Print a Printer Status Report

Print a test page to make sure that the hardware functions correctly.
  • If these steps resolved the issue, and the test page prints, there is no need to continue troubleshooting.
  • If the issue persists, continue with the next solution.
  • If the test page does not print, continue with the next solution.

Solution five: Plug the printer directly into a wall outlet

Follow these steps to plug the printer directly into a wall outlet, and then print a test page.

Step one: Plug the printer directly into a wall outlet

Plug the printer directly into an electrical outlet to make sure that the power source functions correctly.
  1. Disconnect the power cord from the rear of the printer.
  2. Unplug the power cord from any power strip or surge suppressor.
  3. Plug the power cord directly into an electrical outlet.
  4. Reconnect the power cord to the rear of the printer.
  5. Press the Power button to turn on the printer.

Step two: Print a Printer Status Report

Print a test page to make sure that the hardware functions correctly.
  • If these steps resolved the issue, and the test page prints, there is no need to continue troubleshooting.
  • If the issue persists, continue with the next solution.
  • If the test page does not print, continue with the next solution.

Solution six: Reset the printer

Follow these steps to reset the printer.

Step one: Perform a power reset

  1. With the printer turned on, disconnect the power cord from the rear of the printer.
  2. Unplug the power cord from the wall outlet.
  3. Wait at least 15 seconds.
  4. Plug the power cord back into the wall outlet.
  5. Reconnect the power cord to the printer.
  6. Turn the printer on.

Step two: Print a test page

Print a test page to make sure that the hardware functions correctly.
  • If these steps resolved the issue, and the test page prints, there is no need to continue troubleshooting. Reconnect the USB cable, and then try to print again.
  • If the test page prints successfully, but you continue to experience an issue with your printer, then the issue is not related to the hardware.
  • If the printer does not print a test page, there is an issue with the printer hardware. Continue to the next step or solution.

Solution seven: Service the printer

Service or replace your HP product if the issue persists after completing all the preceding steps.
Go to Contact HP Customer Support to schedule a product repair or replacement. If you are in Asia Pacific, you will be directed to a local service center in your area.
To confirm your warranty status, go to HP Product Warranty Check. Repair fees might apply for out-of-warranty products.