This document is for HP Photosmart Plus B210a, B210b, B210c, and B210e e-All-in-One printers.
HP Photosmart Plus B210 Printers - Color or Black Ink Not Printing
The printer is working, but the printed output is missing black or color ink, or the printed page is blank or has very little ink.
Step 1: Use genuine HP ink cartridges
HP recommends that you use genuine HP ink or toner supplies. HP cannot guarantee the quality or reliability of non-HP or refilled cartridges. If you do not use genuine HP cartridges, the steps in this document might not resolve the issue. To check the authenticity of your cartridges, go to the HP anti-counterfeit webpage (in English).
Purchase replacement cartridges and other supplies from the HP Store or local retailers.
If using genuine HP ink cartridges does not resolve the issue, continue to the next step.
Step 2: Check estimated ink levels
Check estimated ink levels to see if any ink cartridges are critically low or empty. Ink must be available in each ink cartridge to run printhead-servicing tasks and prevent nozzles from clogging with ink.
-
On the printer control panel, touch the Setup icon
 , and then touch Tools.
-
Touch Display Estimated Ink Levels.The estimated ink levels display.Figure : Estimated ink levels
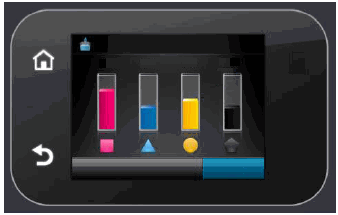
note:Ink level warnings and indicators provide estimates for planning purposes only. When an indicator shows low ink levels, consider having a replacement ink cartridge available to avoid possible printing delays. You do not need to replace ink cartridges until print quality becomes unacceptable.
-
If none of the ink cartridges are low on ink, you do not need to replace them yet. Skip to the step to make sure the ink cartridges are properly vented and seated correctly.
-
If any of the ink cartridges are low on ink, continue to the next step to replace them.
Step 3: Replace any low or empty ink cartridges
Replace low or empty ink cartridges.
-
Press the Power button to turn on the printer, if it is not already turned on.
-
Wait until the printer is idle and silent before continuing.
-
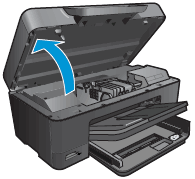
Open the ink cartridge access door.The carriage moves to the center of the printer.Figure : Opening the ink cartridge access door
-
Wait until the carriage is idle and silent before continuing.
-
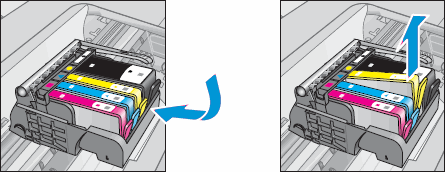
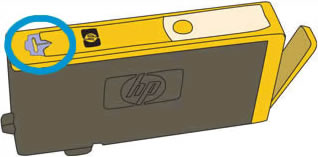
To release the old ink cartridge, press the tab on the front of the ink cartridge, and then remove it from the slot.Figure : Removing the ink cartridge from the slot
caution:
Do not lift the latch next to the carriage to install the ink cartridges. Doing so can result in incorrectly seated ink cartridges and printing problems. The latch must remain down to install the ink cartridges correctly.note:
Never turn off the printer when ink cartridges are missing. Make sure you replace any missing ink cartridges as soon as possible to avoid print quality issues and possible extra ink usage or damage to the ink system. -
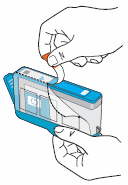
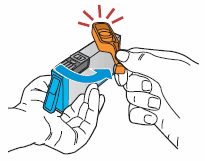
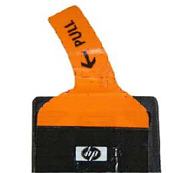
On the new ink cartridge, pull the orange pull-tab straight back to remove the plastic wrap.Figure : Removing the plastic wrap
caution:
Make sure you remove the orange pull-tab and plastic wrap completely before you twist the orange cap in the next step. Otherwise, ink might leak from the ink cartridge. When you remove the plastic wrap, the paper label on the top of the ink cartridge tears slightly, which is necessary to properly vent the ink cartridge. -
Twist the orange cap counter clockwise to snap it off the ink cartridge.Figure : Removing the orange cap
-
With the ink cartridge contacts facing the printhead, slide the ink cartridge into the empty slot. Press down on the ink cartridge until it is firmly seated.
caution:
Do not lift the carriage latch handle to install the ink cartridges. Doing so can result in incorrectly seated ink cartridges and printing problems. The latch must remain down to install the ink cartridges correctly.Figure : Reinstalling the ink cartridge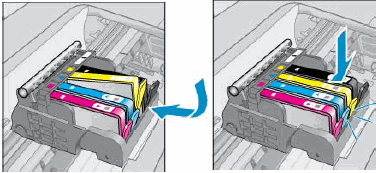
-
If the ink cartridge does not snap into place, remove the ink cartridge from the carriage. Gently bend the tab away from the cartridge, and then reinsert the ink cartridge into the carriage.
caution:
Be careful not to bend the tab out more than 1.27 cm (0.5 in). Moving the tab too far might damage the ink cartridge or cause the tab to break off.-
Bend the tab away from the cartridge
-
Do not bend the tab more than 1.27 cm (0.5 in)
Figure : Bending out the ink cartridge tab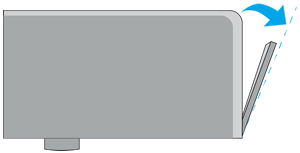
-
-
Repeat these steps to replace other ink cartridges, if necessary.
-
Close the ink cartridge door. The carriage returns to the right side of the printer.Figure : Closing the ink cartridge access door
-
When you insert a new ink cartridge, the printer automatically prompts you to align the ink cartridges.
If replacing any low or empty ink cartridges does not resolve the issue, continue to the next step.
Step 4: Make sure the ink cartridges are properly vented and seated correctly
If the vent on the top of the cartridge is clogged or obstructed, the ink cartridge might not work properly. Make sure the ink cartridges are properly vented and seated correctly.
-
Open the ink cartridge access door.The carriage moves to the center of the printer.Figure : Opening the cartridge access door
-
Press in the tab on the front of the ink cartridge to release it, and then pull it up to remove it from its slot.Figure : Removing the ink cartridge from the slot
-
Examine the vent area on each ink cartridge, above the HP logo on the top of the ink cartridge.Figure : Vent area on the ink cartridge
-
If the ink cartridge still has the orange pull-tab attached, pull to remove it.Figure : Orange pull tab
-
If the vent is clogged, use a straight pin to gently remove excess adhesive from the vent.
-
Clogged vent
-
With a straight pin, gently remove excess adhesive from the vent
-
Unclogged vent
Figure : Cleaning the clogged vent with a pin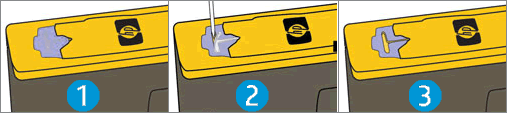
-
-
Reinsert the ink cartridge. With the ink cartridge contacts facing the printhead, slide the cartridge into the empty slot. Press down on the ink cartridge until it snaps firmly into place.
note:
Make sure each ink cartridge is installed in the correct slot. Match the shape of the icon and the color of the ink cartridge with the slot that has the same shaped icon and color.Figure : Reinstalling the ink cartridge
-
Repeat these steps to inspect the vents on each of the ink cartridges.
-
Make sure each ink cartridge is firmly in place in its slot. Run your finger along the top of the ink cartridges to feel for any that are protruding, and if any are, press down firmly until each ink cartridge snaps into place.
-
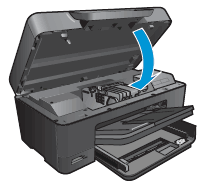
Close the ink cartridge access door.Figure : Closing the ink cartridge access door
If after making sure that the ink cartridges are properly vented and seated correctly does not resolve the issue, continue to the next step.
Step 5: Clean the printhead
From the printer control panel, use an automated tool to clean the printhead.
note:To avoid issues that require cleaning the printhead, always turn the printer off with the Power button on the printer itself.
-
Load plain white paper in the input tray.
-
On the product control panel, touch the Setup icon, and then touch Tools.
-
Touch Clean Printhead.
note:
Mechanical noises during the cleaning process are normal. A test page prints when the cleaning process finishes.
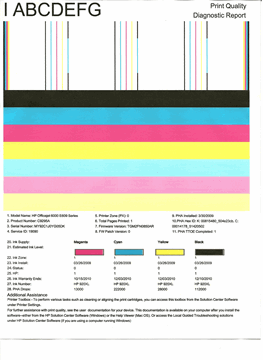
Figure : Example of a Print Quality Diagnostic Report
-
If the print quality on the test page is satisfactory, touch No to return to the current print job.
-
If the print quality on the test page is not satisfactory, touch Yes to perform a secondary cleaning of the printhead.
note:
There are three printhead cleaning stages. Complete all three stages if necessary. If the printhead is badly clogged, it might require another cleaning cycle. If so, wait 30 minutes after the third cleaning cycle to start the first stage of the cleaning process over again.
If cleaning the printhead using the automated tool does not resolve the issue, continue to the next step.
Step 6: Check the printhead warranty status
In general, if your printer is within warranty, so is the printhead. Additionally, if HP has replaced your printhead or if you have purchased a replacement, the replacement printhead is covered under warranty for 90 days, regardless of printer warranty. If you are not sure if your printhead is under warranty, see HP’s Warranty Check Tool to determine if your printer is still under warranty or refer to the receipt documentation that came with your replacement printhead.
-
If the printhead is in warranty, contact HP to see if the printer condition warrants a replacement printhead based on the terms of your printer warranty. Do not continue with the following steps if your printhead is in warranty. Skip to the step to service the printer.
-
If the printhead is out of warranty, continue to the next step to manually clean the printhead.
Step 7: Prepare to clean the printhead
Gather the following items:
-
A clean disposable container capable of holding enough water to submerge the printhead
-
Two clean lint free cloths such as coffee filters
-
Filtered or distilled water (tap or mineral water may contain contaminants that could damage the printhead)
-
A pan and stove or other means of heating water
-
Disposable gloves
-
Paper towels
Step 8: Clean the printhead manually
When manually cleaning the printhead, the printhead nozzles are soaked in very warm water for no longer than ten minutes. Use these steps only as a last resort and if the printhead would be disposed of otherwise.
caution:Manually cleaning the printhead should only be performed if the printhead is no longer under warranty.
-
Set the pan on the stove, and then fill the pan with filtered or distilled water.
caution:
Do not use alcohol or other solvents. This might damage the printhead, causing the printhead layers to separate, requiring replacement of the printhead. -
Heat the water until the water is very warm to the touch, but do not boil the water.
-
Stack the paper towels at the bottom of the disposable container until the stack is about 6.5 mm (1/4 inch) deep.
-
Pour the warm water from the pan into the disposable container so that it is 5 cm (2 inches) deep and covering the paper towels.
-
Put on disposable gloves to prevent ink from transferring to your skin or clothes.
-
Press the tab on the front of the ink cartridges to release them, and then lift the ink cartridges out of the printhead.
note:
Do not leave the ink cartridge outside the printer for longer than 30 minutes. The printhead and ink cartridges can be damaged by being exposed to air outside of the printer. -
Set the ink cartridges upside down on a paper towel.
-
Lift the latch handle on the carriage until it stops, and then carefully lift up on the printhead to remove it from the printer.
-
Moisten one of the clean, lint-free cloths with some of the warm water and use it to clean the underside of the printhead. Repeatedly wipe the nozzle area gently until excess black or color ink does not transfer to the cloth. Do not press into the nozzle area as this can cause damage.
caution:
Do not force water into the printhead, this can cause printhead delamination. -
Place the printhead into the disposable container so that the bottom rests on the paper towels, and then let it soak for 10 minutes.
-
Paper towels
-
Water level
-
-
Remove the printhead, and then gently wipe the excess water with a dry lint free cloth.
caution:
Do not use a hair dryer to dry off the printhead. This could cause the nozzles to dry out and clog. -
Let the printhead air-dry on a paper towel for 15 minutes with the nozzles facing up.
caution:
Do not use compressed air to blow out the printhead. This can cause delamination of the printhead. -
Lower the printhead into the carriage, and then carefully lower the latch handle.
note:
Make sure the colored shapes on the sides of the printhead line up with the colored shapes on the carriage. -
With the ink cartridge contacts facing the printhead, slide the ink cartridge into the correct slot. The color-coded icons on the ink cartridge and in the printhead indicate the correct slot.Press down on the ink cartridge until it snaps firmly into place.
-
Repeat these steps for each ink cartridge.

note:If you encounter the 'Printhead Problem' error message, turn the printer off and on.
The automated printhead cleaning tool must run after manually cleaning the printhead.
Step 9: Clean the printhead
From the printer control panel, use an automated tool to clean the printhead again after manually cleaning the printhead.
-
Load plain white paper in the input tray.
-
On the product control panel, touch the Setup icon, and then touch Tools.
-
Touch Clean Printhead.
note:
Mechanical noises during the cleaning process are normal. A test page prints when the cleaning process finishes.
Figure : Example of a Print Quality Diagnostic Report
-
If the print quality on the test page is satisfactory, touch No to return to the current print job.
-
If the print quality on the test page is not satisfactory, touch Yes to perform a secondary cleaning of the printhead.
note:
There are three printhead cleaning stages. Complete all three stages if necessary. If the printhead is badly clogged, it might require another cleaning cycle. If so, wait 30 minutes after the third cleaning cycle to start the first stage of the cleaning process over again.
If cleaning the printhead does not resolve the issue, continue to the next step.
Step 10: Replace the printhead
If cleaning the printhead did not resolve the issue, order a new printhead from HP or an authorized retailer.
caution:Wait until you have a new printhead assembly available before you remove the cartridges. HP recommends that you do not leave the ink cartridges outside the printer longer than 30 minutes. This could damage both the printer and the ink cartridges.
-
Go to HP Parts Store.If you are in Asia Pacific, the site directs you to a service center in your area.
-
Search for part number CN643A.
-
Follow the instructions to order the printhead assembly.
When you have the replacement printhead, click here for detailed instructions to remove the old printhead and install the new one.
If replacing the printhead does not resolve the issue, continue to the next step.
Step 11: Service the printer
Service or replace your HP product if the issue persists after completing all the preceding steps.
Go to Contact HP Customer Support to schedule a product repair or replacement. If you are in Asia Pacific, you will be directed to a local service center in your area.
To confirm your warranty status, go to HP Product Warranty Check. Repair fees might apply for out-of-warranty products.
note:Keep a print sample that shows the problem. If the ink cartridges, printhead, or printer is replaced under warranty, the support agent will request the print sample. If the printer is returned to HP, the print sample must be returned with the printer. Place the sample in the output tray when you package your printer for shipping.
Enter a topic to search our knowledge library
What can we help you with?

Need Help?