The product picks up or feeds multiple sheets when printing.
HP Deskjet and Officejet Printers - Multiple Pages Feed through the Printer
Issue
Solution one: Check the paper
Paper feed issues might result from dusty, torn, wrinkled, wet, or folded paper in the tray. The quality of the paper can also make a difference. Follow these guidelines to help avoid the issue.
-
Use only good quality paper that meets product specifications.
-
Store all paper in a dry, cool place. This issue occurs more often in humid climates.
-
Do not print on paper that is already printed. The dampness of the ink can cause the paper to stick together.
Follow these steps to check the condition of the paper.
-
Remove the stack of paper from the tray.
-
Examine the condition of the paper, and replace any ripped, dusty, curled, wrinkled, or bent paper.
-
Make sure that all the paper in the stack is the same size and type. Never load mixed types of paper in the tray. The product can only process one type of paper at a time.
-
Make sure that the stack of paper contains no fewer than 10 sheets and no more than 25 sheets of paper.
-
Fan the stack of paper to make sure none of the sheets are stuck together.
-
Tap the stack of paper on a flat surface to align the edges.
-
Insert the stack of paper into the product, and then push the paper into the product until it stops.
note:
Do not push the paper too far into the product. This can cause the paper to jam into the rollers and cause the issue. -
Gently push the paper guides against the paper. Do not push the guides so far that they bind against the paper.
-
Try printing again. If the issue is not resolved, try loading different brands of paper and different types of paper, one type at a time. Then try printing again.
-
If these steps resolved the issue, you do not need to continue troubleshooting.
-
If the issue persists, continue to the next solution.
Solution two: Clean the paper rollers
Follow these steps to clean the paper rollers.
-
Press the Power button (
 ) to turn off the product.
-
Disconnect the power cord from the back of the product.
-
Remove the rear access door.
note:
Some products do not have rear access door. If your product does not have a rear access door, access the rollers through the front cover.Figure : Open the front cover (your product might look different) Different products have different rear access doors. Some have one release tab, some have two release tabs, and some have a knob to turn. Some also have automatic two-sided printing accessories (duplexers). Release the rear access door or duplexer as necessary, and then remove it to access the paper rollers for cleaning.Figure : Product with one rear access door release tab
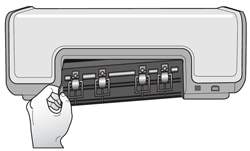
-
The two release tabs
Figure : Product with two rear access door release tabs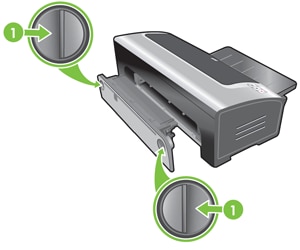 Figure : Product with a rear access door release knob
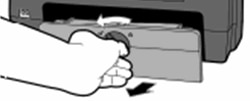 Figure : Product with a duplexer
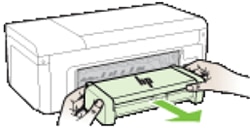
-
-
Look for paper that might have jammed inside the product. Use a flashlight to carefully view the areas around the rollers. Remove all traces of paper found.
-
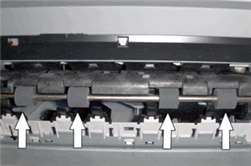
Wipe the rubber paper-feed rollers with a lint-free cloth lightly moistened with distilled or bottled water. Rotate the rollers up carefully to clean all the way around.Figure : Rubber paper-feed rollers
-
Look for the paper pick roller farther inside the rear access area.Figure : The paper pick roller
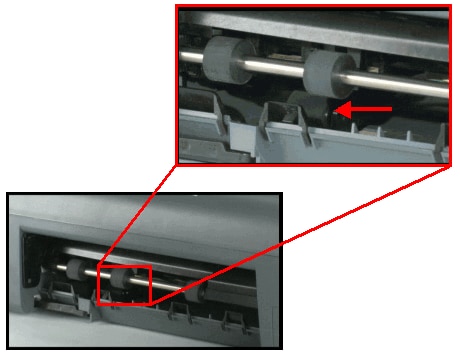
 IMPORTANT: The paper pick roller is a bit more difficult to reach; however, it is the most important part to clean. Make sure to clean it thoroughly. If this roller is not clean, the issue will likely continue.
-
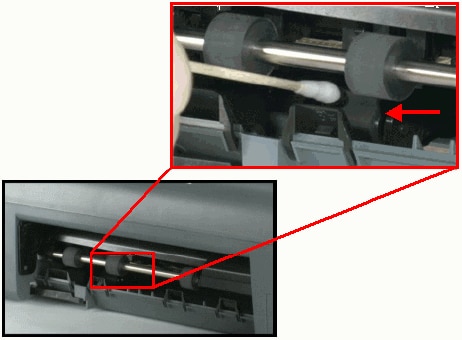
Clean the paper pick roller with a cotton swab moistened with distilled or bottled water. Apply a moderate amount of pressure to make sure that you remove all debris. Clean the roller thoroughly all the way around.Figure : Clean the paper pick roller
-
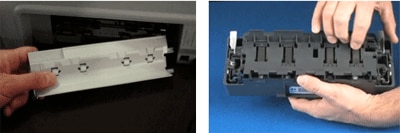
Make sure that the rollers on the rear access door or duplexer are clean and in good condition. If any are missing, stuck, or loose, replace the rear access door or duplexer with a new one.Figure : Rear access door rollers
-
Allow the rollers to dry completely, and then replace the rear access door or duplexer.Slide the rear access door or duplexer into place, and then gently push it in until it clicks or snaps into place.
-
Reconnect the power cord to the rear of the product.
-
Try printing again.
-
If these steps resolved the issue, you do not need to continue troubleshooting.
-
If the issue persists, repeat the previous steps to clean the rollers again. If the issue continues after repeated cleaning, continue to the next solution.
Solution three: Service the product
Service or replace your HP product if the issue persists after completing all the preceding steps.
Go to Contact HP Customer Support to schedule a product repair or replacement. If you are in Asia Pacific, you will be directed to a local service center in your area.
To confirm your warranty status, go to HP Product Warranty Check. Repair fees might apply for out-of-warranty products.
Prevent paper feed issues
Follow these guidelines to help prevent paper feed issues:
-
Load at least 10 sheets of paper into the tray, but do not overload the tray.
-
Load paper correctly. Do not push the paper too far into the tray.
-
Use only one type of paper at a time in the tray.
-
Store paper in a cool dry place.
-
Use only clean unused paper in the tray.
-
Reload paper that has been in the tray for a time. Avoid printing on paper that is dusty.
-
Wait for the product to complete a job or to display an 'Out of paper' message before reloading paper.
Cause
Any of the following issues can cause the issue:
-
The paper trays are overloaded.
-
The paper is curled.
-
The print side, or shiny side, of the paper is not loaded in the tray face down.
-
The paper guides are too tight against the paper stack.
-
The rubber paper feed rollers are coated with dust.
-
Foreign debris might have fallen into the paper path.
Enter a topic to search our knowledge library
What can we help you with?

Need Help?