This document is for the HP Officejet Pro 8600 e-All-in-One Printer Series.
Replacing Cartridges for HP Officejet Pro 8600 e-All-in-One Printer Series (N911)
This document contains steps for replacing the cartridges in your HP printer.
Cartridges types
The following table displays cartridge information for HP Officejet Pro 8600 e-All-in-One Series printers.
|
Color
|
The Americas
|
Europe
|
Middle East and Africa
|
Asia Pacific
|
|
Black
|
HP 950 Black
|
HP 950 Black
|
HP 950 Black
|
HP 950 Black
|
|
Cyan
|
HP 951 Cyan
|
HP 951 Cyan
|
HP 951 Cyan
|
HP 951 Cyan
|
|
Magenta
|
HP 951 Magenta
|
HP 951 Magenta
|
HP 951 Magenta
|
HP 951 Magenta
|
|
Yellow
|
HP 951 Yellow
|
HP 951 Yellow
|
HP 951 Yellow
|
HP 951 Yellow
|
Purchase replacement cartridges and other supplies from the HP Store or local retailers.
Replacing cartridges
Follow these steps to replace one or more cartridges in the HP product.
Video of replacing a cartridge
The following video demonstrates how to replace cartridges.

Replacing a Cartridge - HP Officejet Pro 8600 e-All-in-One (N911a)
This video shows you how to replace a print cartridge in your HP printer. The steps shown work for the HP Officejet Pro 8600 e-All-in-One - N911a, - N911g, and - N911n printers.
If you have trouble viewing the video or to view the video in a different size, play the video on YouTube.
-
Press the Power button to turn on the printer, if it is not already on.
-
Slip your fingers into the slot on the left side of the printer, and then pull forward to open the cartridge access door. The carriage moves to the left side of the printer. Wait until the carriage is idle and silent before you proceed.
-
Slot for opening the cartridge access door
Figure : Open the cartridge access door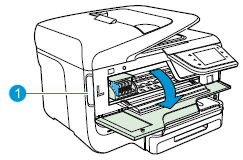
-
-
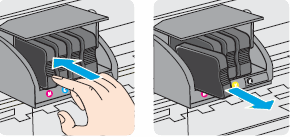
Push in on the front of the cartridge to release it, and then pull it toward you to remove it from its slot.Figure : Remove the cartridge from its slot
-
Remove the new cartridge from its packaging.
-
Hold the cartridge so that the cartridge contacts are facing toward the printer.
-
Slide the new cartridge into its slot, and then gently push it forward until it clicks into place.
note:
Make sure that the colored dot on the cartridge label matches the colored dot on the slot.Figure : Insert the cartridge into its color-coded slot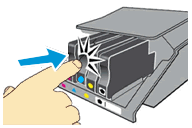
caution:
Do not lift the latch handle on the carriage to insert cartridges. Doing so could cause the printhead or cartridges to be incorrectlyseated, which could damage the print mechanism and cause printing problems. -
Repeat these steps for other cartridges, if necessary.
-
Close the cartridge access door.
-
Wait until the warm-up sequence finishes and your printer is quiet before you proceed.
Enter a topic to search our knowledge library
What can we help you with?

Need Help?