solution Contentsolution Content

A 'Carriage jam' or '0X610000F6' Message Displays for HP Officejet 6500 (E709a) and 6500 Wireless (E709n and E709q) All-in-One Printers

Issue

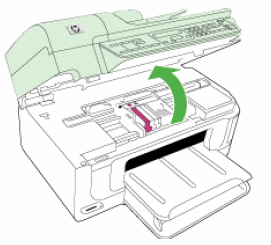
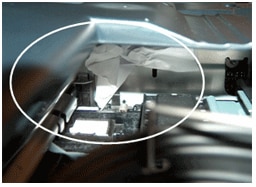
The carriage assembly, which holds the cartridges, stalls against the left side of the product and a 'Carriage jam' or '0X610000F6' message displays on the control panel.
You might also experience the following symptoms:
  • The product does not print.
  • The product stops printing unexpectedly.

How to use the solutions in this document

To resolve the issue, you can watch a video, or you can try each solution in this document in the order presented.
IMPORTANT: Each time you try a solution, try to print a self-test report to determine if the hardware functions correctly. To print a self-test report, use the steps in the following table:
How to print a self-test report
  1. Load plain white paper into the input tray.
  2. Press Setup on the product control panel.
  3. Press the right arrow () to select Print Report, and then press OK.
  4. Press the right arrow () to select Self-Test Report, and then press OK. The self-test report prints.

Video of fixing a carriage jam

The following video demonstrates how to fix a carriage jam.
note:
This video shows the HP Officejet 6500. The outside of the product might not look the same as your product, but the steps are the same.
If you have trouble viewing the video or to view the video in a different size, click here to play the video on YouTube.
note:
Refer to the steps in this table after you try each solution.

Solution one: Turn the product off and on again

Follow these steps to turn the product off and then on again to reset the printing mechanism.
  1. Press the Power button () to turn off the product. If the product does not turn off, continue to the next solution.
  2. Wait 60 seconds.
  3. Press the Power button () to turn on the product.
    note:
    The product might go through a warm-up period. The product lights might flash and the carriage might move. Wait until the warm-up period finishes before you proceed.
  4. Try to print a self-test report. See the steps on how to print a self-test report at the beginning of this document.
  • If these steps resolved the issue, and the test page prints, there is no need to continue troubleshooting.
  • If the issue persists, continue with the next solution.
  • If the test page does not print, continue with the next solution.

Solution two: Clear any paper jam

Follow these steps to clear any paper jam.

Step one: Remove any loose paper

Remove any loose sheets of paper from the input tray and the output tray.
  caution:
Do not remove jammed paper at this stage. Trying to clear jammed paper from the front of the product can damage theprint mechanism.

Step two: Clear the jam from the rear of the product

Use one of the following methods to clear the paper jam from the rear of the product. If your product has a two-sided printing accessory (duplexer), skip to Method two.

Method one: Clear the jam from the rear access door

  1. Press the Power button () to turn off the product, if it is not already off.
  2. Disconnect the USB cable from the rear of the product.
  3. Disconnect the power cord from the rear of the product.
  4. Remove the rear access door: Press the tab on the left side of the door inward, and then pull the door out.
    Figure : Remove the rear access door
    Illustration of removing the rear access door
  5. Gently remove any jammed paper from the rollers.
      caution:
    If the paper tears while you remove it from the rollers, check the rollers and wheels for torn pieces of paper that might remain inside the product. If any torn pieces of paper remain inside the product, more paper jams are likely to occur.
    Figure : Remove torn pieces of paper from the rollers
    Photograph of removing torn pieces of paper from rollers
  6. Reattach the rear access door. Gently push the door forward until it snaps into place.

Method two: Clear the jam from the two-sided printing accessory (duplexer)

  1. Press the Power button () to turn off the product.
  2. Disconnect the USB cable from the rear of the product.
  3. Disconnect the power cord from the rear of the product.
  4. Remove the two-sided printing accessory (duplexer) from the rear of the product: Press the buttons on each side of the duplexer, and then pull it toward you.
    Figure : Remove the two-sided printing accessory
    Illustration of removing the duplexer
  5. Gently pull the jammed paper out of the rollers.
      caution:
    If the paper tears while you remove it from the rollers, check the rollers and wheels for torn pieces of paper that might remain inside the product. If any torn pieces of paper remain inside the product, more paper jams are likely to occur.
    Figure : Remove torn pieces of paper from the rollers
    Photograph of removing torn pieces of paper from rollers
  6. If you do not see jammed paper in the rear access area, push the latch on the top of the duplexer, and then lower its cover.
      Figure : Open the duplexer
      Illustration of opening the duplexer
    1. Latch on top of the duplexer
    2. Duplexer cover
  7. Remove any jammed paper from inside the duplexer.
  8. Close the duplexer cover, and then reinsert the duplexer into the rear access area of the product.
    Figure : Reinsert the duplexer
    Illustration of reinserting the duplexer into the product
  9. Push the duplexer inward until it clicks into place.

Step three: Clear the jam from the front of the product

If you cannot remove the paper jam from the rear of the product, follow these steps to remove the paper jam from the front.
  1. Open the cartridge access door.
    Figure : Open the cartridge access door
    Illustration of opening the cartridge access door
    note:
    The carriage should be on the right side of the product, out of view. If it is on the left side, close the cartridge access door, and then turn on the product. Unplug the power cord from the wall outlet, and then open the cartridge access door again.
  2. Look for any pieces of paper or other debris inside the cartridge access area.
  3. Gently pull the paper out of the rollers.
      caution:
    Remove paper from the front of the product as carefully as possible. If any torn pieces of paper remain inside the product, more paper jams are likely to occur, and this could damage the print mechanism.
  4. Close the cartridge access door.
    Figure : Close the cartridge access door
    Illustration of closing the cartridge access door
  5. Reconnect the USB cable to the rear of the product.
  6. Reconnect the power cord to the rear of the product.
  7. Plug the power cord back into the electrical outlet.
  8. Press the Power button () to turn on the product.
  9. Reload paper in the input tray.
  10. Try to print a self-test report. See the steps on how to print a self-test report at the beginning of this document.
  • If these steps resolved the issue, and the test page prints, there is no need to continue troubleshooting.
  • If the issue persists, continue with the next solution.
  • If the test page does not print, continue with the next solution.

Solution three: Make sure the carriage moves freely

Use the following steps to make sure the carriage moves freely.
  1. Press the Power button () to turn on the product, if it is not already on.
  2. Open the cartridge access door.
    Figure : Open the cartridge access door
    Illustration of opening the cartridge access door
  3. Without turning off the product, disconnect the power cord from the rear of the product.
      warning:
    You must disconnect the power cord to move parts by hand without the risk of an electrical shock.
  4. Unplug the power cord from the wall outlet.
  5. Look inside the product to see where the carriage is stuck, and then check for any torn paper or other objects that might restrict the movement of the carriage.
    note:
    You might need a flashlight to illuminate areas inside the product
    Figure : Use a flashlight to see inside the product
    Photo of using a flashlight to see inside the product.
  6. Remove any loose paper or obstructions you find.
    Figure : Example of obstruction in carriage access area
    Photograph of paper obstructing carriage
  7. Reach inside the product through the cartridge access door, and then manually move the carriage. You might have to reach through the paper output tray to access the carriage.
    • If the carriage is stuck on the right side of the product, move the carriage to the left side of the product.
    • If the carriage is stuck on the left side of the product, move the carriage to the right side of the product.
    • If the carriage is stuck in the middle of the product, move the carriage to the right side of the product.
  8. Make sure the carriage moves freely across the width of the product by gently pushing the carriage to the left, and then to the right.
  9. Close the cartridge access door.
    Figure : Close the cartridge access door.
    Illustration of closing the cartridge access door
  10. Reconnect the power cord to the rear of the product.
  11. Plug the power cord into the wall outlet.
  12. Press the Power button () to turn on the product.
  13. Try to print a self-test report. See the steps on how to print a self-test report at the beginning of this document.
  • If these steps resolved the issue, and the test page prints, there is no need to continue troubleshooting.
  • If the issue persists, continue with the next solution.
  • If the test page does not print, continue with the next solution.

Solution four: Remove and reinstall the cartridges

Improper placement or installation of the cartridges can cause the product to indicate a carriage jam error. Follow these steps to remove, and then reinstall the cartridges.

Step one: Remove the cartridges

  1. Press the Power button () to turn on the product.
  2. Open the cartridge access door.
    Figure : Open the cartridge access door
    Illustration of opening the cartridge access door
      caution:
    Wait until the carriage is idle and silent before you continue.
  3. Press the tab in on a cartridge to release it.
    Figure : Press the tab in on a cartridge
    Illustration of how to press the tab in on the cartridge
  4. Lift up on the cartridge to remove it from its slot.
    Figure : Remove the cartridge from its slot
    Illustration of removing the cartridge from its slot
  5. Repeat steps 3 and 4 for each cartridge.
  6. Check for obstructions under and around the carriage. Remove any obstructions you find.

Step two: Reinstall the cartridges

  1. Slide a cartridge into its empty slot.
    note:
    Make sure that you insert each cartridge into the slot that has the matching color shaped icon.
    Figure : Slide the cartridge into its slot
    Illustration of sliding the cartridge into its slot
  2. Press down on the cartridge until it clicks into place.
    Figure : Press down on the cartridge
    Illustration of pressing down on the cartridge
  3. Repeat steps 1 and 2 for each cartridge.
  4. Close the cartridge access door.
    Figure : Close the cartridge access door
    Illustration of closing the cartridge access door
  5. Try to print a self-test report. See the steps on how to print a self-test report at the beginning of this document.
  • If these steps resolved the issue, and the test page prints, there is no need to continue troubleshooting.
  • If the issue persists, continue with the next solution.
  • If the test page does not print, continue with the next solution.

Solution five: Plug the product directly into a wall outlet

Plug the product directly into a wall outlet to make sure the power source functions correctly.
  1. Disconnect the power cord from the rear of the product.
  2. Unplug the power cord from any power strips or surge suppressors.
  3. Plug the power cord directly into a wall outlet.
  4. Reconnect the power cord to the rear of the product.
  5. Press the Power button () to turn on the product.
  6. Try to print a self-test report. See the steps on how to print a self-test report at the beginning of this document.
  • If these steps resolved the issue, and the test page prints, there is no need to continue troubleshooting.
  • If the issue persists, continue with the next solution.
  • If the test page does not print, continue with the next solution.

Solution six: Perform a partial reset

Use the following steps to reset the product.
  1. Press the Power button () to turn on the product.
  2. Disconnect the power cord from the rear of the product.
  3. Wait 20 seconds.
  4. Press and hold the # and 3 buttons on the product control panel.
  5. While holding down these buttons, reconnect the power cord to the rear of the product.
  6. After the product turns on, release both buttons. The product resets to the factory defaults.
  7. Try to print a self-test report. See the steps on how to print a self-test report at the beginning of this document.
  • If these steps resolved the issue, and the test page prints, there is no need to continue troubleshooting. Reconnect the USB cable, and then try to print again.
  • If the test page prints successfully, but you experience a different issue with your printer, go to HP Product Support Home Page, and then search for another document that relates to the issue you are experiencing.
    note:
    If the page displays in the wrong region or language, click the Region - Language link in the upper right corner of your browser. Then you can select the correct region and language.
  • If the product does not print a test page, there is an issue with the product hardware. Continue to the next solution.

Solution seven: Service the product

Service or replace your HP product if the issue persists after completing all the preceding steps.
Go to Contact HP Customer Support to schedule a product repair or replacement. If you are in Asia Pacific, you will be directed to a local service center in your area.
To confirm your warranty status, go to HP Product Warranty Check. Repair fees might apply for out-of-warranty products.