While attempting to print, the error message 'Paper Jam' appears in the product control panel display. The product does not print or stops feeding pages.
A 'Paper Jam' Error Displays on the HP Officejet 6300 All-in-One Printer Series
Issue
Solution
Paper jam messages can be true or false. The product might report a paper jam when there is not any paper jam. The following steps resolve both true paper jams and false paper jam messages.
Follow these steps in the order presented to resolve the issue.
Video of clearing a paper jam
The following video demonstrates the steps explained on this page. The outside of the product might look different, but the steps are the same for your product.
Fixing a Paper Jam - HP Officejet 6300 All-in-One Printer
Learn how to fix the HP Officejet 6310xi, 6313, 6315, or 6318 All-in-One printer when you see a Paper Jam error message on the control panel or on your computer.
If you have trouble viewing the video or to view the video in a different size, click here to play the video on YouTube.
Step one: Remove any loose paper
Remove any loose paper from the input tray.
caution:Do not remove jammed paper at this stage.
Step two: Clear the jam from the All-in-One
Follow these steps to clear the paper jam from the automatic document feeder (ADF), and then clear the jam from the back of the product.
caution:Clearing a paper jam from the front of the product can damage theprint mechanism. Gain access to and clear paper jams through the rear door whenever possible.
Clear the jam from the automatic document feeder (ADF)
-
Lift the cover of the automatic document feeder (ADF).Figure : Lift the ADF cover

-
Gently pull the paper out of the rollers.
caution:
If the paper tears while removing it from the rollers, check the rollers and wheels for torn pieces of paper that might remain inside the product. If any torn pieces of paper remain inside the product, more paper jams are likely to occur. -
If there is no paper in the rollers, lift the ADF mechanism.Figure : Lift ADF mechanism

-
Check for jammed paper in the ADF mechanism.Figure : Check for jammed paper inside ADF

-
Gently lower the ADF mechanism.
-
Close the cover ofthe ADF.
Clear the jam from the back of the All-in-One
-
Remove the rear door. Press in the tab on the left side of the door to release it, and then pull the door away from the product to remove it.
caution:
Clearing a paper jam from the front of the product can damage theprint mechanism. Gain access to and clear paper jams through the rear door whenever possible.Figure : Remove the rear door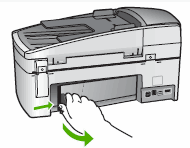
-
Gently pull the paper out of the rollers.
caution:
If the paper tears while removing it from the rollers, check the rollers and wheels for torn pieces of paper that might remain inside the product. If any torn pieces of paper remain inside the product, more paper jams are likely to occur. -
Replace the rear door. Gently push the door forward until it snaps into place.
-
Press OK to continue the current job.
note:
The print job might cancel instead of print. If this happens, reprint the document.
-
If these steps resolved the issue, there is no need to continue troubleshooting.
-
If the issue persists, see the next step.
Step three: Clean the rollers
Follow these steps to clean the rollers to remove debris or paper.
-
Press the Power button (
 ) to turn off the product.
-
Disconnect the power cord from the back of the product.
-
Remove the rear door. Press in the tab on the left side of the rear door, and then pull it away from the product.Figure : Remove the rear door
-
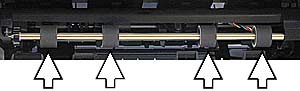
Lightly moisten a clean, lint-free cloth with distilled or bottled water and then gently wipe the paper rollers.Rotate the rollers with your fingers while cleaning, to clean all the way around the rollers.Figure : Clean the paper rollers
-
Allow the rollers to dry completely.
-
Replace the rear door. Gently push the door toward the product until it snaps into place.
-
Reconnect the power cord to the back of the product.
-
Press the Power button () to turn on the product.
Step four: Reload paper and test the All-in-One
-
Gather a stack of paper to load into the product and then loosen the stack and fan the pages to make sure that no pages stick together.
-
Reload the paper in the input tray.
-
Open the document that stopped printing when the jam occurred. Open the document in the same software program that you used before the jam.
-
Click File, click Print, and then click Properties.
-
In the printer Preferences window, click the Paper/Quality tab.
-
Make sure that the type of paper specified in the Type is text box matches the type of paper in the product.
note:
A paper jam might occur if photo paper is specified in the printer Preferences window, but plain paper is loaded in the product. -
Try printing the job again.
-
If these steps resolved the issue, there is no need to continue troubleshooting.
-
If the issue persists, see the next step.
Step five: Service the product
Service or replace your HP product if the issue persists after completing all the preceding steps.
Go to Contact HP Customer Support to schedule a product repair or replacement. If you are in Asia Pacific, you will be directed to a local service center in your area.
To confirm your warranty status, go to HP Product Warranty Check. Repair fees might apply for out-of-warranty products.
Cause
The following actions can cause paper jams:
-
Adding paper while the product is printing
-
Loading more than 35 sheets of plain paper in the document feeder tray
-
Using paper in the input tray that is curled, wrinkled, bent, torn, or creased
-
Not securely fastening the rear door
Enter a topic to search our knowledge library
What can we help you with?

Need Help?