The product has experienced an error that can be corrected at the product, such as no packing material inside the product, an open door, no paper in the proper tray, a missing print cartridge, or a paper jam.
 IMPORTANT:
 You must follow these solutions
in the order presented to resolve the issue.
Solution one: Check to make sure that there is no packing material inside the product
Follow these steps to check for and remove any packing material from inside the product.
-
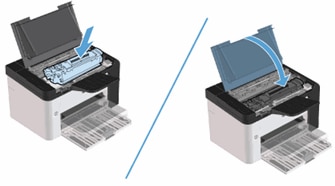
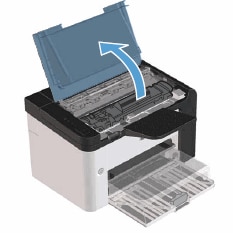
Open
the print cartridge door.
Figure : Open the print cartridge door

-
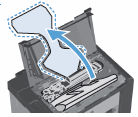
Lift up the paper packing, but do not remove it.
Figure : Lift the paper packing
-
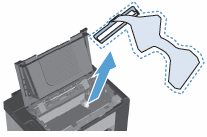
Remove the print cartridge packing material.
Figure : Remove the print cartridge packing material
-
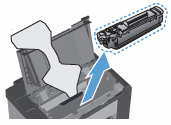
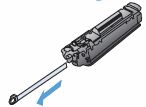
Remove the print cartridge from
the product.
Figure : Remove the print cartridge
caution:
To prevent damage to the print cartridge, hold the print
cartridge at each end.
-
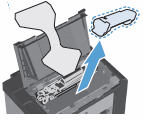
Remove the packing material from inside the product.
Figure : Remove the packing material from inside the product
-
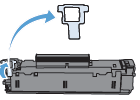
Remove the orange clip from the end of the print cartridge.
Figure : Remove the orange clip from the print cartridge
-
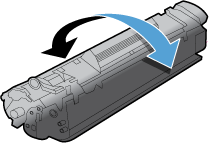
Gently rock the print cartridge back and forth to distribute the toner evenly.
Figure : Rock the print cartridge
-
Bend the tab on the left side of the print cartridge until the tab breaks loose. Pull the tab to remove all the sealing tape from the print cartridge.
Figure : Remove the sealing tape
caution:
If toner gets on your clothing, wipe it off with a dry cloth and wash the clothing in cold water. Hot water sets toner into the fabric.
-
Insert the print cartridge, and then close the print cartridge door.
Figure : Insert the print cartridge and close the door
Solution two: Make sure that the print cartridge door is closed
Follow these steps to open and close the print cartridge door.
-
Open
the print cartridge door.
Figure : Open the print cartridge door
-
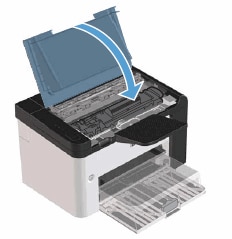
Close the print cartridge door.
Figure : Close the print cartridge door
Solution three: Check to see if there is paper loaded in the product
If there is no paper loaded in the product, follow these steps to load paper.
-
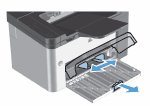
Raise the priority input tray, and then slide the paper length and width guides to their outermost positions.
Figure : Slide out paper guides
-
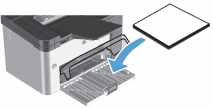
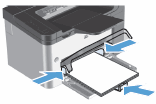
Load plain paper in the main input tray with the top forward and the print side up.
Figure : Load paper
-
Slide the paper guides inward so that they rest against the stack of paper.
note:
To prevent jams and skewing, always adjust the side and front paper guides.
Figure : Adjust the paper guides
-
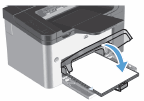
Lower the priority tray.
Figure : Lower the priority tray
Solution four: Check to see if the print cartridge is installed
There might not be a print cartridge installed in your product. If there is no cartridge installed in your product, follow these steps to install a new print cartridge.
-
Open the print cartridge door.
Figure : Open the print cartridge door
-
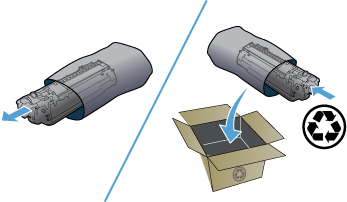
Remove the new print cartridge from its package. Place the used print cartridge in the bag and box for recycling.
Figure : Remove new cartridge from package, and then prepare old cartridge for recycling
caution:
To prevent damage to the print cartridge, hold the print cartridge at each end. Do not touch the cartridge shutter or the roller surface.
-
Grasp both sides of the print cartridge and gently rock the print cartridge to distribute the toner evenly inside the print cartridge.
Figure : Gently rock the print cartridge
-
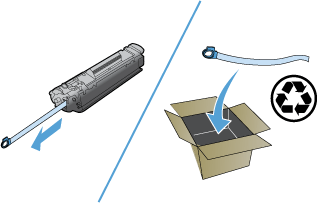
Bend the tab on the left side of the cartridge until the tab breaks loose, and then pull the tab until all the tape is removed from the cartridge. Place the tab and tape in the print cartridge box to return for recycling.
Figure : Remove the tab from the cartridge and recycle it
-
Insert the print cartridge in the product, and then close the print cartridge door.
Figure : Insert the print cartridge, and then close the print cartridge door
caution:
If toner gets on your clothing, wipe it off with a dry cloth and wash the clothing in cold water. Hot water sets toner into the fabric.
Solution five: Check to see if there is a paper jam
There might be paper jammed in your product. Follow these steps clear a paper jam. If the Attention light stops blinking after you remove jammed paper from the product, you can stop troubleshooting.
caution:
Before clearing jams, turn the product off, and then disconnect the power cord.
note:
When clearing jams, be careful not to tear jammed paper. If a small piece of paper remains in the product, it could cause additional jams
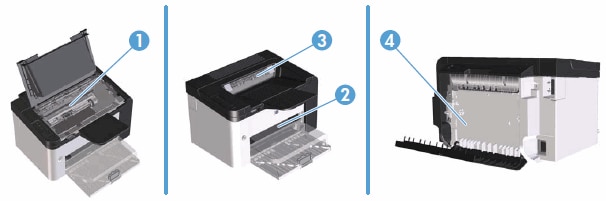
Step one: Locate the jam
Jams can occur at the following locations in the product, and can occur in more than one location.
Figure : Jam locations
-
Internal areas
-
Input trays
-
Output bins
-
Rear door and duplexer (P1600dn only)
Step two: Remove any loose paper from the product
Remove any loose sheets of paper from the input tray and the output tray.
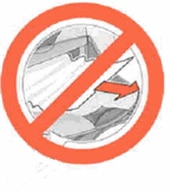
caution:
Do not remove jammed paper at this stage. Trying to clear jammed paper from the front of the product can damage theprint mechanism.
|
Remove any loose paper
|
Do not pull jammed paper
|
|
|
|
Step three: Clear a jam from inside the product
Follow these steps to clear a jam from inside the product.
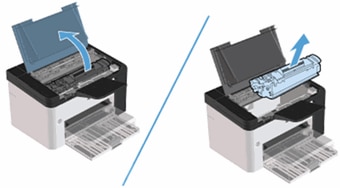
-
Open the print cartridge door, and then remove the print cartridge.
Figure : Open the print cartridge door, and then remove print cartridge
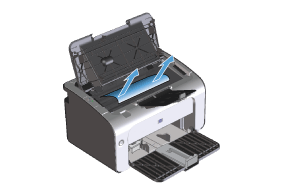
-
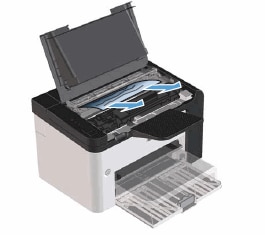
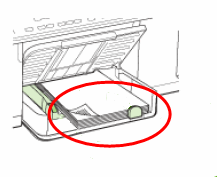
If you can see the jammed paper, carefully grasp the jammed paper, and then slowly pull it out of the product.
Figure : Remove jammed paper from inside the product
-
Reinstall the print cartridge, and then close the print cartridge door.
Figure : Reinstall the print cartridge, and then close the print cartridge door
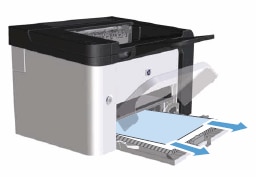
Step four: Clear a jam from the input tray
Follow these steps to clear a jam from the input tray.
-
Open the print cartridge door, and then remove the print cartridge.
Figure : Open the print cartridge door, and then remove the print cartridge.
-
Remove the paper stack from the input tray.
-
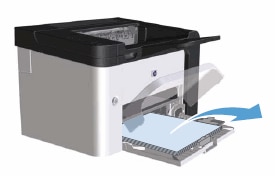
With both hands, grasp the side of the jammed paper that is most visible (this includes the middle), and carefully pull it free from the product.
Figure : Remove jammed paper from input tray
-
Reinstall the print cartridge, and then close the print cartridge door.
Figure : Reinstall the print cartridge, and then close the print cartridge door.
Step five: Clear a jam from the output areas
Follow these steps to clear a jam from the output areas.
-
Open the print cartridge door, and then remove the print cartridge.
Figure : Open the print cartridge door, and then remove print cartridge.
-
Keep the print cartridge door open, and then with both hands, grasp the side of the jammed paper that is most visible (this includes the middle), and then carefully pull it free from the product.
Figure : Remove jammed paper from output area
-
Reinstall the print cartridge, and then close the print cartridge door.
Figure : Reinstall the print cartridge, and then close the print cartridge door.
Step six: Clear a jam from the rear of the product (P1606dn only)
Follow these steps to clear a jam from the rear of the product.
-
Open the print cartridge door, and then remove the print cartridge.
Figure : Open the print cartridge door, and then remove print cartridge.
-
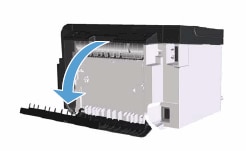
Open the rear door.
Figure : Open the rear door
-
With both hands, grasp the side of the jammed paper that is most visible (this includes the middle), and then carefully pull it free from the product.
Figure : Remove jammed paper from rear of product

-
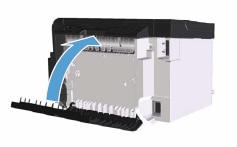
Close the rear door.
Figure : Close rear door
-
Reinstall the print cartridge, and then close the print cartridge door.
Figure : Reinstall the print cartridge, and then close the print cartridge door.
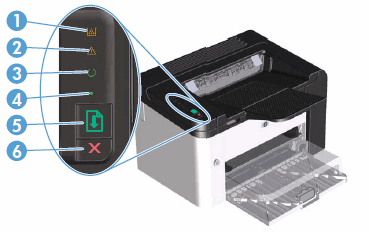


 ) to deactivate the Auto-Off mode or turn on the product.


 ) to cancel the print job.


 ) to recover from the error and print the available data.