solution Contentsolution Content

HP PCs - Things You Should Do When Setting Up Your PC (Windows 10)

This document is for HP computers with Windows 10.
This document provides a helpful, secure process to follow when setting up your computer for the first time or after using HP System Recovery to restore the computer to its original configuration. During this critical time when the computer is being set up, it is more vulnerable to security threats because it does not contain the most recent updates. Use the following steps to make sure your computer is up-to-date and secure.

Step 1: Connecting the hardware and completing setup

When setting up your computer for the first time or after a System Recovery, connect only the basic hardware you need to use Windows (usually the mouse, keyboard, and monitor). Make sure that the network cable and any wireless connections are disconnected before you begin. During the setup process, you must complete a series of computer setup screens. It is important to fill out the setup information and wait for the setup to complete. Do not restart the computer during this process.
  caution:
A new computer or newly recovered computer might not have protection installed or set up. Do not connect the network cable, printers, cameras, scanners, or any other non-essential peripheral devices and do not install any extra software until setup has finished and you have completed the rest of the steps in this document. Remove USB storage devices and HP Personal and Pocket Media drives until the setup process is complete.
If the computer uses a broadband Internet connection, do not connect the network cable (or broadband modem). The computer can be more susceptible to security threats during this critical period. If you are prompted to complete an Internet connection to complete a setup screen, try to bypass the screen and complete that portion of setup later. If this is not possible, temporarily connect the cable to complete the screen then disconnect the cable until after completing the steps in this document. After completing the setup or System Recovery, continue to the next step to enable the firewall.

Step 2: Enabling the firewall

Setting up a firewall provides basic protection against security threats before connecting to the Internet. You can use Windows Security or another firewall software, such as McAfee Personal Firewall.
note:
Do not enable more than one firewall. Firewall software programs can interfere with one another if more than one is open.
  1. In Windows, search for and open Windows Security.
  2. Check the message in the Firewall & network protection area.
    • If the wireless icon displays a green circle with a checkmark and the message No actions needed, Windows Security is enabled.
    • If the wireless icon displays a red circle with an x and the message Firewalls are turned off. Your device may be vulnerable, click Turn on.
  3. If you want to enable other firewall software, click the Settings icon , and then click Manage providers.
  4. Select your firewall provider, and then follow the on-screen instructions to turn on the firewall.
After enabling the firewall, continue to the next step to connect the computer to the Internet.

Step 3: Connecting to the Internet

Once you have enabled a firewall, connect to the Internet using an existing connection or set up a new connection. If you are having trouble setting up a connection or need help with the password, contact the Internet Service Provider (ISP) support number. After connecting to the Internet, continue to the next step to install the security software.
  caution:
Do not browse the Internet or use e-mail yet. Finish the steps in this document to make the computer more secure before using the Internet.

Step 4: Installing security software

Once you have enabled a firewall and connected to the Internet, install a security or antivirus program to protect the computer against security threats such as viruses and spyware. Windows 10 comes with Windows Security software built into the operating system to protect your computer. Depending on the model, your computer might also come with a preinstalled trial subscription to security software, such as McAfee or Norton. After selecting and installing your preferred security software, continue to the next step to update the security software.

Step 5: Updating security software

When setting up your computer for the first time or after a System Recovery, your security software needs to be updated with the newest virus definitions and threat information for the best protection. If you are using Windows Security, update the security software.
  1. In Windows, search for and open Windows Security.
  2. On the Windows Security window, select Virus & threat protection.
  3. Scroll down the window to Virus & threat protection updates, and then click Check for updates.
    Checking for security updates
  4. Under Security intelligence, click Check for updates.
    Checking for updates with the security intelligence of Windows Security
After updating security software, continue to the next step to scan the computer.

Step 6: Scanning the computer

After updating the security software, perform a system scan to check the computer for potential threats.
  1. In Windows, search for and open Windows Security.
  2. On the Windows Security window, select Virus & threat protection, and then select Quick scan.
    Selecting Quick scan
After the computer has been scanned, continue to the next step to update the software and drivers.

Step 7: Updating software and drivers from HP Support Assistant

The latest software and drivers increase security features and help the computer run smoothly. Use HP Support Assistant to check for updates.
  1. In Windows, search for and open HP Support Assistant, or click the app icon in the taskbar.
    If the app is not installed on your computer, download the latest version from the HP Support Assistant website.
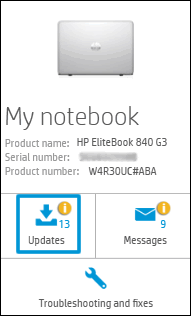
  2. On the HP Support Assistant window, select the My devices tab, and then click Updates in the My PC or My notebook tile.
    Click Updates in the My notebook pane
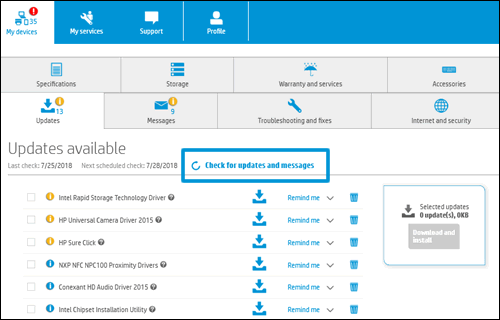
  3. Click Check for updates and messages to scan for new updates.
     Updates list in HP Support Center
  4. Review the list of updates, select the check box next to any updates, and then click Download and install.
  5. Wait for the updates to install, and then restart your computer if prompted.
Once the updates install, you can then install hardware devices, such as printers, all-in-ones, and cameras, using the manufacturer's installation instructions. Make sure each device is completely installed and working before installing another one. You can also install additional software that did not come pre-installed on the computer.