solution Contentsolution Content

HP DeskJet 5645, ENVY 5640, 5660 Printers - First Time Printer Setup

This document is for HP DeskJet Ink Advantage 5645 All-in-One, and ENVY 5640, 5642, 5643, 5644, 5646, 5660, 5661, 5663, 5664, and 5665 e-All-in-One printers.
Complete the steps in this document to set up the printer hardware before you install the printer software on the computer.
note:
You can download the latest version of the printing software from the following HP websites:

Step 1: Unpack the printer

Remove the printer from the box, and then remove all packing materials from the printer.
  1. Remove the printer from the box.
  2. Remove all tape and packing materials from the outside of the printer.
    Figure : Remove the tape and packing materials from outside the printer
    Image: Remove the tape and packing materials from outside the printer
  3. Remove the sticker on the control panel display.
  4. Lift up to open the scanner lid.
    Figure : Open the scanner lid
    Image: Open the scanner lid
  5. Remove all tape and packing materials from the scanner glass.
  6. Close the scanner lid.
  7. Open the cartridge access door by placing two fingers under one or both of the small handles on the sides of the cartridge access door and then lifting it up, and then remove all tape and packing materials from inside the printer.
    Figure : Remove the tape and packing materials from inside the printer
    Image: Remove the tape and packing materials from inside the printer
  8. Close the cartridge access door.
    Figure : Close the cartridge access door
    Image: Close the cartridge access door
  9. Grasp the handle on the paper tray and pull to open the tray, lift to remove the output tray, and then remove all tape and packing materials from the photo tray.
    Figure : Remove all packing materials from the photo tray
    Image: Remove all packing materials from the photo tray
  10. With the paper tray pulled out, push in the photo tray.
    Figure : Push in the photo tray
    Image: Push in the photo tray
  11. Slide out the paper width guides, and then remove all tape and packing materials from inside the paper tray.
    Figure : Remove all packing materials from inside the paper tray
    Image: Remove all packing materials from inside the paper tray
  12. Replace the output tray on the paper tray, and then push in the paper tray until it locks into place.
    Figure : Push in the paper tray
    Image: Push in the paper tray
  13. Discard or recycle the packing materials.

Step 2: Check the contents of the box

Make sure that you remove all hardware and materials from the box before discarding or recycling the box.
The contents might vary by country/region. See the packaging for a list of items shipped in the box.

Step 3: Load paper into the paper tray

Before you install the cartridges, load the paper tray with plain white paper.
  1. Grasp the handle on the input tray, and then pull the tray toward you to open it.
    Figure : Pull to open the paper tray
    Image: Pull to open the paper tray
    The Close Tray screen displays on the printer control panel with the message, 'A paper tray is open. Close the tray to continue. Touch 
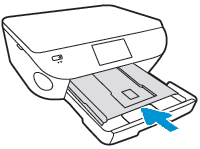
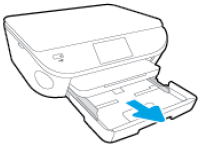
to view paper loading instructions.
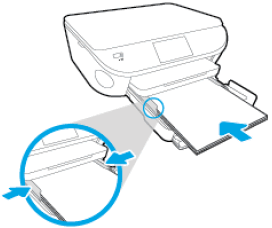
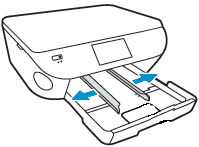
' The Play icon also () displays on the bottom left corner of the touchscreen.
  2. Touch the Play icon () to watch a video on the touchscreen about loading paper (optional).
  3. With the paper tray pulled out, push in the photo tray as far as possible.
    Figure : Push in the photo tray
    Image: Push in the photo tray
  4. Slide out the paper width guides as far as possible.
    Figure : Slide out the paper width guides
    Image: Slide out the paper width guides
  5. Load plain white paper into the paper tray.
  6. Push the stack of paper toward the rear of the paper tray until the paper stops, and then gently slide in the paper width guides until they lightly rest against the edges of the paper.
    Figure : Slide the paper back and the paper width guides in
    Image: Slide the paper back and the paper width guides in
  7. Push in the paper tray until it locks into place.
    Figure : Push in the paper tray
    Image: Push in the paper tray
  8. The Have You Changed the Paper? screen displays. If you do not touch an option, the message fades after several seconds, and the printer uses the last paper settings that were entered. Adjust the paper settings as needed.
    • If you did not change the paper size or type in the main tray or the photo tray, touch OK to return to the Home screen, or wait several seconds to allow the printer to automatically return to the Home screen.
    • If you did change the paper size or type in the input tray or photo tray, follow these steps to adjust the paper settings:
      • If you changed the paper in the input (main) tray, touch Main Tray, touch Paper Size, and then touch your paper size. Touch Paper Type, and then touch your paper type. Touch Done, and then touch OK to return to the Home screen, or wait several seconds to allow the printer to automatically return to the Home screen.
      • If you changed the paper in the photo tray, make sure that 4x6 in., Photo Paper displays in the Photo Tray field. Touch OK to return to the Home screen, or wait several seconds to allow the printer to automatically return to the Home screen.
        If the Photo Tray field displays as Empty, open the photo tray and make sure that the index cards or photo paper is pushed all the way to the rear of the tray, and then push the photo tray into the printer until it locks into place. Push the input tray into the printer until it locks into place, and then check the touchscreen to make sure that 4x6 in., Photo Paper displays in the Photo Tray field.

Step 4: Connect the power cord and set your preferences

Plug the printer into a power source, turn on the printer, and then select your preferences.
  caution:
Do not connect a USB cable at this time. The printer prompts you to connect the USB during the software installation.
  1. Connect the power cord to the rear of the printer, and then plug the other end of the power cord into an electrical outlet.
    Figure : Connect the power cord
    Image: Connect the power cord
  2. Press the Power button to turn on the printer.
  3. On the printer control panel, touch your preferred language, and then touch Continue to confirm your choice.
  4. Touch the display to select your specific country/region, and then touch Continue Setup.
  5. Scroll the display to set the month, day, and year, and then touch Continue.
  6. Scroll the display to set the time, and then touch Continue.

Step 5: Install the cartridges

Install the HP cartridges that are included in the box with your printer. Make sure that you install cartridges that are compatible with your printer and that they are unmodified, genuine HP cartridges.
  1. Open the cartridge access door by placing two fingers under one or both of the small handles on the sides of the cartridge access door and then lifting it up. The Door Open screen displays on the printer control panel with the message 'The cover or door must be closed to print. Check that it is completely closed.'
    Figure : Open the cartridge access door
    Image: Open the cartridge access door
  2. A Change Ink option might display in the bottom right corner of the touchscreen. If desired, touch Change Ink to watch an animation for installing new cartridges (optional).
  3. Remove one of the cartridges from its package. Be careful to only touch the black plastic on the cartridge.
    Figure : Remove the cartridge from its package
    Image: Remove the cartridge from its package
  4. Pull the orange tab to remove the protective tape.
      caution:
    Do not touch the copper-colored contacts or the ink nozzles.Do not replace the protective tape on the contacts. Handling these parts can result in clogs, ink failure, and bad electricalconnections.
    Figure : Remove the tape and avoid touching the cartridge contacts or ink nozzles
    Image: Remove the tape and avoid  touching the cartridge contacts or ink nozzles
  5. Slide the new cartridge at a slight upward angle into the empty slot, and then gently push up on the cartridge until it snaps into place.
    • Insert the tri-color cartridge into the left slot.
    • Insert the black cartridge into the right slot.
    Figure : Insert the new cartridge
    Image: Insert the new cartridge
  6. Repeat these steps to install the other cartridge.
  7. Close the cartridge access door. When the door is completely closed, the Door Open screen with the message 'The cover or door must be closed to print. Check that it is completely closed.' disappears, and the printer returns to the Home screen.
    Figure : Close the cartridge access door
    Image: Close the cartridge access door
  8. Touch OK.
  9. Wait for the printer to calibrate and align the cartridges. After the alignment is complete, the printer prints an alignment page.
  10. If the alignment page does not print, follow these steps to complete the alignment:
    1. Make sure that you have loaded plain white paper into the paper tray.
    2. On the printer control panel, touch Setup ().
    3. Touch Printer Maintenance, and then touch Align Printer.
    4. Follow the instructions on the control panel to complete the alignment process. After the alignment is complete, the printer prints an alignment page.
  11. Touch OK, and then discard or recycle the alignment page.

Step 6: Install the printer software

Your HP printer hardware is now set up and you can install the printing software. Do not attempt to connect the printer to a computer until instructed to do so in the printing software.
Download the latest version of the printing software from the following HP websites: