solution Contentsolution Content

Updating the Android Operating System Using a Recovery Image on Your HP Slate 7 Extreme Tablet (Android)

This document applies to HP Slate 7 Extreme tablets with Android operating system.
HP provides OTA (over-the-air) updates for the Android operating system on your tablet. When your tablet is connected to the Internet, updates download automatically and prompt you to install. If you received and installed the updated Android 4.4/KitKat operating system over the air, you do not need to use this document to update your tablet. To check for OTA updates and see which version of Android is currently installed on your tablet, refer to the HP support document Installing OTA (Over-the-Air) Android Operating System Updates on Your HP Slate 7 Extreme Tablet (Android).
An operating system update does not destroy the data or settings you have saved on the tablet.
If needed, use a microSD card to manually install an updated version of Android on your tablet, using the steps in this document. If you choose to update manually, Slate 7 Extreme tablets require a two-part update: The tablet must be updated to Android 4.3/Jelly Bean before updating to Android 4.4/KitKat.
This document describes how to manually update the operating system on your tablet using a microSD card.
  caution:
You must update the tablet from Android 4.2/Jelly Bean to Android 4.3/Jelly Bean before you can update to Android 4.4/KitKat. Follow the instructions in this document in the exact order they appear.
Before you begin

Before starting the Android operating system update process, you need the following:
  • MicroSD memory card: You need a microSD card with 1GB or more capacity. All data is erased from the card when you create the software update media. Back up any files currently stored on the memory card before you begin.
  • MicroSD-to-SD memory card adapter and SD card reader: You need a memory card adapter and card reader to create the software update media on your computer.
  • Access to another computer: You need a computer with Internet access to download the software images and create the Android update media.

Step 1: Creating the Android update media for Android 4.3/Jelly Bean

The update media is a system file (called a "software image") stored on a microSD memory card. After the update media is created, use the memory card to load a new version of the Android operating system on your tablet.
Use the steps in this section to create software update media that you can use to update your tablet from Android 4.2/Jelly Bean to Android 4.3/Jelly Bean.
  1. Insert the microSD card in the SD card adapter, and then insert the adapter into the SD card reader in your computer.
  2. Format the microSD card using the FAT32 file system.
    note:
    If you need instructions for formatting the card, search the Internet using the term "format memory card fat32" plus your operating system (for example, search for format memory card fat32 Windows 7).
  3. If prompted to enter your model number, do the following:
    1. Enter the model name for your HP tablet (slate 7 extreme).
    2. Click Go.
    3. You may need to select a product number from a list before you can access your product support page. If so, select your product number from the list.
    4. From your product support site, click Drivers.
  4. On the Drivers page, select your operating system from the drop-down menu, and then click Next.
  5. Click the plus (+) sign next to Software - Solutions.
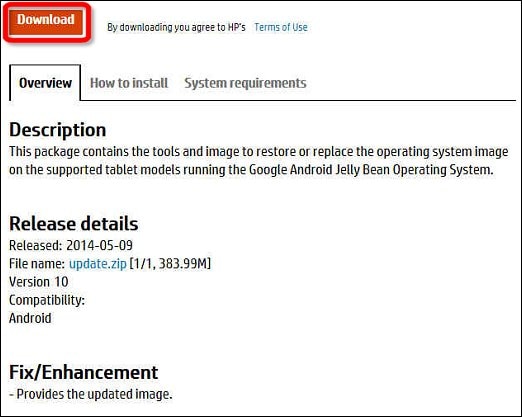
  6. Click the Version 10 Google Android Jelly Bean Restore Image.
  7. Click Download.
    Figure : Download software image file
    Download software image file
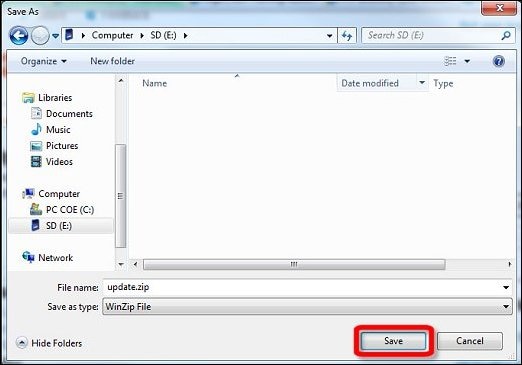
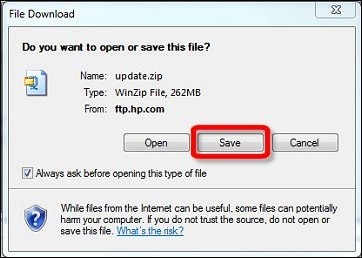
  8. Save the update.zip file (software update image) to your microSD card. Do not unzip or rename the file.
    Figure : File download (Windows 7 example)
    File download (Windows 7 example)
    Figure : Save to microSD card (Windows 7 example)
    Save to microSD card (Windows 7 example)
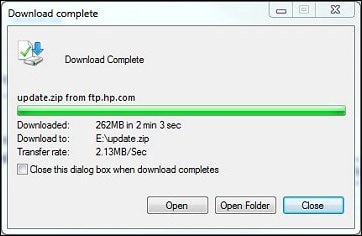
  9. When the download is complete, close the window, and then remove the memory card from the card reader.
    Figure : Download complete (Windows 7 example)
    Download complete (Windows 7 example)
    The software update media is ready to use in the tablet.

Step 2: Entering recovery mode and installing Android 4.3/Jelly Bean

Use the software update media you created in Step 1 to install Android 4.3/Jelly Bean on your tablet, using the following steps:
  1. Fully charge the tablet, and then disconnect the charging cable from the tablet.
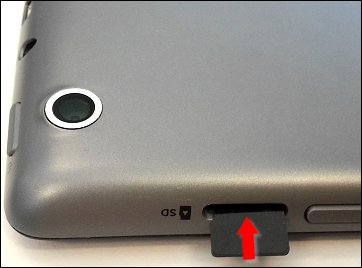
  2. With the tablet powered off, insert the update media microSD card into the card reader, located on the right edge of the tablet.
    Figure : Inserting a microSD card
    Inserting a microSD card
  3. Press and hold the volume up button and power button at the same time.
  4. When an HP logo and bootloader menu appear on the screen, release the buttons.
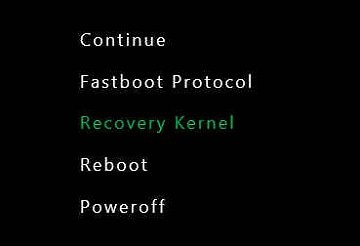
  5. In the bootloader menu, use the volume down button to scroll down to Recovery Kernel.
    note:
    The bootloader menu displays for only a few seconds. If you do not make a selection from the menu, the tablet reboots or shuts down. Repeat steps 3 and 4 to return to the boot menu.
    note:
    The touch screen is disabled when the tablet is in recovery mode. Use the volume up and volume down buttons to navigate up or down in the bootloader menu and the recovery menu. Use the power button to make a selection.
    Figure : Recovery Kernel
    Recovery Kernel
  6. With Recovery Kernel highlighted, press the power button to select.
  7. After a few seconds, an Android graphic appears with the message No command. Hold down the power button and briefly press the volume up button at the same time.
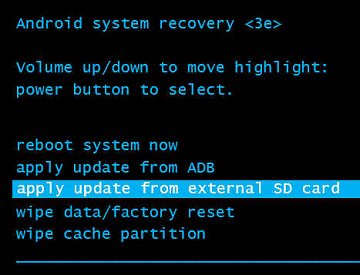
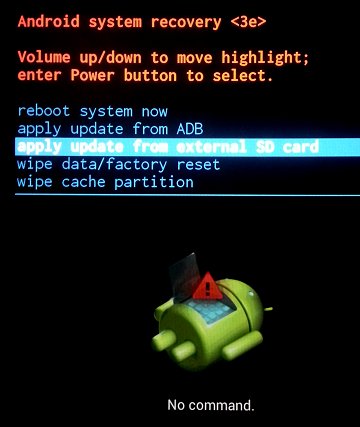
  8. When the Android system recovery menu appears, use the volume down button to highlight apply update from external SD card.
    Figure : apply update from external SD card
    apply update from external SD card
  9. Press the power button to select.
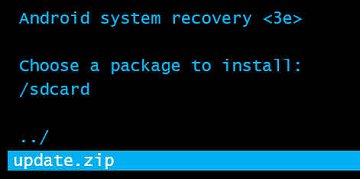
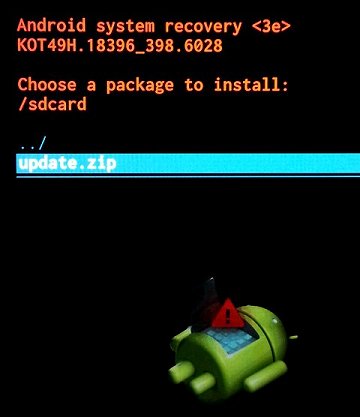
  10. Use the volume down button to highlight the software image file: update.zip.
    Figure : update.zip
    update.zip
  11. Press the power button to select the file and begin the update.
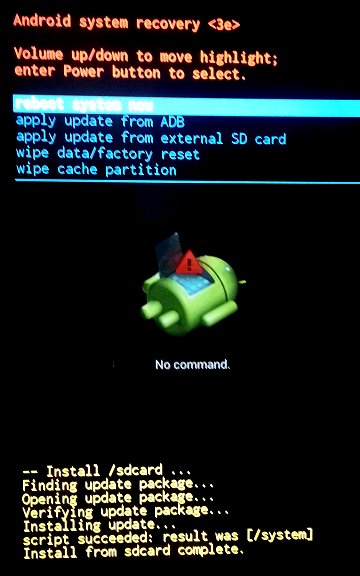
  12. Wait for the update process to complete. When the message Install from sdcard complete appears on the screen, remove the microSD card from the card reader.
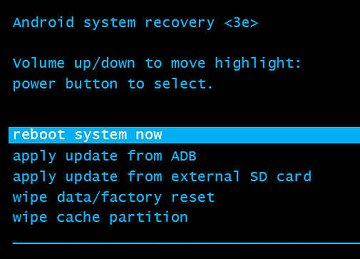
  13. With the option reboot system now highlighted in the system recovery menu, press the power button to restart the system.
    Figure : reboot system now
    reboot system now
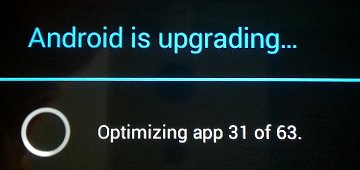
  14. The tablet restarts. Wait while installed apps are optimized for the new version of Android.
    Figure : Optimizing apps
    Optimizing apps
    The initial update process is complete, and Android 4.3/Jelly Bean operating system is installed on the tablet. Continue to Step 3 to create new update media, and update the tablet to Android 4.4/KitKat.

Step 3: Creating the Android update media for Android 4.4/KitKat

The update media is a system file (called a "software image") stored on a microSD memory card. After the update media is created, use the memory card to load a new version of the Android operating system on your tablet.
Use the steps in this section to create software update media that you can use to update your tablet from Android 4.3/Jelly Bean to Android 4.4/KitKat.
  1. Insert the microSD card in the SD card adapter, and then insert the adapter into the SD card reader in your computer.
  2. Format the microSD card using the FAT32 file system.
    note:
    If you need instructions for formatting the card, search the Internet using the term "format memory card fat32" plus your operating system (for example, search for format memory card fat32 Windows 7).
  3. If prompted to enter your model number, do the following:
    1. Enter the model name for your HP tablet (slate 7 extreme).
    2. Click Go.
    3. You may need to select a product number from a list before you can access your product support page. If so, select your product number from the list.
    4. From your product support site, click Drivers.
  4. On the Drivers page, select your operating system from the drop-down menu, and then click Next.
  5. Click the plus (+) sign next to Software - Solutions.
  6. Click the Version 13 Google Android Jelly Bean Restore Image.
  7. Click Download.
  8. Save the update.zip file (software update image) to your microSD card. Do not unzip or rename the file.
    Figure : File download (Windows 7 example)
    File download (Windows 7 example)
    Figure : Save to microSD card (Windows 7 example)
    Save to microSD card (Windows 7 example)
  9. When the download is complete, close the window, and then remove the memory card from the card reader.
    Figure : Download complete (Windows 7 example)
    Download complete (Windows 7 example)
    The software update media is ready to use in the tablet.

Step 4: Entering recovery mode and installing Android 4.4/KitKat

Use the software update media you created in Step 3 to install Android 4.4/KitKat on your tablet, using the following steps:
  1. Fully charge the tablet, and then disconnect the charging cable from the tablet.
  2. With the tablet powered off, insert the update media microSD card into the card reader, located on the right edge of the tablet.
    Figure : Inserting a microSD card
    Inserting a microSD card
  3. Press and hold the volume up button and power button at the same time.
  4. When an HP logo and bootloader menu appear on the screen, release the buttons.
  5. In the bootloader menu, use the volume down button to scroll down to Recovery Kernel.
    note:
    The bootloader menu displays for only a few seconds. If you do not make a selection from the menu, the tablet reboots or shuts down. Repeat steps 3 and 4 to return to the boot menu.
    note:
    The touch screen is disabled when the tablet is in recovery mode. Use the volume up and volume down buttons to navigate up or down in the bootloader menu and the recovery menu. Use the power button to make a selection.
    Figure : Recovery Kernel
    Recovery Kernel
  6. With Recovery Kernel highlighted, press the power button to select.
  7. After a few seconds, an Android graphic appears with the message No command. Hold down the power button and briefly press the volume up button at the same time.
  8. When the Android system recovery menu appears, use the volume down button to highlight apply update from external SD card.
    Figure : apply update from external SD card
    apply update from external SD card
  9. Press the power button to select.
  10. Use the volume down button to highlight the software image file: update.zip.
    Figure : update.zip
    update.zip
  11. Press the power button to select the file and begin the update.
  12. Wait for the update process to complete. When the message Install from sdcard complete appears on the screen, remove the microSD card from the card reader.
  13. With the option reboot system now highlighted in the system recovery menu, press the power button to restart the system.
    Figure : reboot system now
    reboot system now
  14. The tablet restarts. Wait while the optimization process is finished.
    note:
    The tablet may seem unresponsive while the installation is being finalized.
    Figure : Optimizing apps
    Optimizing apps
    The update process is complete, and Android 4.4/KitKat operating system is installed on the tablet.