The printed text is cut off at the top or bottom of the page.
HP Officejet 4500 All-in-One Printer Series (G510) - Printed Text is Cut Off at the Top or Bottom of the Page
Issue
Solution one: Check the paper
The condition or the amount of paper loaded in the tray might prevent the rollers from picking up the paper and feeding it through the product. Follow these steps to check the paper in the input tray.
-
Remove the stack of paper from the input tray.
-
Examine the condition of the paper, and then replace any ripped, dusty, curled, wrinkled, or bent paper.
-
Make sure that all the paper in the stack is the same size and type. Never load mixed types of paper in the tray. The product can only process one type of paper at a time.
-
Tap the stack of paper on a flat surface to align the edges.
-
Make sure that the stack of paper contains no fewer than 10 sheets and no more than 25 sheets of paper.
note:
Do not overload the input tray. Make sure the stack of paper is shorter than the top of the paper width guide. -
Insert the stack of paper into the product, and then gently push the paper width guide snugly against the paper.
-
Load paper
-
Adjust the paper width guide
Figure : Load paper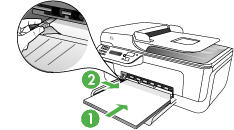
-
-
Try to print the document again.
-
If these steps resolved the issue, you do not need to continue troubleshooting.
-
If the issue persists, continue to the next solution.
Solution two: Change the print settings
Follow these steps to change the page setup or print settings.
-
Open the document that you were trying to print when the issue occurred.
-
Click File, and then click Page Setup (for example, Microsoft Word 2010) or Page Layout (for example, Microsoft Word 2007).
note:
If you do not know how to change the page setup or print settings in your software program, consult the program's help system. -
Click Margins, or navigate to the screen to change the page format and adjust margins.
-
Increase the top and bottom margins to a minimum of 13 mm (0.5"). You might need to increase this amount slightly if the issue is not resolved the first time.
-
Make sure that the paper size (for example, A4 or letter) is set correctly. If not, change to the correct paper size.
-
Click OK or Apply to save the changes.
-
Click File, and then click Print.
-
If these steps resolved the issue, you do not need to continue troubleshooting.
-
If the issue persists, continue to the next solution.
Solution three: Clean the rollers
Follow these steps to clean the rear rollers and the pick rollers on the HP product.
Step one: Clean the rear rollers
-
Press the Power button (
 ) to turn off the product.
-
Disconnect the power cord from the rear of the product.
-
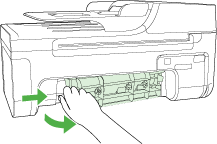
Remove the rear access door. Press in the tab on the left side of the door, and then pull the door away from the product.Figure : Remove the rear access door
-
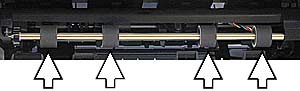
Lightly moisten a lint-free cloth with distilled or bottled water, and then wipe the paper rollers. Rotate the rollers with your fingers to clean all the way around.Figure : Clean the rollers
-
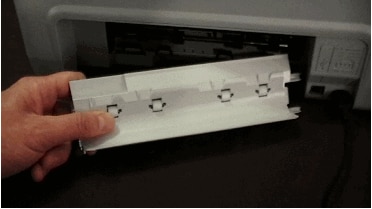
Make sure that the paper feed rollers on the rear access door are clean, free of paper bits, and rotate freely.Figure : Check the access door rollers
-
Allow the rollers to dry completely.
Step two: Clean the pick roller
-
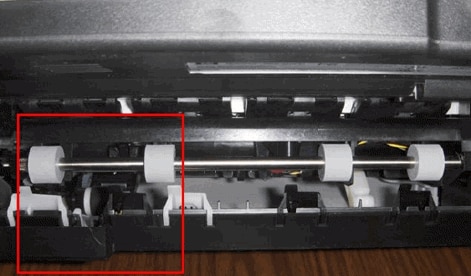
With the rear access door still removed, locate the rear rollers and the pick roller.Figure : Rear rollers and location of pick roller
-
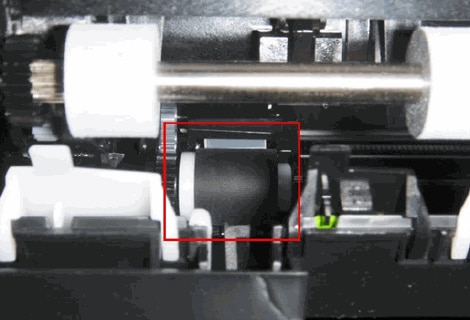
Lightly moisten a lint-free cloth with distilled or bottled water, and then wipe the pick roller. Rotate the pick roller upward with your fingers to clean all the way around.Figure : Wipe and rotate the pick roller
-
Make sure that the pick roller and the rollers around it are clean, free of paper bits, and rotate freely.
-
Allow the pick roller to dry completely.
-
Reattach the rear access door. Push the door forward until it snaps into place.
-
Load the tray with plain white paper.
-
Reconnect the power cord to the rear of the product.
-
Press the Power button () to turn on the product.
-
Try to print the document again.
-
If these steps resolved the issue, you do not need to continue troubleshooting.
-
If the issue persists, continue to the next solution.
Solution four: Service the All-in-One
Service or replace your HP product if the issue persists after completing all the preceding steps.
Go to Contact HP Customer Support to schedule a product repair or replacement. If you are in Asia Pacific, you will be directed to a local service center in your area.
To confirm your warranty status, go to HP Product Warranty Check. Repair fees might apply for out-of-warranty products.
Enter a topic to search our knowledge library
What can we help you with?

Need Help?