This document is for the HP Officejet Pro 251dw, 276dw, and 8600 series printers.
Replacing the Printhead for the HP Officejet Pro 8600 e-All-in-One Printer Series
-
Go to HP Parts Store.If you are in Asia Pacific, the site directs you to a service center in your area.
-
Search for your printhead number.
-
In the United States, type CR322A.
-
For the rest of the world, type CR324A.
-
-
Follow the instructions to order the printhead assembly.
Replace the printhead
Follow these steps to replace the printhead assembly in the HP printer.
Video of how to replace the printhead
The following video demonstrates how to replace the printhead.
note:This video shows an HP Officejet 8600 printer, but the steps are the same for your printer.
Replacing the Printhead - HP Officejet Pro 8600 e-All-in-One Printer
Learn how to replace the printhead in your HP Officejet Pro 8600 e-All-in-One Printer.
If you have trouble viewing the video or to view the video in a different size, click here to play the video on YouTube.
Step 1: Remove the cartridges and the printhead
Follow these steps to remove the cartridges and the printhead.
-
Load unused, plain white paper in the input tray.
-
Press the Power button to turn on the printer, if it is not already on.
-
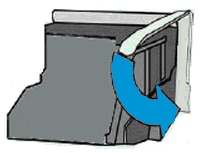
Slip your fingers into the slot on the left side of the printer, and then pull forward to open the cartridge access door. The carriage moves to the left side of the printer. Wait until the carriage is idle and silent.Figure : Open the cartridge access door

-
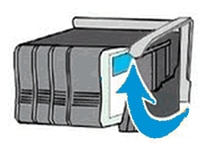
Lift the latch handle on the carriage.Figure : Lift the latch handle on the carriage
-
Grasp the sides of the printhead, and then lift the printhead and pull it towards you to remove it.
note:
Do not remove the cartridges from the printhead. You can safely remove the printhead with all of the cartridges inserted.Figure : Remove the printhead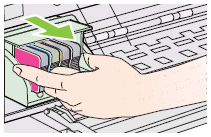
caution:
Handle the printhead carefully to avoid ink stains. Do not touch the underside of the printhead. -
Dispose of the printhead:
-
If a postage-paid mailing label and a return envelope are included with the new printhead, HP would like to have the old part back for analysis. Follow the instructions in the step to return the failed parts to HP at the end of this document.
-
If no post-paid mailing label came with the new printhead, you can recycle the old part. Put the printhead (with the cartridges still inserted) into a plastic bag, then go to hp.com/recycle for information on recycling the old printhead and cartridges.
-
Step 2: Insert the new printhead
Follow these steps to insert the new printhead into the printer.
-
Remove the new printhead and cartridges from the plastic package.Figure : Remove the new printhead and cartridges from the package
caution:
Do not touch the electrical contacts or the nozzles on the printhead, which might cause electrical failures or print quality problems.Figure : Do not touch the electrical contacts or nozzles on the printhead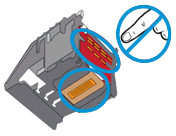
-
Grasp the printhead on both sides with the electrical contacts towards the rear of the printer, and then insert the printhead into the carriage.Figure : Insert the new printhead

-
Carefully lower the latch handle on the carriage.Figure : Lower the latch handle on the carriage
Step 3: Insert the new cartridges
Follow these steps to insert the new cartridges.
 Important: To avoid startup failures, HP recommends that you use the new cartridges that came with the new printhead.
-
Remove the new cartridge from the package.
-
Slide the new cartridge into its slot, and then gently push it forward until it clicks into place.
note:
Make sure that the colored dot on the cartridge label matches the colored dot on the slot.Figure : Insert the cartridge into its color-coded slot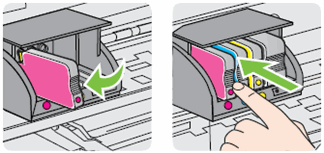
caution:
Do not lift the latch handle on the carriage to insert cartridges. This might cause the printhead or cartridges to be incorrectlyseated, which could damage the print mechanism and cause printing problems. -
Repeat these steps to insert other cartridges.
-
Close the cartridge access door.The HP printer starts an initialization process, which takes about six minutes. It is normal for the printer to make noises during this process. After the process completes, the printer prints an alignment page.
Step 4: Return failed parts to HP
Return the failed parts if the new printhead assembly came with a post-paid mailing label and instructions to return the failed parts to HP. HP would like to analyze the parts in order to improve its printers in the future.
note:Not all customers are requested to return the old parts. If the replacement printhead assembly came without a post-paid return mailing label, ignore the rest of this section.
-
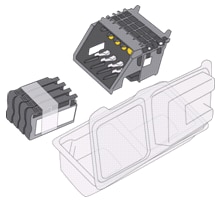
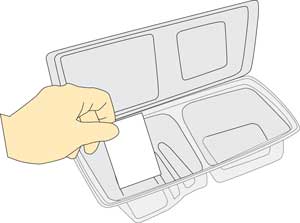
Place the ink absorbing pad into the plastic package that came with the new printhead.Figure : Place the ink absorbing pad into the plastic package
-
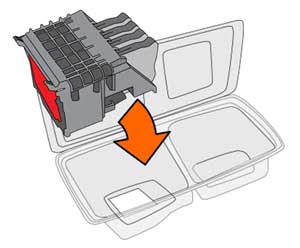
Place the old printhead, with the cartridges still installed, in the plastic package, and then close the package.Figure : Place the old printhead and cartridges in the package
-
Put the old parts and the form that came with the new parts into the box. If possible, include a print sample that shows the issue with the old printhead.Figure : Put the old parts, form, and print sample into the box

-
Close the box, apply the post-paid mailing label, and put the box in the mail.Figure : Mail the box back to HP

Enter a topic to search our knowledge library
What can we help you with?

Need Help?