|
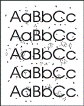
Character shadows
|
Paper quality is poor
|
|
Product is not connected directly to computer or wall outlet
|
|
Crooked or skewed output
|
Paper fed incorrectly due to paper type or poor paper quality
|
|
Media guides are too tight or too loose
|
|
Curled or wavy paper
|
Paper quality is poor
|
|
Paper is too thin
|
|
Fuser temperature is too high
|
|
Toner fuser setting needs adjusting
|
|
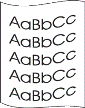
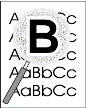
Distorted characters
|
Paper quality is poor
|
|
Paper is too glossy or too textured
|
|
Product is not connected directly to computer or wall outlet
|
|
Dropped edges
|
Paper quality is poor
|
|
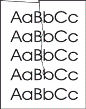
Dropped out text
|
Paper quality is poor
|
|
Paper is too thick or too glossy and is resisting the toner
|
|
Print cartridge is almost empty
|
|
Print cartridge is damaged
|
|
Pickup roller is dirty
|
|
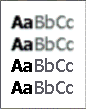
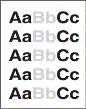
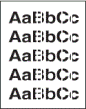
Dull, faded or light text
|
Paper quality is poor
|
|
Paper is too thick or too glossy and is resisting the toner
|
|
Print cartridge is almost empty
|
|
Print cartridge is damaged
|
|
Print settings need adjusting
|
|
Pickup roller is dirty
|
|
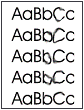
Fuzzy, blurry, or bold areas
|
Paper quality is poor
|
|
Extreme humidity conditions
|
|
Product is exposed to adverse environmental conditions
|
|
Product is not connected directly to computer or wall outlet
|
|
Print settings need adjusting
|
|
Print cartridge is damaged
|
|
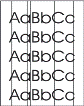
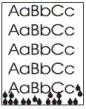
Gray shading or background
|
Paper quality is poor, likely due to extremely high or low humidity
|
|
Input tray is not correctly in place
|
|
Product is not connected directly to computer or wall outlet
|
|
Print settings need adjusting
|
|
Print cartridge is damaged
|
|
Toner specks
|
Paper is too thick or too glossy and is resisting the toner
|
|
Print cartridge is damaged
|
|
Pickup roller is dirty
|
|
Paper path is dirty
|
|
Streaks or vertical lines
|
Print cartridge is almost empty
|
|
Print cartridge is damaged
|
|
Pickup roller is dirty
|
|
Paper path is dirty
|
|
Streaks or vertical lines (photos)
|
Print cartridge is almost empty
|
|
Print cartridge is damaged
|
|
Product is not connected directly to computer or wall outlet
|
|
Toner smears
|
Paper is too glossy and is resisting the toner
|
|
Print cartridge is damaged
|
|
Repetitive marks, regular intervals
|
Pickup roller is dirty
|
|
Product is not connected directly to computer or wall outlet
|
|
Vertical white stripes or banding
|
Print cartridge is almost empty
|
|
Print cartridge is damaged
|
|
Scanner is dirty
|
|
Water droplets on the printed page
|
Extremely high humidity
|
|
Wrinkled or creased paper
|
Paper fed incorrectly
|
|
Media guides are too tight or too loose
|
|
Paper type is too thin, too textured, or too moist
|
|
Media path is obstructed
|


 IMPORTANT: You must follow the solutions and steps in the order presented to resolve the issue.
 ) to turn on the product.
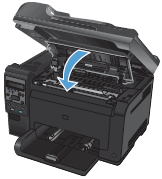
 ). The product makes noises while the print cartridge carousel rotates.
 ).
).
 ) to select
  ), click
  ), skip to the next step.
 ) next to


 , and then click
  .
.
 click the
  , and then click
  ) on the upper-left corner of your computer screen.
 ) to turn on the product.