solution Contentsolution Content

HP LaserJet Pro M1132, M1212 Printers - Paper Jam Error

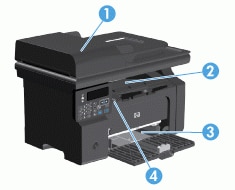
This document is for HP LaserJet Pro M1132, M1132s, and M1212nf Multifunction printers.
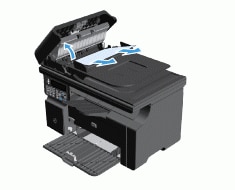
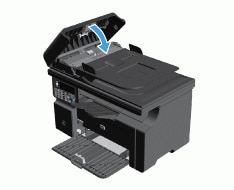
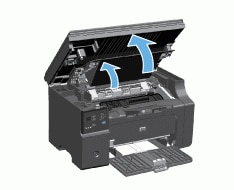
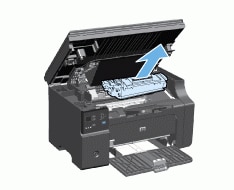
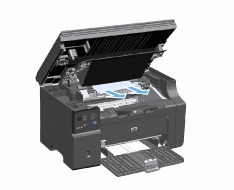
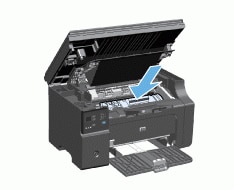
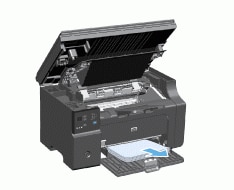
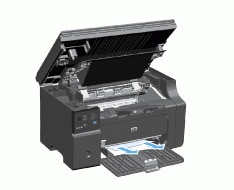
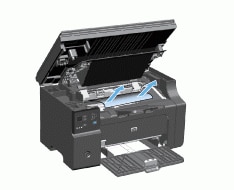
When clearing paper jams, be careful not to tear jammed paper. If a small piece of paper remains in the printer, it could cause additional jams.

Video overview

The following video demonstrates how to fix a paper jam.
note:
This video shows an HP LaserJet M1212 printer, but the steps are the same for your printer.
Cleaning Area Around Ink Nozzles
This video describes how to clean the area around the ink nozzles to resolve print quality Issues. The remove\//replace cartridge steps vary by printer.
If you have trouble viewing the video or to view the video in a different size, click here to play the video on YouTube.

Paper jam locations

Paper jams can occur at the following locations in the printer.
    Paper jam locations
  1. Document feeder (M1212nf only)
  2. Output bin
  3. Input tray
  4. Internal areas (open the toner cartridge door)

Clear paper jams from the document feeder (M1212nf only)

  1. Open the document-feeder lid.
    Opening document feeder
  2. Carefully remove jammed paper. Gently try to remove the page without tearing it.
    Clearing paper from document feeder
  3. Close the document feeder lid.
    Close the document feeder

Clear paper jams from the output areas

  caution:
Do not use sharp objects, such as tweezers or needle-nose pliers, to remove jams. Damage caused by sharp objects will not be covered by the warranty.
  1. Lift the scanner assembly, and open the print-cartridge door.
    Lift the scanner assembly
  2. Remove the toner cartridge.
    Remove the toner cartridge
  3. Keep the toner cartridge door open, and then with both hands, grasp the side of the jammed paper that is most visible (this includes the middle), and carefully pull it free from the printer.
    Clear jammed paper
  4. Install the toner cartridge.
    Install toner cartridge
  5. Close the print-cartridge door and the scanner assembly.
    Close scanner assembly

Clear paper jams from the input tray

  caution:
Do not use sharp objects, such as tweezers or needle-nose pliers, to remove jams. Damage caused by sharp objects will not be covered by the warranty.
When removing jammed paper, pull the jammed paper straight away from the printer. Pulling jammed paper out of the printer at an angle can damage the printer.
 
note:
Depending on where the jam is located, some of the following steps might not be necessary.
  1. Lift the scanner assembly, and open the print-cartridge door.
    Lift scanner assembly
  2. Remove the toner cartridge.
    Remove toner cartridge
  3. Remove the paper stack from the input tray.
    Remove paper from the input tray
  4. With both hands, grasp the side of the jammed paper that is most visible (this includes the middle), and carefully pull it free from the printer.
    Clear jammed paper
  5. Install the toner cartridge.
    Install the toner cartridge
  6. Close the print-cartridge door and the scanner assembly.
    Close the scanner assembly

Clear paper jams from inside the printer

  1. Lift the scanner assembly, and open the print-cartridge door.
    Lift the scanner assembly
  2. Remove the toner cartridge.
    Remove the toner cartridge
  3. If you can see the jammed paper, carefully grasp the jammed paper, and slowly pull it out of the printer.
    Clear jammed paper
  4. Reinstall the toner cartridge.
    Install the toner cartridge
  5. Close the print-cartridge door and the scanner assembly.
    Close the scanner assembly