The Resume light is on or blinks, the Right Cartridge light blinks, and the Power light is on. The following light pattern displays on the product control panel:
-
Resume light: On or blinking
-
Left Cartridge light: Off
-
Right Cartridge light: Blinking
-
Power light: On
Figure : The Resume light is on, the Right Cartridge light blinks, and the Power light is on

The Resume light is on, the Right Cartridge light blinks and the Power light is on. The message 'Replace Ink Service Module As Soon As Possible' might display on the computer.
OR
Figure : The Resume light blinks, the Right Cartridge light blinks, and the Power light is on

The Resume light blinks, the Right Cartridge light blinks, and the Power light is on. The message 'Replace Ink Service Module Immediately' might display on the computer.
-
Cause
There is an issue with the ink service module.
Solutions
 IMPORTANT
: Follow these solutions in the order presented to resolve the issue.
Solution one: Replace the ink service module and reset the product
Follow these steps to replace the ink service module and reset the product.
Step one: Replace the ink service module
note:
Do not turn the product upside down when removing the ink service module as this might cause wet ink to flow out of the module. To avoid ink stains on hands or furniture, wear plastic gloves when removing the ink service module.
-
Disconnect the power cord from the product.
-
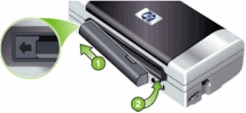
If there is a battery in your product, slide the battery release slider to the left, and then remove the battery. If there is no battery in your product, skip to the next step to remove the ink service module.
note:
The battery is an optional accessory.
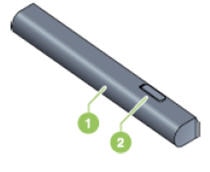
Figure : Battery
-
Battery
-
Battery release slider
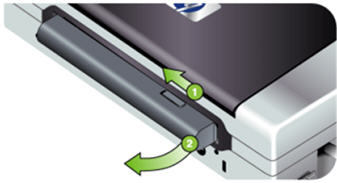
Figure : Remove the battery
-
Slide the battery to the left
-
Remove the battery
-
Gently turn the product sideways to remove the ink service module. The ink service module is located on the bottom of the product.
-
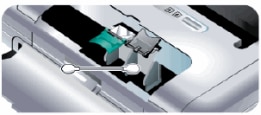
Press and slide the notch with a screwdriver, and then rotate the ink service module to the left to remove it.
Figure : Press and slide the notch with a screwdriver
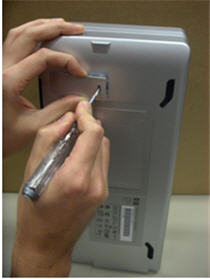
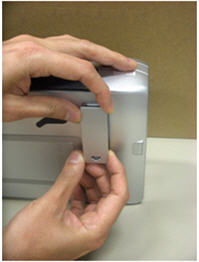
Figure : Remove the ink service module
-
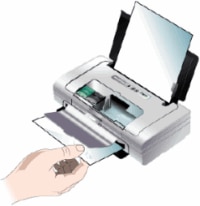
Remove the new ink service module from the packaging.
-
Install the new ink service module.
note:
Check to make sure the part number of the ink service module replacement kit is correct for your product.
-
Place the product back in its normal position, and then reconnect the power cord.
Step two: Reinstall the battery
If your product has a battery, use the following steps to reinstall it. If your product does not have a battery, reconnect the power cord to the back of the product, and then proceed to the steps in this document to
reset your product.
-
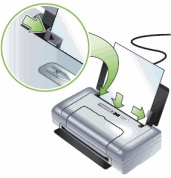
Slide the battery into the battery slot until the contacts on the battery
align with the contacts in the battery slot.
-
Push the battery into the battery slot until the battery clicks into place.
Figure : Install the battery
-
Slide the battery
-
Push the battery into the battery slot
-
Reconnect the power cord to the product.
Step three: Reset the product
Follow these steps to reset the product.
caution:
Do not reset the product if you did not replace the ink service module. The ink service module might overflow.
-
Make sure the power cord is reconnected the product.
-
Make sure that the product is on.
-
Press and hold the Cancel button (

) and the Resume button (

) for 8 seconds. The Right Cartridge light and the Resume light turn off and the product is ready to print.
-
If these steps resolved the issue, you do not need to continue troubleshooting.
-
If the issue persists, continue to the next solution.
Solution two: Print in Reserve Mode
You can remove the black cartridge and continue printing with only the tri-color cartridge. This is called printing in Reserve Mode. However, this is a temporary workaround only. The ink service module needs to be replaced as soon as possible.
note:
Printing in Reserve Mode might affect the color results and the print speed.
Follow these steps to remove the black cartridge.
-
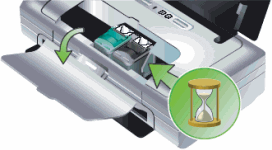
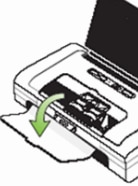
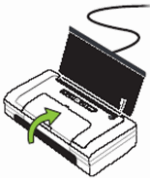
With the product turned on, open the cover on the product and wait for the carriage to
stop moving.
-
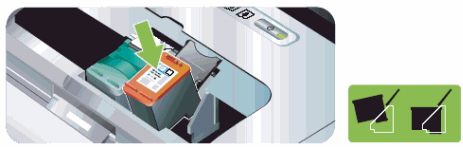
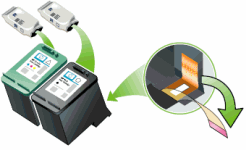
Lift the cartridge cover, and then gently remove the black cartridge from the slot.
Figure : Remove the black cartridge

-
Press the Resume button (
) to continue printing.


 ) to turn the product on.

 ), click


 ) four times.


