This document explains how to set up the physical parts of the product. Complete these steps before you install the product software on your computer.
HP Deskjet F300 All-in-One Printer Series- Setting up the All-in-One (Hardware)
Introduction
This document includes the following steps to set up the product:
-
Unpack the All-in-One
-
Check the contents of the box
-
Connect the power cord and adapter
-
Load plain paper
-
Turn on power
-
Install the cartridges
Setting up the All-in-One
Follow these steps in order.
Step one: Unpack the All-in-One
-
Lower the cartridge door.Figure : Open the cartridge door

-
Remove all tape and packing material from the product.Figure : Remove all packing materials

Step two: Check the contents of the box
The contents might vary by country/region. See the packaging for a list of items shipped in the box.
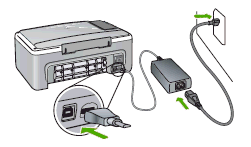
Step three: Connect the power cord and adapter
-
Plug the printer end of the power adapter into the back of the product.
-
Plug the adapter end of the power cord into the power adapter.
-
Plug the remaining end of the power cord into a grounded wall outlet or surge protector.
Figure : Connect the power cord and adapter
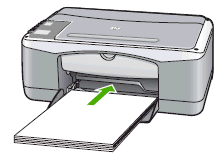
Step four: Load plain paper
-
Slide the paper-width guide to its widest position and flip the paper tray extender towards you.Figure : Slide the paper guide

-
Insert plain white letter or A4 paper into the input tray with the short edge forward and the print side down. Slide the paper forward until it stops.Figure : Insert paper
caution:
Make sure that the product is idle and silent when loading paper into the input tray. If the product is servicing the cartridges or otherwise engaged in a task, the paper stop inside the device might not be in place. You could push the paper too far forward, causing the product to eject blank pages. -
Slide the paper-width guide inward until it stops at the edge of the paper.Figure : Adjust the paper guides

note:
Do not overload the input tray; make sure the stack of paper fits within the input tray and is no higher than the top of the paper-width guide.
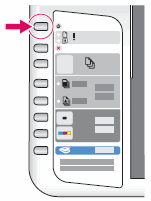
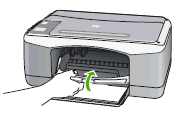
Step five: Turn on power
Press the button next to the On light (  ) on the product control panel.
) on the product control panel.
Figure : On button
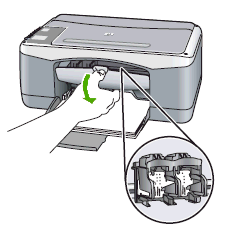
Step six: Install the cartridges
-
Open the cartridge door. Make sure that the carriage moves to the center of the product.Figure : Open the cartridge door
-
Remove each new cartridge from its packaging. Touching only the black plastic, gently remove the plastic tape by using the pink pull tab.
-
Copper-colored contacts
-
Plastic tape with pink pull tab (must be removed before installing)
-
Ink nozzles under tape
Figure : Remove the tape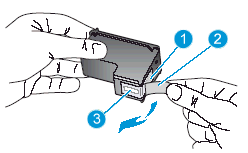
caution:
Do not touch the copper-colored contacts or ink nozzles. Touching these parts can result in clogs, ink failure, and bad electrical connections.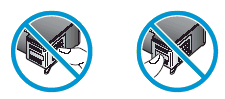
-
-
Slide each new cartridge forward into the empty slot. Then gently push on the upper part of the cartridge until it snaps into place.
-
If you are installing the tri-color cartridge, slide it into the left slot.
-
If you are installing a black or photo cartridge, slide it into the right slot.
Figure : Insert the cartridge
-
-
Close the cartridge door.Figure : Close the cartridge door
-
Wait a few minutes while the alignment page prints automatically.
note:
If you remove and reinstall the same cartridge, the product does not print an alignment page. The product remembers the alignment values for that cartridge, so you do not need to realign the cartridges.If the cartridge alignment sheet prints, follow these steps:-
Load the alignment sheet on the left front corner of the scanner glass with the top of the page to the left.Figure : Load the alignment sheet on the scanner glass

-
Make sure that there is plain paper loaded in the input tray, and then press the Scan (
 ) button.
The product aligns the cartridges. Recycle or discard the cartridge alignment sheet.
) button.
The product aligns the cartridges. Recycle or discard the cartridge alignment sheet.note:
If you do not scan the alignment page within 5 minutes, the product will print out an alignment page after the next print job. If the alignment is ignored, no further alignment pages will be printed unless manually initiated.
-
Enter a topic to search our knowledge library
What can we help you with?

Need Help?