Scan multiple pages with the HP Smart app, and then save, share, or fax it as a single PDF file.
-
From the HP Smart app home screen, click a scan tile.
-
To scan from the printer, place your original on the scanner glass or into the automatic document feeder (ADF) (documents
only), click Scan or Printer Scan.
-
To scan with a mobile device camera, place your original on a flat, well-lit surface, and then click Camera Scan.
-
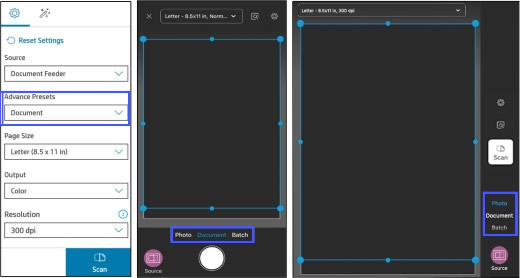
Select a scan job type, such as Batch(mobile, macOS only), Document, or Photo, from the Advance Presets menu (Windows), or from the bottom (mobile) or right (macOS) of the screen.
Location of the scan job types in Windows (left), mobile (middle), and macOS (right)

-
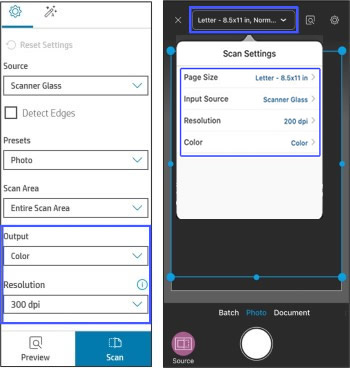
Change any scan settings using the right-side menu (Windows) or from the scan settings menu at the top of the screen (mobile,
macOS).
-
Click Paper Size to change the scan size of the original item, such as Letter, A4, 4x6 in/10x15 cm.
Click Input Source to change where the printer is scanning the original from, such as Automatic, Scanner Glass, or Document Feeder (ADF only).
-
Click Resolution to change the scan quality, such as 300 dpi for normal quality or 1200 dpi for high quality.
-
Click Color to change the scan output to Greyscale or Color.
Location of the scan settings in Windows (left) and mobile, macOS (right)

-
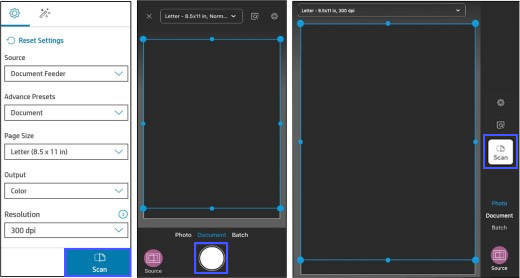
Click Scan  (Windows, macOS) or the circle button
  at the bottom (mobile) of the screen.
Location of Scan in Windows (left) and macOS (right), and the circle button in mobile (middle)

-
If a Detect Edges or Adjust Boundaries screen displays, select Auto, Full, or manually adjust the scan boundaries, and then
click Apply or Next.
-
Click Auto to let the app select the edges of the item.
-
Click Full to keep the entire capture.
-
Drag the blue dots on the scan to adjust the edges manually.
-
From the Preview screen, use the editing tools to rotate, edit, or remove scans.
-
Click the Rotate icon  to change the orientation of a scan.
-
Click the blue icon  on a scan to edit, replace, or delete it.
-
Click + Add to scan or import additional files until you have added all the files you would like to include.
-
When you are done, click an option to share, save, or fax the file.
-
Change the File Name, click Basic PDF as your File Type, and then follow the remaining prompts to share, save, or fax the file.
