solution Contentsolution Content

HP Ink Tank 310, 410 Printers - 'Out of Paper' Displays, Printer Does Not Pick Up Paper

This document is for HP Ink Tank 310, 311, 315, 316, 318, 319, Wireless 410, 411, 412, 415, 416, 418, and 419 printers.
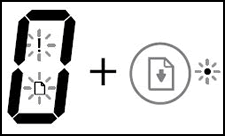
The Error icon, the Paper Error icon, and the Resume light blink, a Load Paper message displays on the computer, and the printer does not pick up paper from the input tray.
Figure : The Error icon, the Paper Error icon, and the Resume light blink
The Error icon, the Paper Error icon, and the Resume light blink

Step 1: Check the paper, and then reload it

Paper feed issues might result from using ripped, dusty, curled, wrinkled, or bent paper. The quality of the paper can also make a difference. Use these guidelines to help avoid the issue.
  • Use only good quality paper that meets printer specifications.
  • Store all paper in a dry, cool place. Paper feed issues occur more often in humid environments.
  • Do not print on paper that is already printed. The dampness of the ink can cause the paper to stick together.
  • Wait for the printer to complete a job or for an Out of paper or Load Paper message to display before you reload the paper.
Make sure the paper you use to print is in good condition, is neatly stacked in the tray, and the paper path and tray are free from obstructions.
  1. Remove any paper from the input tray.
  2. Remove any severely bent, wrinkled, or torn paper from the stack.
  3. Check for obstructions inside the input tray area. Make sure nothing blocks the paper from engaging with the rollers. Even small pieces of paper can cause paper feed issues.
  4. With both hands, hold the stack of paper, and then tap the bottom edge of the stack on a flat surface so that the stack is even on all sides.
  5. Load the stack of paper into the input tray, and then slide in the paper-width guides against the paper.
    Figure : Loading the paper, and then sliding in the paper-width guide
    Sliding paper-width guides against the paper
Try to print. If the issue persists, continue to the next step.

Step 2: Clean the paper feed rollers

Dust, paper fiber, and other debris might accumulate on the paper feed rollers and cause paper jams and paper feed issues. Clean the rollers inside the printer, and then try to print again.
  1. Turn off the printer.
  2. Disconnect the USB cable from the printer, if it is connected.
  3. Disconnect the power cord from the rear of the printer.
      warning:
    You must disconnect the power cord before reaching inside the printer to avoid risk of injuries or electric shock.
  4. Raise the input tray.
    Pull up the input tray
  5. Lift and hold the input tray shield.
      caution:
    Do not remove the input tray shield. The input tray shield prevents foreign debris from falling into the paper path and causing paper jams.
  6. Look through the open input tray, and then find the gray paper pick rollers.
    Photo: paper pick rollers
  7. Dampen a long cotton swab with distilled water, and then squeeze out any excess water.
  8. Press the swab against the rollers, and then rotate them upward with your fingers. Apply a moderate amount of pressure to remove dust or dirt buildup.
  9. Lower the input tray shield.
  10. Allow the rollers to dry for 10 minutes.
  11. Reconnect the power cord to the rear of the printer.
  12. Reconnect the USB cable to the printer, if necessary.
  13. Turn on the printer.
Try to print. If the issue persists, continue to the next step.

Step 3: Reset the printer

Sometimes an error persists even though there is no paper feed issue. Reset the printer, and then try to print.
  1. With the printer turned on, disconnect the power cord from the printer.
  2. Unplug the power cord from the power source.
  3. Wait 60 seconds.
  4. Reconnect the power cord to a wall outlet and to the printer.
    note:
    HP recommends plugging the printer directly into a wall outlet.
Try to print. If the error persists, continue to the next step.

Step 4: Service the printer

Service or replace your HP product if the issue persists after completing all the preceding steps.
Go to Contact HP Customer Support to schedule a product repair or replacement. If you are in Asia Pacific, you will be directed to a local service center in your area.
To confirm your warranty status, go to HP Product Warranty Check. Repair fees might apply for out-of-warranty products.