This document explains how to set up the physical parts of the product. Complete these steps before you install the product software on your computer.
HP Officejet 5600 All-in-One Printer Series- Setting up the All-in-One (Hardware)
Introduction
This document includes the following steps to set up the product:
-
Unpack the All-in-One
-
Check the contents of the box
-
Attach the control panel faceplate
-
Attach the trays and load paper
-
Connect the power cord and adapter
-
Connect the supplied phone cord
-
Select the language/region
-
Install the cartridges
-
Align the cartridges
Setting up the All-in-One
Follow these steps in order.
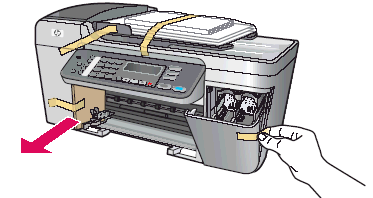
Step one: Unpack the All-in-One
Remove all tape and cardboard packing material from the outside and inside of the product.
Figure : Remove all packing materials
Step two: Check the contents of the box
The contents might vary by country/region. See the packaging for a list of items shipped in the box.
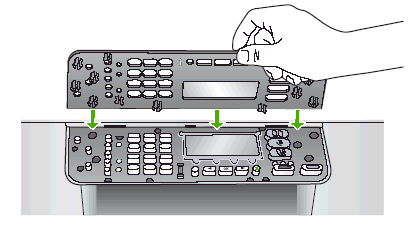
Step three: Attach the control panel faceplate
The control panel faceplate must be in place for the product to work. If the control panel faceplate is not already attached, do the following:
-
Align the faceplate over the buttons on the top of the product.Figure : Align the faceplate
-
Snap the faceplate firmly into place.
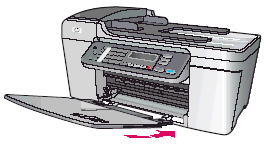
Step four: Attach the trays and load paper
-
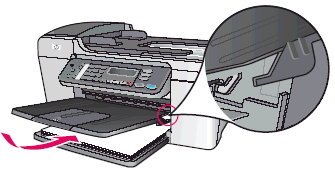
Insert the tabs of the bottom tray into the product, and then lower the tray until it is flat.Figure : Insert the bottom tray
-
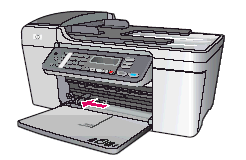
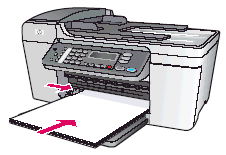
Slide the paper adjuster to the left.Figure : Slide the paper adjuster to the left
-
Insert plain white paper.Figure : Load plain paper
-
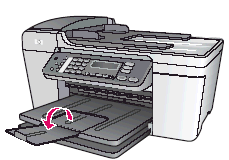
Insert the top edge of the output tray into the light gray latches, and then lower it.Figure : Attach the output tray
-
Open the paper tray extender.Figure : Open the tray extender
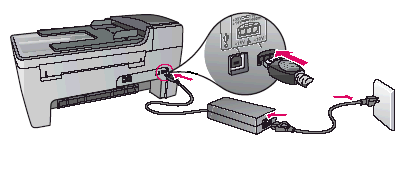
Step five: Connect the power cord and adapter
-
Plug the printer end of the power adapter into the back of the product.
-
Plug the adapter end of the power cord into the power adapter.
-
Plug the remaining end of the power cord into a grounded wall outlet or surge protector.
Figure : Connect the power cord and adapter
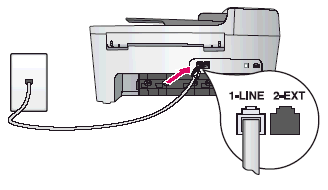
Step six: Connect the supplied phone cord
-
Connect one end of the supplied phone cord to the phone port on the left (1-LINE) and the other to a wall jack.Figure : Connect the phone cord
-
On the HP All-in-One control panel, press the On button (
 ).
The green light flashes, and then becomes solid. This might take up to a minute.
).
The green light flashes, and then becomes solid. This might take up to a minute.
Step seven: Select the language/region
-
When prompted, use the arrow keys to select your language, press OK, and then confirm.
-
When prompted, use the arrow keys to select your country/region, press OK, and then confirm.
Step eight: Install the cartridges
-
Lower the access door, and then wait for the carriage that holds the cartridges to move to the right side.Figure : Lower the access door
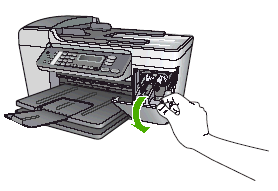 Figure : The carriage
-
Pull the pink tab to remove the tape from both cartridges.
-
Copper-colored contacts
-
Plastic tape with pink pull tab (must be removed before installing)
-
Ink nozzles under tape
Figure : Remove the tape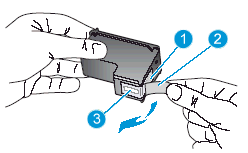
caution:
Do not touch the copper-colored contacts or ink nozzles. Touching these parts can result in clogs, ink failure, and bad electrical connections.Figure : Do not touch the electrical contacts or ink nozzles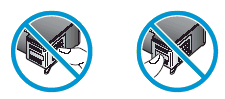
-
-
Slide each new cartridge forward into its empty slot, and then gently push on the upper part of the cartridge until it snaps into place.
-
Insert the tri-color cartridge into the left slot.
-
Insert the black or photo cartridge into the right slot.
Figure : Insert the cartridges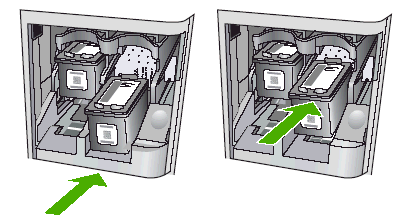
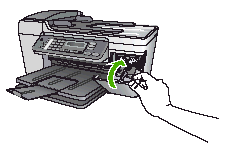
-
-
Close the access door.Figure : Close the access door
Step nine: Align the cartridges
After you insert the cartridges, a message displays indicating that the product is ready for alignment.
-
Align the cartridges when prompted from the printer control panelThe printer prompts you to align the cartridges each time you install or replace a cartridge.
note:
If you remove and reinstall the same cartridge, the printer will not prompt you to realign the cartridge. The alignment values for the cartridge are recorded in the printer from the first alignment.-
Make sure that you have letter or A4 unused plain, white paper loaded in the input tray, and then press OK.
note:
If you have colored paper loaded in the input tray when you align the cartridges, the alignment fails. Load unused plain, white paper into the input tray, and then try the alignment again by restarting it from the control panel. -
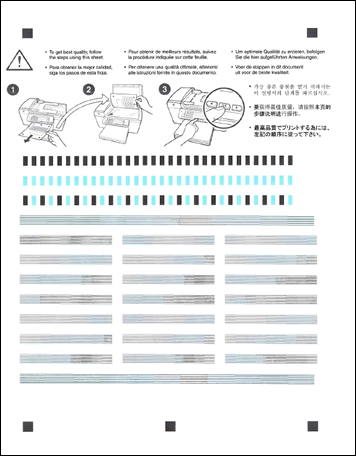
Wait for the alignment page to print, and then examine the page. The alignment page should have black and blue print areas, and the print areas should be sharp and clear, with no fading or streaking.Figure : Example of an alignment page
-
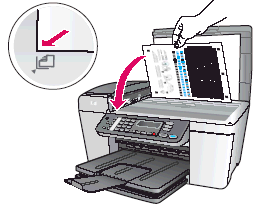
Lift the lid, place the top of the alignment page face-down on the left front corner of the scanner glass, and then close the lid.Figure : Place the alignment page on the scanner glass
-
Press OK to begin the alignment. The printer aligns the cartridges. After the On light stops blinking, a message displays to indicate that the alignment is complete.
-
Recycle or discard the alignment page.
-
-
Align the cartridges at any time from the printer control panelFollow these steps to start alignment at any time from the printer control panel.
-
Make sure that you have letter or A4 unused plain, white paper loaded in the input tray.
note:
If you have colored paper loaded in the input tray when you align the cartridges, the alignment fails. Load unused plain, white paper into the input tray, and then try the alignment again. -
Press Setup.
-
Press 6 to select Tools, and then press 2 to select Align Print Cartridge.
-
Wait for the alignment page to print, and then examine the page. The alignment page should have black and blue print areas, and the print areas should be sharp and clear, with no fading or streaking.Figure : Example of an alignment page
-
Lift the lid, place the top of the alignment page face-down on the left front corner of the scanner glass, and then close the lid.Figure : Place the alignment page on the scanner glass
-
Press OK to begin the alignment. The printer aligns the cartridges. After the On light stops blinking, a message displays to indicate that the alignment is complete.
-
Recycle or discard the alignment page.
-
Enter a topic to search our knowledge library
What can we help you with?

Need Help?