solution Contentsolution Content

HP Officejet 6500, J6400, Printers - Paper Jam Error

This document is for HP Officejet 6500, J6405, J6410, J6413, J6415, J6424, J6450, J6480, and J6488 All-in-One printers.
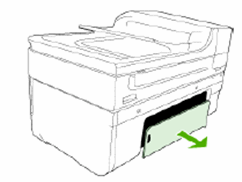
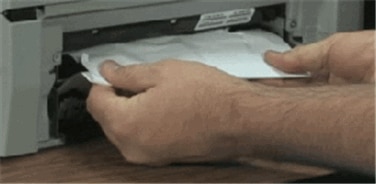
The print job stalls and a 'Paper jam' error message displays on the printer control panel.

Video overview

The following video demonstrates the steps explained on this page. The outside of the printer might look different, but the steps are the same.
Fixing a Paper Jam - HP Officejet 6500 All-in-One Printer
Learn how to fix a paper jam on the HP Officejet 6500 All-in-One printer.

Step 1: Look for jammed paper

Paper jams can occur in multiple areas of the printer. If you cannot find the paper jam in one area, continue to the next area until you locate the jam.
  caution:
Trying to clear a paper jam from the front of the printer can damage the print mechanism. Gain access to and clear paper jams through the rear of the printer whenever possible.
If you have checked and removed any jammed paper from each printer area and the error persists, continue to the next step.

Step 2: Make sure the carriage can move freely

Make sure the carriage moves freely across the width of the printer.
  1. Turn on the printer, if it is not already on.
  2. Open the ink cartridge access door.
    Illustration of opening the ink cartridge access door
  3. Wait until the carriage is idle and silent before you continue.
  4. With the printer turned on, disconnect the power cord from the rear of the printer.
      warning:
    You must unplug the power cord to move the carriage by hand and reset the paper feed mechanism without the risk of electrical shock.
  5. Check for any paper or objects that might be restricting the carriage.
    Graphic: Paper in carriage path that could be restricting the carriage
  6. Remove any paper or objects you find.
    note:
    If the paper tears when you remove it from the rollers, check the rollers and wheels for torn pieces of paper that might remain inside the printer. If pieces of paper remain in the printer, more paper jams might occur.
  7. Reach inside the printer, and then manually move the carriage.
    • If the carriage is stuck on the right side, move the carriage to the left side of the printer.
    • If the carriage is stuck on the left side, move the carriage to the right side of the printer.
    • If the carriage is stuck in the middle, move the carriage to the right.
  8. Make sure the carriage can move freely across the width of the printer by gently pushing the carriage to the left, and then to the right.
  9. Close the ink cartridge access door.
    Illustration of closing the ink cartridge access door
  10. Reconnect the power cord to the rear of the printer, and then turn on the printer.
Try to print. If the error persists, continue to the next step.

Step 3: Clean the paper feed rollers

Dust, paper fiber, and other debris might accumulate on the paper feed rollers and cause paper jams and paper feed issues. Clean the rollers inside the printer, and then try to print again.
  1. Turn off the printer, and then disconnect the power cord.
      warning:
    Disconnect the power cord before reaching inside the printer to avoid risk of injuries or electric shock.
  2. Remove the rear access door or the duplexer from the rear of the printer.
    • To remove the rear access door: Press in the two release buttons toward each other, and then pull the door away from the printer.
      Illustration of removing the rear access door
    • To remove the duplexer: Press in the buttons on the sides of the duplexer, and then pull the duplexer toward you.
      Illustration of removing the duplexer
  3. Lightly dampen a clean, lint-free cloth with bottled or distilled water, and then squeeze any excess liquid from the cloth.
  4. Press the cloth against the rollers and rotate them upwards with your fingers. Apply a moderate amount of pressure to remove any dust or dirt buildup.
    Illustration of the rollers
  5. Allow the rollers to dry for 10 or 15 minutes.
    • If your printer has a rear access door, reattach it, and then continue to the end of this section.
    • If your printer has a duplexer, continue with these steps.
  6. Check the paper feed rollers on the duplexer to make sure they are clean, free of paper bits, and rotate freely.
    Photograph of the rollers in the duplexer
  7. Clean the surface of the duplexer rollers the same way you cleaned the large rollers inside the printer.
  8. Allow the rollers of the duplexer to dry for 10 or 15 minutes.
  9. Replace the duplexer. Gently push the door forward until it snaps into place.
  10. Reconnect the power cord to the rear of the printer, and then turn on the printer.
Try to print. If the error persists, continue to the next step.

Step 4: Reset the printer

Sometimes a paper jam error persists even though there is no jammed paper (false paper jam). Reset the printer, which might clear a false paper jam error, and then try to print again.
  1. With the printer turned on, disconnect the power cord from the printer.
  2. Unplug the power cord from the power source.
  3. Wait 60 seconds.
  4. Reconnect the power cord to a wall outlet and to the printer.
    note:
    HP recommends plugging the printer directly into a wall outlet.

Step 5: Download and install the firmware update (Officejet J6400 series only)

Go to HP Customer Support - Software and Driver Downloads, to download and install the latest printer firmware.
Try to print. If the error persists, continue to the next step.

Step 6: Service the printer

Service or replace your HP product if the issue persists after completing all the preceding steps.
Go to Contact HP Customer Support to schedule a product repair or replacement. If you are in Asia Pacific, you will be directed to a local service center in your area.
To confirm your warranty status, go to HP Product Warranty Check. Repair fees might apply for out-of-warranty products.