solution Contentsolution Content

HP DeskJet 3630, 4720 Printers - 'E4' Error Displays (Paper Jam)

This document is for HP DeskJet 3630, 3631, 3632, 3633, 3634, 3635, 3636, 3637, 3638, 3639, DeskJet Ink Advantage 3635, 3636, 3638, and DeskJet Ink Advantage Ultra 4729 All-in-One printers.
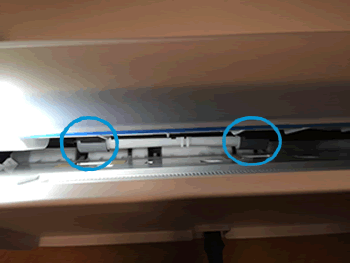
During printing the printer stops feeding pages and the control panel displays an alternating E and 4, and the Error icon , Paper Error icon , and Ink Alert light blink. This indicates that paper might be jammed inside the printer.
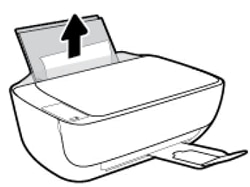
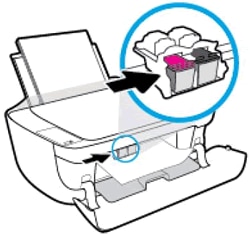
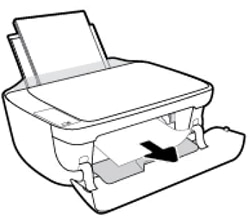
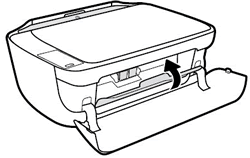
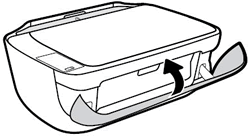
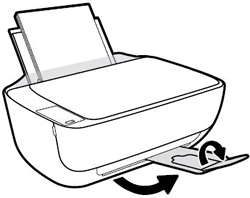
note:
Paper jams can be real or false. The printer might report a paper jam even when there is no jammed paper. The following steps apply to both real and false paper jams.

Video overview

This video shows how to fix a paper jam on the HP DeskJet 3634 printer.
Fixing a Paper Jam on the HP DeskJet 3634 Printer
Learn how to fix a paper jam on the HP DeskJet 3634 printer.

Step 1: Look for jammed paper

Paper jams can occur in multiple areas of the printer. If you cannot find the paper jam in one area, continue to the next area until the jam is located.
If you have checked and removed any jammed paper from each printer area and the error persists, continue to the next step.

Step 2: Make sure the carriage can move freely

Make sure the carriage moves freely across the width of the printer.
  1. If the printer is not turned on, press the Power button to turn it on.
  2. Open the exterior door.
    Image: Open the exterior door
  3. Open the ink cartridge access door.
    The carriage moves to the center of the printer.
    Image: Opening the ink cartridge access door
  4. Wait until the carriage is idle and silent before you continue.
  5. With the printer turned on, disconnect the power cord from the rear of the printer.
  6. Unplug the power cord from the power source or electrical outlet.
      warning:
    You must unplug the power cord to move the carriage by hand and reset the paper feed mechanism without the risk of electrical shock.
  7. Use a flashlight to check for any paper or objects that might be restricting the carriage, and then remove any paper or objects that you find.
      caution:
    If the paper tears when you remove it from the rollers, check the rollers and wheels for torn pieces of paper that might remain inside the printer. If pieces of paper remain in the printer, more paper jams can occur.
  8. Reach inside the printer through the ink cartridge access door, and then manually move the carriage.
    • If the carriage is stuck on the right side of the printer, move the carriage to the left side of the printer.
    • If the carriage is stuck on the left side of the printer, move the carriage to the right side of the printer.
    • If the carriage is stuck in the middle of the printer, move the carriage to the right side of the printer.
  9. Remove any loose paper or obstructions you find.
  10. Make sure the carriage can move freely across the width of the printer. Firmly push the carriage to the left side of the printer, and then push the carriage to the right side.
  11. Close the ink cartridge access door.
    Image: Close the ink cartridge access door
  12. Close the exterior door.
    Image: Close the exterior door
  13. Reconnect the power cord to the rear of the printer, and then plug the power cord back into the power source or electrical outlet.
  14. Press the Power button to turn on the printer.
Try to print. If the error persists, continue to the next step.

Step 3: Clean the paper rollers

Use an automated utility to clean the paper feed rollers inside the printer.
  1. Press the Power button to turn on printer.
  2. Remove paper from the input tray.
  3. Press and hold the Power button, press the Cancel button three times, press the Start Copy Color button seven times, and then release the Power button.
    The printer makes some noise for approximately one minute.
  4. Wait until the printer is silent before you proceed.
Try to print. If the error persists, continue to the next step.

Step 4: Clean ink smears

Use an automated utility to clean ink smears, which can help clear paper jams and optimize print quality.
  1. Press the Power button to turn on the printer.
  2. Load paper into the input tray.
  3. Press and hold the Power button, press the Cancel button three times, press the Start Copy Color button eight times, and then release the Power button.
    The printer feeds one page slowly. The printer might make some noise for approximately one minute. Wait until the page is out of the printer before you remove it.
  4. Try to print. If the error persists, continue to the next step.

Step 5: Manually clean the paper rollers inside the input tray

Dust, paper fiber, and other debris might accumulate on the paper feed rollers and cause paper jams and paper feed issues. Clean the rollers inside the printer, and then try to print again.
  1. Turn off the printer, and then disconnect the power cord and any other cables.
  2. Raise the input tray.
     Raising the input tray
  3. Lift and hold the input tray shield.
    note:
    Do not remove the input tray shield. The input tray shield prevents foreign debris from falling into the paper path and causing paper jams.
  4. Look down through the open input tray and find the gray paper pick rollers. You might need a flashlight to illuminate the area.
    Paper pick rollers
  5. Lightly dampen the cotton swab with water, and then squeeze any excess liquid from the swab.
  6. Press the swab against the rollers, and then rotate them upward with your fingers. Apply a moderate amount of pressure to remove dust or dirt buildup.
  7. Lower the input tray shield.
  8. Allow the rollers to dry completely (approximately 10 minutes).
  9. Reconnect the power cord and any other cables, and then turn on the printer.
Try to print. If the error persists, continue to the next step.

Step 6: Reset the printer

Sometimes a paper jam error persists even though there is no jammed paper (false paper jam). Reset the printer, which might clear a false paper jam error, and then try to print again.
  1. With the printer turned on, disconnect the power cord from the printer.
  2. Unplug the power cord from the power source.
  3. Wait 60 seconds.
  4. Reconnect the power cord to a wall outlet and to the printer.
    note:
    HP recommends plugging the printer directly into a wall outlet.
Try to print. If the error persists, continue to the next step.

Step 7: Service the printer

Service or replace your HP product if the issue persists after completing all the preceding steps.
Go to Contact HP Customer Support to schedule a product repair or replacement. If you are in Asia Pacific, you will be directed to a local service center in your area.
To confirm your warranty status, go to HP Product Warranty Check. Repair fees might apply for out-of-warranty products.