Follow these solutions to fix ink streaks, faded prints, and other common print quality problems.
Fixing Print Quality Problems for the HP Color LaserJet Pro MFP M176n and M177fw Printer Series
Print from a different software program
Try printing from a different software program. If the page prints correctly, the problem is with the software program from which you were printing.
Set the paper-type setting for the print job
Check the paper-type setting if you are printing from a software program and the pages have any of these problems:
-
smeared print
-
fuzzy print
-
dark print
-
curled paper
-
scattered dots of toner
-
loose toner
-
small areas of missing toner
Check the paper-type setting (Windows)
-
From the software program, select the Print option.
-
Select the product, and then click the Properties or Preferences button.
-
Click the Paper/Quality tab.
-
From the Media: drop-down list, select the correct paper type.
-
Click the OK button to close the Document Properties dialog box. In the Print dialog box, click the OK button to print the job.
Check the paper-type setting (Mac OS X)
-
Click the File menu, and then click the Print option.
-
In the Printer menu, select the product.
-
By default, the print driver displays the Copies & Pages menu. Open the menus drop-down list, and then click the Finishing menu.
-
Select a type from the Media-type drop-down list.
-
Click the Print button.
Check the toner-cartridge status
Check the supplies status page for the following information:
-
Estimated percentage of cartridge life remaining
-
Approximate pages remaining
-
Part numbers for HP toner cartridges
-
Number of pages printed
Use the following procedures to print the supplies status page:
LCD control panel
-
On the product control panel, press the Setup
 button.
-
Open the following menus:
-
Reports
-
Supplies status
-
-
Select Print Supplies status page, and then press the OK button.
Touchscreen control panel
-
From the Home screen on the product control panel, touch the Supplies
 button.
-
Touch the Report button to print the supplies status page.
Calibrate the product to align the colors
If the printed output has colored shadows, blurry graphics, or areas that have poor color, you might need to calibrate the product to align the colors. Print the diagnostics page from the Reports menu on the control panel to check the color alignment. If the blocks of color on that page are not aligned with each other, you need to calibrate the product.
LCD control panel
-
On the product control panel, press the Setup button.
-
Open the following menus:
-
System Setup
-
Print Quality
-
Calibrate Color
-
-
Select the Calibrate Now option, and then press the OK button.
Touchscreen control panel
-
From the Home screen on the product control panel, touch the Setup
 button.
-
Open the following menus:
-
System Setup
-
Print Quality
-
Color Calibration
-
-
Select the Calibrate now option, and then press the OK button.
Print a cleaning page
LCD control panel
-
From the product control panel, press the Setup button.
-
Open the Service menu.
-
Select the Cleaning mode option, and then press the OK button.The product prints the first side and then prompts you to remove the page from the output bin and reload it in Tray 1, keeping the same orientation. Wait until the process is complete. Discard the page that prints.
Touchscreen control panel
-
From the Home screen on the product control panel, touch the Setup button.
-
Touch the Service menu.
-
Touch the Cleaning Page button.
-
Load plain letter or A4 paper when you are prompted.
-
Touch the OK button to begin the cleaning process.The product prints the first side and then prompts you to remove the page from the output bin and reload it in Tray 1, keeping the same orientation. Wait until the process is complete. Discard the page that prints.
Perform additional print quality troubleshooting
Print the print quality page
LCD control panel
-
From the product control panel, press the Setup button.
-
Open the following menus:
-
System Setup
-
Reports
-
-
Select the Print Quality Report option, and then press the OK button.
Touchscreen control panel
-
From the Home screen on the product control panel, touch the Setup button.
-
Open the Reports menu.
-
Touch the Print Quality Page option, and then touch the OK button.
Interpret the print quality page
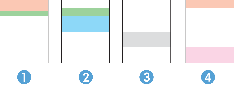
This page contains five bands of color, which are divided into four groups as indicated in the following illustration. By examining each group, you can isolate the problem to a particular toner cartridge.
-
Yellow
-
Cyan
-
Black
-
Magenta
Figure : Print-quality troubleshooting page bands
-
If dots or streaks appear in only one of the groups, replace the toner cartridge that correlates with that group.
-
If dots appear in more than one group, print a cleaning page. If this does not solve the problem, determine if the dots are always the same color; for example, if magenta dots appear in all five color bands. If the dots are all the same color, replace that toner cartridge.
-
If streaks appear in multiple color bands, contact HP. A component other than the toner cartridge is probably causing the problem.
Inspect the toner cartridge for damage
-
Remove the toner cartridges from the product, and verify that the sealing tape has been removed.
-
Grasp both sides of the toner cartridge and distribute the toner by gently rocking the cartridge.
-
Check the memory chips for damage.
-
Examine the surface of the roller on the toner cartridges.
caution:
Do not touch the roller on the toner cartridges. Fingerprints on the roller can cause print-quality problems. -
If you see any scratches, fingerprints, or other damage on the roller, replace the toner cartridge.
-
If the roller does not appear to be damaged, rock the toner cartridges gently several times and reinstall them. Print a few pages to see if the problem has resolved.
Check the paper and printing environment
Use paper that meets HP specifications
Use different paper if you are having any of the following problems:
-
The printing is too light or seems faded in areas.
-
Specks of toner are on the printed pages.
-
Toner is smearing on the printed pages.
-
Printed characters seem misformed.
-
Printed pages are curled.
Always use a paper type and weight that this product supports. In addition, follow these guidelines when selecting paper:
-
Use paper that is of good quality and free of cuts, nicks, tears, spots, loose particles, dust, wrinkles, voids, staples, and curled or bent edges.
-
Use paper that has not been previously printed on.
-
Use paper that is designed for use in laser printers. Do not use paper that is designed only for use in inkjet printers.
-
Use paper that is not too rough. Using smoother paper generally results in better print quality.
Check the product environment
Verify that the product is operating within the environmental specifications listed in the product Warranty and Legal Guide.
Check the EconoMode settings
HP does not recommend the full-time use of EconoMode. If EconoMode is used full-time, the toner supply might outlast the mechanical parts in the toner cartridge. If print quality begins to degrade and is no longer acceptable, consider replacing the toner cartridge.
Follow these steps if the entire page is too dark or too light.
-
From the software program, select the Print option.
-
Select the product, and then click the Properties or Preferences button.
-
Click the Paper/Quality tab, and then locate the Quality Settings area.
-
If the entire page is too dark, select the EconoMode setting.If the entire page is too light, make sure you are using the correct setting for the print job.
-
If you a printing photos, select the Photo option.
-
For all other print jobs, select the Normal option.
-
-
Click the OK button to close the Document Properties dialog box. In the Print dialog box, click the OK button to print the job.
Adjust color settings (Windows)
Change the color theme
-
From the software program, select the Print option.
-
Select the product, and then click the Properties or Preferences button.
-
Click the Advanced button.
-
Select a color theme from the Color Themes drop-down list.
-
None: No color theme is used.
-
Default/sRGB: This theme sets the product to print RGB data in raw device mode. When using this theme, manage color in the software program or in the operating system for correct rendering.
-
Vivid/sRGB: The product increases the color saturation in the midtones. Use this theme when printing business graphics.
-
Photo (sRGB): The product interprets RGB color as if it were printed as a photograph using a digital mini lab. The product renders deeper, more saturated colors differently than with the Default (sRBG) theme. Use this theme when printing photos.
-
Photo (Adobe RGB 1998): Use this theme with printing digital photos that use the AdobeRGB color space rather than sRGB. Turn off color management in the software program when using this theme.
-
-
Click the OK button to close the Advanced Options dialog box, and then click the OK button to close the Document Properties dialog box. In the Print dialog box, click the OK button to print the job.
Change the color options
-
From the software program, select the Print option.
-
Select the product, and then click the Properties or Preferences button.
-
Click the Paper/Quality tab.
-
In the Color section, select Black & White or Color.
note:
When Black & White is selected, the Print in Grayscale setting in the Advanced Options is automatically changed to the Black print cartridge only option. -
Click the OK button to close the Document Properties dialog box. In the Print dialog box, click the OK button to print the job.
Enter a topic to search our knowledge library
What can we help you with?

Need Help?