solution Contentsolution Content

HP Smart Tank 450 Printers - First Time Printer Setup

This document is for HP Smart Tank Wireless 450, 455, and 457 printers.
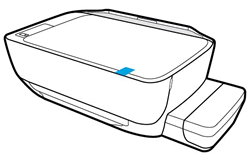
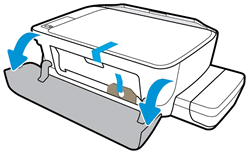
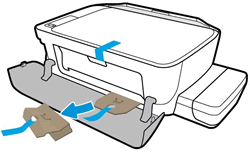
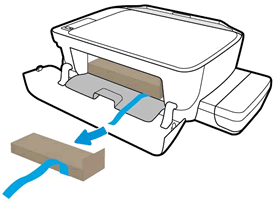
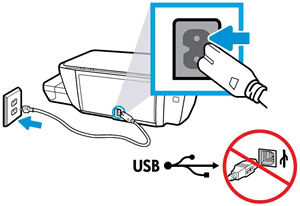
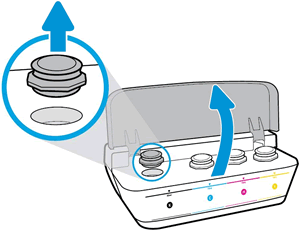
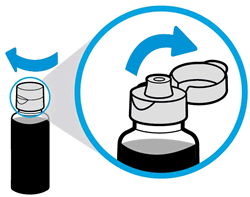
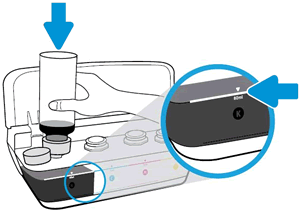
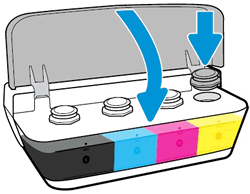
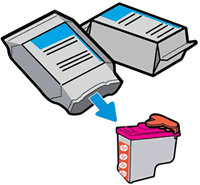
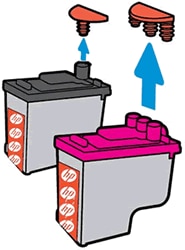
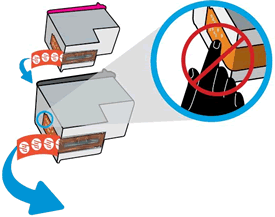
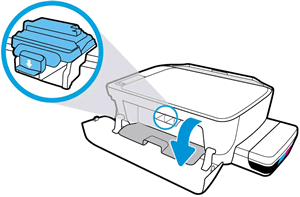
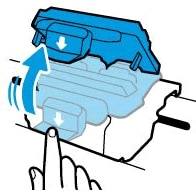
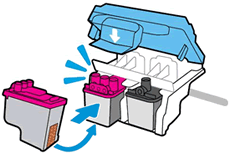
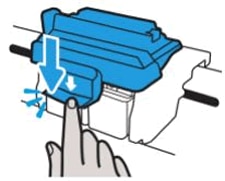
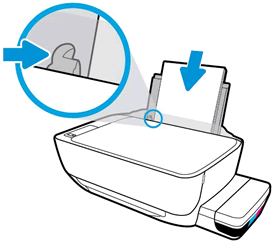
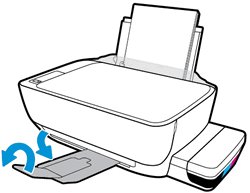
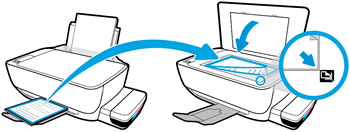
To set up a printer for the first time, remove the printer and packing materials from the box, connect the power cable, fill the ink tanks, install the printheads, load paper into the input tray, align the printheads, prime the ink system, and then install the printer software.
note:
If you are looking for the printer software, go to 123.hp.com/ST450.
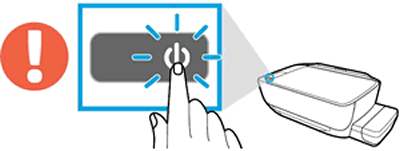
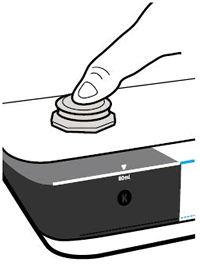
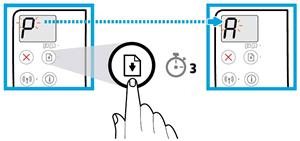
Step 1: Remove the printer from the box

Remove the printer from the box, and then remove all tape, stickers, and packing materials.
  1. Remove the printer from the box.
  2. Remove all tape from the outside of the printer.
    Figure : Remove the tape
    Remove the tape and packing materials from outside the printer
  3. Open the exterior door.
    Figure : Opening the exterior door
    Open exterior door
  4. Remove the tape and packing material from under the printhead access door.
    Figure : Removing the tape and packing material from under the printhead access door
    Remove packing material
  5. Open the printhead access door, and then remove the tape and packing material from inside the printer.
    Figure : Removing the tape and packing materials from inside the printer
    Remove the box from  the printer
  6. Close the printhead access door, and then close the exterior door.
  7. Place the printer on a level surface, where you intend to use it.
      Figure : Placing the printer on a level surface
      Image: Place the printer on a level surface
    1. Level surface
    2. Uneven surface
  8. Connect the power cord to the rear of the printer, and then plug the other end into an electrical outlet.
      caution:
    Do not connect the USB cable at this time.
    Figure : Connect the power cord
    Connect the power cord
  9. Turn on the printer.
    note:
    The printer might take up to 15 seconds to turn on.
    Figure : Turning on the printer
    Turn on the printer

Step 2: Fill the ink tanks

Fill the ink tanks with ink using the ink bottles that shipped in the box with your printer.
note:
Be aware of the following when working with ink bottles:
  • Keep the ink bottles beyond the reach of children.
  • Open the ink bottle only when you are filling the ink tanks.
  • Store the ink bottles upright in a cool, dry place.
  1. Open the ink tank lid, and then remove the plug from the black tank.
    Figure : Opening the ink tank lid, and then removing the plug from the black tank
    Remove the plug
  2. Remove the cap from the black ink bottle, and then pull the seal tab to remove it.
    Carefully dispose of the seal.
    Figure : Removing the bottle cap, and then removing the seal
    Remove the cap and seal
  3. Replace and tighten the cap on the bottle, and then open the lid.
    Figure : Tightening the bottle cap, and then opening the lid
    Replace the cap and open
  4. Turn the bottle upside down, and then place the black ink bottle over the tank spout.
  5. Gently push the bottle down, and then let the ink drain into the ink tank. Fill the ink tank to the fill line on the tank.
    If the bottle does not start draining, remove and reinsert the bottle onto the tank spout. Do not squeeze the bottle.
    Figure : Filling the black ink tank
    Drain ink
  6. After the black ink tank is filled, pull the ink bottle straight up.
    Close the ink bottle lid, set the bottle upright, and then push the ink tank plug into its slot on the ink tank.
    Figure : Replacing the ink tank plug
    Replace the plug
  7. Repeat the previous steps to fill the other ink tanks.
      caution:
    Do not fill the ink tanks over the fill line. Store any remaining ink in a cool, dry place.
  8. Close the ink tank lid.
    Figure : Closing the ink tank lid
    Close the ink tank lid

Step 3: Install the printheads

Install the printheads that shipped in the box with your printer.
  1. Open the packages, and then remove the printheads.
    Figure : Removing the printheads from the package
     Remove printheads from package
  2. Pull the orange plugs straight up to remove them from the tops of the printheads.
    Figure : Pulling out the orange plugs
    Pull the orange plugs
  3. Remove the tape from the printhead contacts using the pull tabs.
      caution:
    Do not touch the copper-colored contacts or the ink nozzles. Do not replace the protective tape on the contacts. Handling these parts can result in clogs, ink failure, and bad electrical connections.
    Figure : Removing the tape from the printhead contacts
    Remove the tape
  4. With the printer turned on, open the exterior door, and then open the printhead access door.
    The printhead carriage moves to the center of the printer.
    Figure : Accessing the printhead carriage
    Access the printhead carriage
  5. Gently push down on the blue printhead carriage latch.
    The blue printhead carriage latch opens.
    Figure : Pushing down on the blue printhead carriage latch
    Open the printhead carriage latch
  6. Slide the printhead at a slight upward angle into the empty slot, and then gently push up on the printhead until it snaps into place.
    • Insert the black printhead into the right slot.
    • Insert the tri-color printhead into the left slot.
    Figure : Inserting the black and color printheads
    Insert the printheads
  7. Close the blue carriage latch by pushing down firmly until the latch snaps into place.
    Figure : Closing the blue carriage latch
    Closing the latch
      caution:
    Do not open the blue carriage latch after printhead installation unless you are installing new printheads or moving the printer long distances.
    Do not open carriage latch
  8. Close the printhead access door.
    A blinking P displays on the control panel.
    Figure : A blinking 'P' displays
    A blinking 'P' displays
  9. Close the exterior door.
    Figure : Closing the exterior door
    Close the exterior door

Step 4: Load paper into the input tray

Load plain white paper in the input tray after you install the printheads.
  1. Raise the input tray.
    Pull up the input tray
  2. Slide the paper width guide all the way to the left.
    Slide the paper width guide left
  3. Load plain white paper into the input tray, slide the stack of paper down until it stops, and then slide the paper width guide against the edge of the paper.
    Load paper and slide guide right
  4. Pull out the output tray, and then raise the tray extender.
    Pull out the output tray and tray extender
note:
Before printing, select the correct paper size and paper type settings from the computer.

Step 5: Align the printheads and prime the ink system

Aligning the printheads is necessary to achieve the best print quality. After the alignment, the printer begins the process of priming the ink system.
  1. On the printer control panel, press and hold the Resume button for 3 seconds.
    The alignment starts when the blinking P becomes a blinking A.
    The printer prints an alignment page.
    note:
    The alignment page might have a small blot or smear at the bottom of the page. This is a normal during the printer's initial setup.
    Figure : Pressing and holding the Resume button
    Press and hold the resume button
  2. Lift the scanner lid.
  3. Place the alignment page with the print side down on the right-front corner of the scanner glass, and then close the scanner lid. Position it according to the guides around the scanner glass.
    Figure : Placing the alignment page on the scanner glass
    Printer alignment
  4. Close the scanner lid.
  5. On the control panel, press the Start Copy Color button .
  6. Alignment is complete when the A becomes a 0 on the control panel.
    Figure : Alignment complete
    Alignment complete

Step 6: Install the printer software

Download the latest version of the printing software from 123.hp.com/ST450.