solution Contentsolution Content

HP OfficeJet 200 Mobile Printers - 'Paper Jam' Message

This document is for the HP OfficeJet 200, 200c, 202, 202c Mobile Printers.
During a print job, the printer stops feeding pages and a Paper Jam error message displays on the printer control panel.
note:
Paper jams can be real or false. The printer might report a paper jam even when there is no jammed paper. The following steps apply to both real and false paper jams.

Video overview

This video shows you how to clear a paper jam on HP OfficeJet 200 Mobile printers.
Fixing a Paper Jam on HP OfficeJet 200 and 250 Mobile Printers
Learn how to fix a paper jam and clear a paper jam error message on HP OfficeJet 200 Mobile and 250 Mobile All-in-One printers

Step 1: Turn the printer off and on

When you turn off the printer with the Power button, the printer automatically tries to eject any remaining paper inside the printer. When the printer restarts, it might eject the jammed paper.
Turn the printer off, wait 30 seconds, and then turn on the printer.
If the printer did not eject the jammed paper or if the printer did not turn off, continue to the next step.

Step 2: Clear any jammed paper from the output slot

Use both hands to pull out any paper from the output slot in front of the printer.
  1. On the printer control panel, press OK on the paper jam screen.
    The printer tries to clear the jam automatically.
    If the paper jam error persists, continue these steps to manually clear the jam.
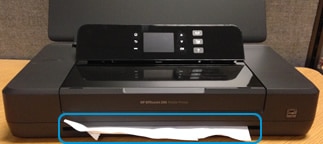
  2. Remove any jammed paper and bits of torn paper that are visible from the output slot. To avoid the paper tearing, use both hands to pull out paper.
    Figure : Jammed paper in output area
    Image: Jammed paper in output area
Try to print. If the error persists, continue to the next step.

Step 3: Clear any jammed paper from the ink cartridge access area

Disconnect all power to the printer, and then use both hands to pull out any paper from the ink cartridge access area. Once any jammed paper, torn bits of paper, and debris are removed from the ink cartridge access area, make sure the carriage can move freely.
note:
You need a flashlight for the following steps.
Figure : Use a flashlight
Image: Use a flashlight.
  1. On the printer control panel, press OK on the paper jam screen.
    The printer tries to clear the jam automatically.
    If the paper jam error persists, continue these steps to manually clear the jam.
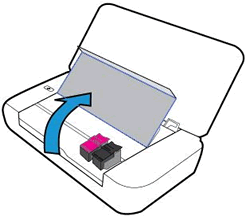
  2. Open the ink cartridge access door.
    Figure : Opening the ink cartridge access door
    Image: Lift the ink cartridge cover
  3. Wait until the carriage is idle and silent before you continue.
  4. Disconnect any cords connected to the printer, such as the power cord and USB cable.
      warning:
    To avoid the risk of electrical shock, disconnect any cords from the printer before reaching inside.
  5. If installed, remove the battery.
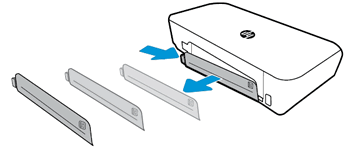
    1. Remove the battery cover. Push the battery cover tab to the right, and then pull the cover toward you.
      Figure : Removing the battery cover
      Image: Removing the battery cover
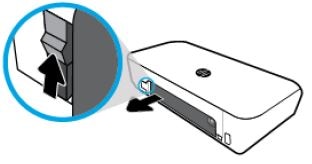
    2. Push up on the battery latch, and then slide the battery out of its slot.
      Figure : Removing the battery
      Image: Removing the battery
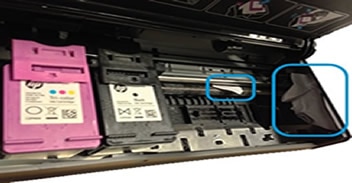
  6. Use a flashlight to check for any paper or objects that might be restricting the carriage, and then remove any paper or objects that you find.
      caution:
    If pieces of paper remain in the printer, more paper jams can occur.
    Figure : Example of torn or crumpled paper in ink cartridge access area
    Image: Torn or crumpled paper
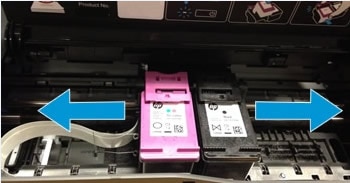
  7. Firmly push the carriage to the left side of the printer, and then push it to the right side.
    Figure : Moving the carriage from side to side
    Image: Moving the carriage
  8. Remove any loose paper or obstructions found.
  9. Reconnect the power cord to the printer, and then install the battery, if necessary.
  10. Turn on the printer.
Try to print. If the error persists, continue to the next step.

Step 4: Reset the printer

Sometimes a paper jam error persists even though there is no jammed paper (false paper jam). To clear any possible false carriage jam messages, reset the printer.
  1. With the printer turned on, disconnect the power cord from the printer.
  2. Unplug the power cord from the power source.
  3. Wait 60 seconds.
  4. Reconnect the power cord to a wall outlet and to the printer.
    note:
    HP recommends plugging the printer directly into a wall outlet.
Try to print. If the error persists, continue to the next step.

Step 5: Service the printer

If you have completed the steps in this document and your printer is still displaying a 'Paper Jam' error message, service the printer.
Service or replace your HP product if the issue persists after completing all the preceding steps.
Go to Contact HP Customer Support to schedule a product repair or replacement. If you are in Asia Pacific, you will be directed to a local service center in your area.
To confirm your warranty status, go to HP Product Warranty Check. Repair fees might apply for out-of-warranty products.