solution Contentsolution Content

HP OfficeJet 8600 Printers - First Time Printer Setup

This document is for the following printers:
HP OfficeJet 8600 Series Printer
HP Officejet Pro 8610 e-All-in-One Printer
HP Officejet Pro 8625 e-All-in-One Printer
HP Officejet Pro 8600 e-All-in-One Printer
HP Officejet Pro 8615 e-All-in-One Printer
HP Officejet Pro 8630 e-All-in-One Printer
HP Officejet Pro 8600 Plus e-All-in-One Printer
HP Officejet Pro 8616 e-All-in-One Printer
HP Officejet Pro 8640 e-All-in-One Printer
HP Officejet Pro 8600 Premium e-All-in-One
HP Officejet Pro 8620 e-All-in-One Printer
HP Officejet Pro 8660 e-All-in-One Printer
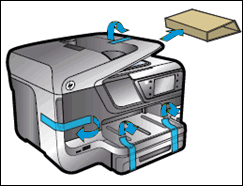
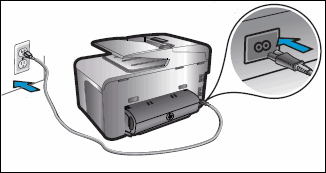
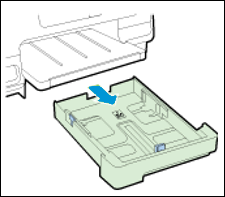
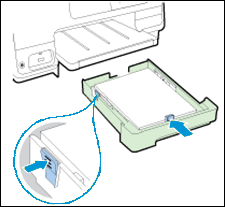
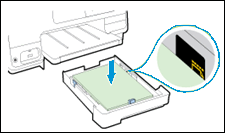
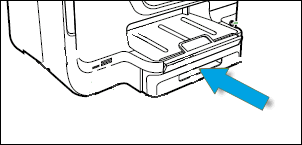
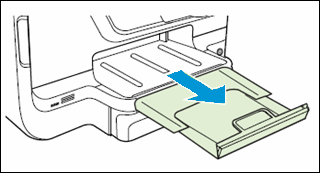
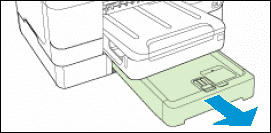
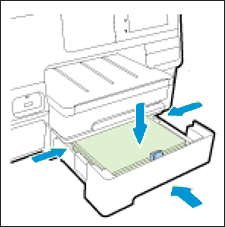
To set up a printer for the first time, remove the printer and all packing materials from the box, connect the power cable, set control panel preferences, load paper into the input tray, install the ink cartridges, and then download and install the printer software.
note:
If you are looking for the printer software, skip to the step to install the printer software.

Step 1: Remove the printer from the box

Remove the printer from the box and all tape, stickers, and packing materials from the printer.
The contents might vary by country/region. See the packaging for a list of items shipped in the box.
  1. Remove the printer from the box.
  2. Remove all tape and packing materials from the outside of the printer.
    Figure : Remove the packing materials
    Image: Remove the tape and packing materials
  3. Remove the sticker on the control panel display.
  4. Place your fingers into the slot on the left side of the printer, and then pull to open the ink cartridge access door.
    Figure : Slot on the left side of the printer
    Image: Slot on the left side of the printer
  5. Remove all tape and packing materials from inside the printer.
  6. Close the ink cartridge access door.
  7. Recycle the packing materials.

Step 2: Install the two-sided printing accessory (duplexer)

After the printer is unpacked, install the duplexer.
  1. Find the duplexer in the box.
  2. Take the duplexer out of its packing material, and then remove any tape from the duplexer.
  3. Turn the printer so the rear faces you.
  4. Hold the duplexer by its sides with the rollers toward the printer, insert it into the slot in the rear of the printer, and then push the duplexer into the printer until it snaps into place.
    note:
    Look for the engraved arrows on the duplexer for help positioning it.
    Figure : Insert the duplexer
    Image: Insert the duplexer into the rear access area
  5. Turn the printer back around so the front faces you

Step 3: Install Tray 2 (optional)

Tray 2 is an optional accessory. If your printer does not include a Tray 2, continue to the next step.
  1. Remove Tray 2 from its box, remove its packing material, and then remove any tape from the tray.
  2. Place the tray on a flat, level surface where you intend to use the printer.
  3. Lift the printer, position it over the top of the paper tray, and then lower the printer on top of the paper tray.
      caution:
    Keep your fingers and hands clear of the bottom of the printer.
    Figure : Set the printer on top of Tray 2
    Image: Lower the printer onto Tray 2
  4. Make sure the printer is even with the left, right, and back edges of the tray.

Step 4: Connect the power cord and set your preferences

Once you have installed the duplexer, plug the printer into a power source, turn on the printer, and then set your preferences.
note:
Do not connect a USB cable now. If you plan to use a USB cable to connect the printer to the computer, the installer prompts you to connect it at the correct time during the software installation.
  1. Connect the power cord to the rear of the printer, and then plug the other end of the power cord into an electrical outlet.
    Figure : Connect the power cord
    Image: Plug the power cord into the printer and the electrical outlet
  2. Turn on the printer.
  3. On the printer control panel, touch your preferred language, and then touch Continue to confirm your choice.
  4. Swipe your finger up and down the display to select your specific country/region, and then touch Continue to confirm your choice.
  5. Touch Date and Time, and then swipe your finger up and down the display to set the month, day, and year.
  6. Touch Done.

Step 5: Load paper into Tray 1

Load plain U.S. letter or A4 paper into Tray 1.
  1. Grasp the underside of Tray 1, and then pull out the tray.
    Figure : Pull out the paper tray
    Image: Pull out the paper tray.
  2. Pinch the paper width guide tabs, and then slide the paper width guides to their outermost positions.
    Figure : Slide out the paper width guides
    Image: Slide out the paper width guides.
  3. Insert plain white paper in the tray. Make sure that the print side is face-down and the short edge is forward.
      caution:
    Do not fill the paper above the yellow, dotted lines on the sides of the paper tray.
    Figure : Load paper into the paper tray
    Image: Load paper into the paper tray.
  4. If necessary, slide the paper width guides inward so that they rest on the edges of the paper.
  5. Push the tray toward the printer until it locks into place.
    Figure : Push in the paper tray
    Image: Push in the paper tray.
  6. Pull out the output tray extender, and then raise the paper catch.
    Figure : Pull out the tray extender
    Image: Pull out the tray extender.

Step 6: Load paper into Tray 2 (optional)

If you have Tray 2, you can load paper into the tray. If your printer does not include a Tray 2, continue to the next step.
  1. Grasp the underside of Tray 2, and then pull out the tray.
    Figure : Pull out Tray 2
    Image: Pull out Tray 2.
  2. Slide out the paper width guides to their outermost positions.
    Figure : Slide out the paper width guides in paper Tray 2
    Image: Slide out the paper width guides in Tray 2.
  3. Insert a stack of plain white paper in the center of the tray. Make sure that the print side is down.
      caution:
    Do not fill the paper above the red lines on the gauges on the sides of the tray.
  4. Slide in the paper guides so that they rest against the edges of the paper.
    Figure : Slide in the paper width guides for paper Tray 2
    Image: Slide in the paper width guides for paper Tray 2
  5. Gently reinsert the tray into the printer.
  6. Pull out the output tray extender, and then raise the paper catch.
    Figure : Pull out the tray extender
    Image: Pull out the tray extender.

Step 7: Install the SETUP ink cartridges

Install the HP SETUP ink cartridges that came in the box with your printer.
  caution:
You must install the SETUP ink cartridges when first setting up the printer, or an ink cartridge error occurs.
  1. Place your fingers into the slot on the left side of the printer, and then pull to open the ink cartridge access door.
    Figure : Place your fingers in the slot on the left side of the printer
    Image: Slot on the left side of the printer
  2. Wait until the printer is idle and silent before you continue.
  3. Remove the ink cartridge from its package.
    note:
    After you remove an ink cartridge from its package, install it right away to avoid damaging the ink.
  4. Hold the ink cartridge by its sides with the nozzles toward the printer, insert the ink cartridge into its slot, and then push the ink cartridge forward until it snaps into place.
    Figure : Insert the ink cartridge
    Image: Inserting the ink cartridge
  5. Repeat these steps to install all the new ink cartridges.
  6. Close the ink cartridge access door.
  7. Wait for the printer to align the ink cartridges.
    After the alignment is complete, the printer prints an alignment page.
    note:
    If your printer is the HP Officejet 8640, a message displays to use only genuine HP ink cartridges. Touch Yes to accept the terms of use.

Step 8: Install the printer software

Your HP printer hardware is now set up and you can install the printing software. Do not attempt to connect the printer to a computer until instructed to do so in the printing software.
Download the latest version of the printing software from the following HP websites:
note:
Some of the printers in the list have similar names. Make sure to select the link next to the exact name of your printer.

Step 9: Set up the printer for fax

After you complete the previous setup steps, use one of the following links to set up the printer to send and receive faxes.
Printer model
Link
HP Officejet 8600 Series printers
HP Officejet Pro 8610 printers
HP Officejet Pro 8615 printers
HP Officejet Pro 8616 printers
HP Officejet Pro 8620 printers
HP Officejet Pro 8625 printers
HP Officejet Pro 8630 printers
HP Officejet Pro 8640 printers
HP Officejet Pro 8660 printers
HP Officejet Pro 8600 printers
HP Officejet Pro 8600 Plus printers
HP Officejet Premium 8600 Plus printers