Use this document to find out how to enable printing for the HP Color LaserJet 3500, 3550, and 3600 Printers in Windows 10 or Windows 8.1/8. To view the recommended solution for another product, go to Drivers and software support for Windows 10 or Windows 8.1/8.
HP Color LaserJet 3500, 3550, and 3600 - Install the HP driver created for Windows Vista to print in Windows
Introduction
What you need to know
The HP Color LaserJet 3500, 3550, and 3600 Printers do not have print drivers available for Windows. However, customers can enable the HP print software by installing the Windows Vista driver created for these products on a Windows computer.
-
Color LaserJet 3500 Printers (USB install only, 64-bit only)
-
Color LaserJet 3550 Printers (USB install only, 64-bit only)
-
Color LaserJet 3600 Printers (USB and network install, 64-bit only)
note:The Color LaserJet 3500 and 3550 Printers are not supported in the Windows 32-bit operating system, and are not supported via a network. For more information, go to Products Not Supported in Windows.
Download and install the Vista solution in a newer Windows version
To install software for the HP Color LaserJet 3500, 3550, and 3600 Printers, follow these steps to download and install the HP software created for Windows Vista on a newer Windows computer.
Step one: Download the installer files needed to run the installation (USB only)
note:Follow the steps in this section only if you are connected via USB. If you are connected via a network, skip to Step two: Download the driver and extract the files.
-
Go to HP Support and select your country/language.
-
Select Drivers & Downloads.
-
Type your printer name or number in the Enter product name or number search box, and then click Go.
-
Select your model from the search results.
-
Select your language from the drop-down list and then select the operating system.
-
Under the Driver - USB section, locate the HP LaserJet USB (DOT4) communications driver for Windows file.
-
Click Download, click Run, and then wait for the process to finish.
note:
If you receive a prompt to install .Net, click OK and follow the steps to install it.
Step two: Download the driver and extract the files (USB and network)
note:Do NOT connect the USB cable until prompted in Step four: Install the driver.
-
Go to HP Support and select your country/language.
-
Select Drivers & Downloads.
-
Type your printer name or number in the Enter product name or number search box, and then click Go.
-
Select your model from the search results.
-
Select your language from the drop-down list and then select the Windows Vista operating system version.
-
Under the Driver section, locate the HP LaserJet Host-based driver and click Download.
-
From the drop-down list, click Save as, browse to the location where you want to save the .exe file, click Save, and then wait while the file downloads.
-
Browse to the location where you saved the .exe file and then double-click the file to launch the WinZip Self Extractor.
-
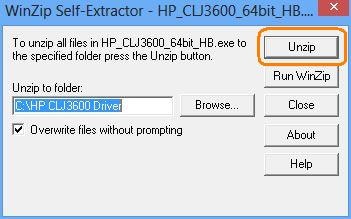
Browse to the location where you want to save the extracted files, and then click Unzip.Figure : WinZip Self-Extractor
-
When you receive notification that the all files have unzipped successfully, click OK, and then click Close.
Step three: Add the printer to Print Server Properties (USB and network)
note:Do NOT connect the USB cable until prompted in Step four: Install the driver.
-
Open Devices and Printers.
-
Click any printer in the list, and then click Print server properties (near the top of the screen).
-
Click the Drivers tab, click Add… to start the Add Printer Driver Wizard, click Next, select the processor, and then click Next.
-
Click Have Disk, click Browse, browse to the location where you unzipped the files, click Open, and then click OK.
note:
Do NOT insert an older software CD. The Add Printer Driver Wizard will automatically select the .inf or .dll file to run the installer. -
Select the printer, click Next, and then click Finish to close the Add Printer Driver Wizard.
note:
If you receive a User Account Control prompt, click Yes to allow the changes. -
Click Close, to close the Printer Properties.
Step four: Install the driver
Follow the steps for one of the following methods to install the driver either via a network or USB cable.
Method one: Install the driver using a USB cable
-
Make sure the printer is turned on and in a ready state.
-
Connect the USB cable to the printer and to the computer, and then follow any onscreen prompts to complete the installation.
-
Confirm that the printer is installed.
note:
If you have more than one print queue listed, right click the printer, click Delete print queue, and then selectHP Color LaserJet 3600 (Copy 1).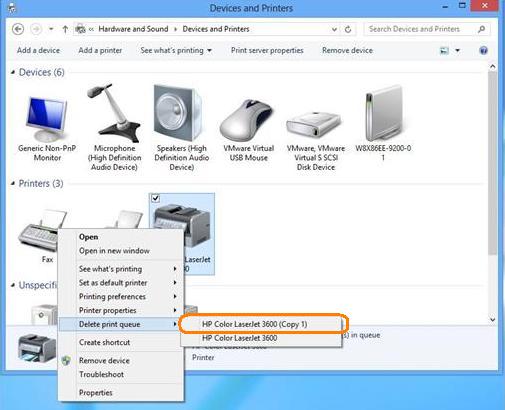
Method two: Install the driver on a network using Add Printer Wizard
note:This section applies to only the HP Color LaserJet 3600. The HP Color LaserJet 3500 and 3550 are not supported via a network installation.
-
Power on the product, connect the network cable to the printer and to the computer, make sure the network is connected and configured, and make sure the printer IP address is available.
note:
If you do not know or have the printer IP address, print a configuration page that contains the printer IP address. For instructions see the user guide that came with the printer. -
Open Devices and Printers.
-
Click Add a printer.
-
While Windows searches for printers, click The printer I want isn't listed.
-
Select Add a local printer or network printer with manual settings and then click Next.
-
Select Create a new port, select Standard TCP/IP port from the drop-down list, and then click Next.
-
Type the printer IP address (or Printer host name), click Next and then wait while the port is created.
note:
If prompted for an administrator password or confirmation, type the password or provide confirmation. -
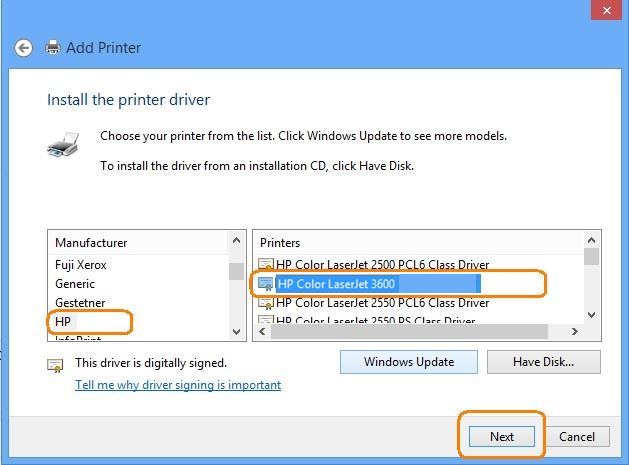
Select HP from the Manufacturer list, select the printer from the Printers list, and then click Next.
note:
If you have previously installed this printer model, you might be prompted to use the driver that is currently installed. If so, select Replace the current driver and then click Next. -
Use the default or type the printer name and then click Next.
note:
If prompted, select Do not share this printer and then click Next. -
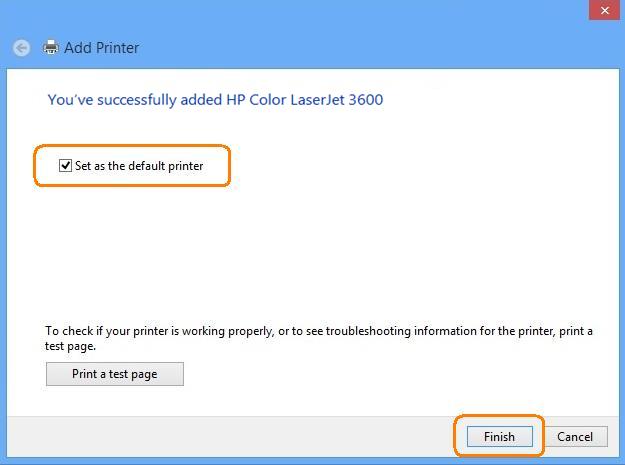
Select Set as the default printer, and then click Print a test page, or click Finish to complete the installation and close the window.
Введіть тему для пошуку в нашій бібліотеці знань
Чим ми можемо вам допомогти?

Потрібна допомога?