Windows users can use this document to learn how to install print software for a host-based printer such as the HP Color LaserJet 2600n on a network using the host-based driver solution in Windows 10, Windows 8.1/8, or Windows 7. To view the recommended solution for another printer, go to one of the following support pages:
HP LaserJet - Install HP print software on a network in Windows
Introduction
Step one: Download the driver
-
Go to www.hp.com/support and select your country/language.
-
Select Drivers & Downloads.
-
Type your printer name or model number in the Enter a product name or number search box, and then select Go.
-
Select the HP LaserJet model from the search results.
-
Select the Windows operating system version.
-
Locate the host-based driver option, click Download, click Save, browse to the location where you want to save the .exe file, and then click Save.
บันทึก
If you receive a prompt to install .Net, click OK and follow the steps to install it.
Step two: Check the connections and pre-install the driver files
-
Power on the printer and then wait until it arrives at a Ready state.
-
When the printer Ready light is on and no other jobs are printing, press and hold the Go button on the printer control panel for 5 seconds to print a configuration page and obtain the IP address.
-
Make sure the network cable is connected to the printer and to the computer.
-
Make sure the network is configured and that the computer has an active network connection.
-
Double-click the .exe file downloaded previously.
บันทึก
If you receive a prompt to install .Net, click OK and follow the steps to install it. -
Select I accept the terms in the license agreement, click Next, and then wait while the driver files are pre-installed.
-
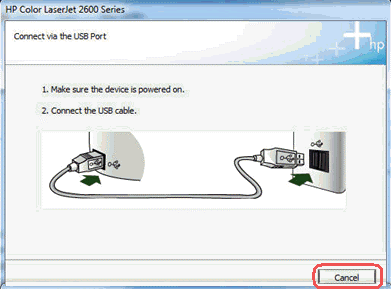
When prompted to connect the USB cable, click Cancel to abort the setup, and then click Yes to confirm.
Step three: Install the driver on a network using Devices and Printers
-
Open Devices and Printers.
-
Click Add a printer.
-
While Windows searches for available printers, click The printer that I want isn't listed.

-
Select Add a local printer or network printer with manual settings and then click Next.

-
Select Create a new port, select Standard TCP/IP port from the drop-down list, and then click Next.
-
Type the printer IP address (or Printer host name), click Next, and then wait while the port is created.
บันทึก
If prompted for an administrator password or confirmation, type the password or provide confirmation. -
Select HP from the Manufacturer list, scroll down to select the printer from the Printers list, and then click Next.
บันทึก
The printer drivers might not be listed in alpha or numerical order. Be sure to carefully scroll through the list to find the correct printer driver. -
If prompted, select Replace the current driver and then click Next.
-
Use the default or type the printer name and then click Next.
บันทึก
If prompted, select Do not share this printer and then click Next. -
Select Set as the default printer, and then click Print a test page.
-
If the test page prints, you do not need to complete Step four: Disable bi-directional support.
-
If the test page does not print, continue to Step four: Disable bi-directional support.
-
Step four: Disable bi-directional support
-
In the Devices and Printers window, right-click the printer and then click Printer Properties.
-
Click the Ports tab, clear the Enable bidirectional support check box, click Apply, and then click OK.
บันทึก
If the bi-directional support is enabled, Windows will display an error message when printing. -
Click the General tab, and then print a test page.
ตัวเลือกการสนับสนุนเพิ่มเติม
ป้อนหัวข้อเพื่อค้นหาในไลบรารี่ความรู้ของเรา
เราสามารถช่วยอะไรคุณได้บ้าง?

ต้องการความช่วยเหลือหรือไม่