solution Contentsolution Content

HP Image Editor - Editing Images in the HP Imaging Software

Introduction

This document explains how to edit images with the HP Image Editor software. At times it is desirable to change the appearance or size of an image, and with the aid of the HP Imaging software, this is easily accomplished.

Accessing the Image Editor

Use the instructions below to gain access to the Image Editing Software provided with your HP Digital Imaging product.
  1. Open the HP Director software.
    • Double-click the HP Director icon located on the Windows Desktop. The HP Director window opens.
      If there is not an HP Director Icon on the desktop,
    • Click Start, Programs (All Programs in Windows XP), Hewlett-Packard, the HP Digital Imaging product in use, and then HP Photo and Imaging Director. The HP Director window opens.
  2. Click View and Print. The HP Photo and Imaging Gallery window opens. This program is the interface between images and the available functions of the product software, such as Viewing, Sending, Editing and Printing.
  3. Click the thumbnail of the Image to edited. This highlights the thumbnail image in blue.
  4. Click Image Editor Icon at the top of the screen or double-click the image. The HP Image Editor window opens.

Features of the HP Image Editor

HP Image Editor icons
Figure : HP Image Editor
Use the icons in the HP Image Editor window to rotate, resize, adjust colors, adjust brightness and contrast, sharpen, remove red-eye, and add titles to images.
Using the Rotate icon
Figure : Rotate menu
Rotating the image.
  1. With an image open, click the Rotate icon. The image opens on the left side of the screen.
  2. Rotate the image using one or both of the following methods
    • Click the appropriate icon to rotate the image 90 degrees left or right.
    • Move the slider bar to rotate the image up to 45 degrees to the left or the right.
  3. When the image has been rotated to the desired position, click OK and then click Save or Save As to save to image.
    Click Cancel to disregard the changes.
Using the Resize icon
Figure : Resize menu
Resizing the image.
  1. With an image open, click the Resize icon. The Resize options display on the left side of the screen.
  2. Use the down arrow in the Units box to select what unit of measurement to use when displaying the image. The available choices are centimeters, inches, pixels, and percent values.
  3. Checking the Keep original proportion checkbox allows the image to remain in proportion when manually changing just the height or width.
    note:
    If the resolution of the image is decreased, the physical size of the image changes as well. For example, if a 4x6 inch image is changed from 200 dpi to 100 dpi, the image will no longer be 4x6 inches. It will be much smaller. It is important to set the desired resolution before resizing an image.
  4. If the Resample box is checked, the image will be rescanned.
  5. Enter the desired resolution of the image in the Resolution box.
  6. Click OK to accept the changes.
    Click Reset to return the image back to its original size.
    Click Cancel to discard all changes.
Using the Colors icon
Figure : Adjust Color menu
Adjusting the colors of an image.
  1. With an image open, click the Colors icon. The image displays on the left side of the screen. There is a preview window to show adjustments as they are made.
  2. Change the color of the image with the slider bar (move the bar to the far left side for more Blue –180 and the far right side for more Green +180).
  3. Adjust the color saturation of your image with the slider bar (far left is –100 and far right is +100).
  4. Click OK to accept the changes.
    Click Reset to return the image back to its original size.
    Click Cancel to discard all changes.
Using the Brightness icon
Figure : Brightness/Contrast menu
Adjusting the brightness of the image.
  1. With an image open, click the Brightness icon. The image displays on the left side of the screen. There is a preview window to show adjustments as they are made.
  2. Below the preview window is a Slider Bar for Brightness (move to the far left is –100 and to the right is +100).
  3. Next is a Slider Bar for Contrast (move to the far left is –100 and to the right is +100).
  4. Click OK to accept the changes.
    Click Reset to return the image back to its original size.
    Click Cancel to discard all changes.
Using the Sharpen icon
Figure : Adjust Sharpness menu
Adjusting the sharpness of an image
  1. With an image open, click the Sharpen icon. The image displays on the left side of the screen. There is a preview window to show adjustments as they are made.
  2. Using the Slider Bar for Sharpness, move to the left for –100 and to the right for +100).
  3. Click OK to accept the changes.
    Click Reset to return the image back to its original size.
    Click Cancel to discard all changes.
Using the Red eye icon
Figure : Remove Red Eye menu
Removing red eye for the image.
  1. With an image open, click the Red Eye icon. On the left side of the window are options to make adjustments for Darker or Lighter to remove red eye on a specified location in the image.
  2. There is a Darker/Lighter Slider Bar for more control. After making adjustment on the slider bar, left click the "red eye" in the image to make the edit.
  3. After making the edits, click OK to accept the changes.
    Click Undo to undo any changes.
    Click Cancel to close the Red Eye Edit Screen without saving any changes.
Using the Add Title icon
Figure : Add Title menu
Adding a title to the image.
  1. With an image open, click the Add Title icon. On the left side of the window are options to add text to an image (the text is updated on the right side image for preview).
  2. Click in the white Add Title box and type the desired text.
  3. Use the Font and Color buttons to adjust the color and style of the typed text.
  4. The Circle in the center of the navigational arrows places the text in the center of the image.
    • Click the arrow that points up to place the text at the top of the image.
    • Click the arrow that points right to place the text at the right side of the image.
    • Click the arrow that points down to place the text at the bottom of the image.
    • Click the arrow that points left to place the text at the left side of the image.
    • Use the buttons with the letter A in them to change the characteristics of the type text.
  5. Click OK to accept the changes.
    Click Reset to return the image back to its original size.
    Click Cancel to discard all changes.
Using the File Menu
Figure : File menu
Using the items under the File menu.
  • Clicking Open allows opening an image from a file.
  • Clicking Close closes the current open window.
  • Clicking Save saves the current file.
  • Clicking Save As saves the current image as a different file, leaving the original file unchanged.
  • Clicking Print Setup allows changes to be made in the printers properties.
  • Clicking Print Preview viewing the image before it is printed.
  • Clicking Print opens the printer properties pages and allows printing.
  • Clicking Exit closes the Image Editor application.
Using the Edit Menu
Figure : Edit menu
Using the items under the Edit menu.
  • Clicking Undo cancels the last change made to an image.
  • Clicking Cut removes a selected area and copies it to the clipboard.
  • Clicking Copy copies a selected area and places it on the clipboard, leaving the original image unchanged.
  • Clicking Paste places the item copied to the clipboard onto the image.
  • Clicking Crop allows the selection of a specific area in an area to be selected. The remainder of the image is discarded.
  • Clicking Delete deletes the selected area.
  • Clicking Select All selects the entire image along with any text or edits made to the image.
  • Clicking Select Area allows the selection a specific area in the image to edit.
  • Clicking Select Object this option allows changes to the entire image.
Using the View Menu
Figure : View menu
Using the items under the View menu.
  • Clicking Zoom in zooms in on the image.
  • Clicking Zoom out zooms out from the image.
  • Clicking Next page changes the view to the next page when working with multiple files.
  • Clicking Previous page changes the view to the previous page when working with multiple files.
  • Clicking Annotation Toolbar displays the annotation toolbar on the right side of the Editor Window.
  • Clicking Main Toolbars displays the Main Toolbars on the Editor Window.
  • Clicking Status Bar displays the status on the bottom of the Editor Window.
  • The Thumbnails view is not available here (it is used to view the details/thumbnails etc.).
  • Clicking Image Properties displays all information available about the selected image, such as size, dimensions, and dpi.
Using the Image Menu
Figure : Image menu
Using the items under the Image menu.
  • Clicking Rotate allows the rotation of the image.
  • Clicking Resize allows changing the physical dimensions of the image.
  • Clicking Adjust Color allows adjusting the colors in the image.
  • Clicking Adjust Brightness/Contrast allows changing the brightness of an image.
  • Clicking Adjust Sharpness allows changing the sharpness of an image.
  • Clicking Remove Red Eye removes red eye from subjects in an image.
  • Clicking Add Title allows adding text to an image.
  • Clicking Flip Right to Left flips the image right to left.
  • Clicking Flip Top to Bottom flips the image top to bottom.
  • Clicking Black and White Deskew straightens a slanted image containing text by +/- 15°. If Deskew does not work properly for the image, try rotating the image manually with the Rotate Tool.
Using the Annotate Menu
Figure : Annotate Menu
Using the items under the Annotate menu.
  • Clicking Sticky Note places a sticky note on the image.
  • Clicking Text allows placing text on the image.
  • Clicking Highlight allows highlighting parts of an image.
  • Clicking Line places a line in a specific location on the image.
  • Clicking Rectangle places a rectangle in a specific location on the image.
  • Clicking Bitmap places a bitmap image in a specific location over the image.
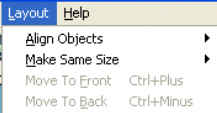
Using the Layout Menu
Figure : Layout Menu
Using the items under the Layout menu.
  • Clicking Align Objects aligns all the objects.
  • Clicking Make Same Size allows making all edits the same size on the image.
  • Clicking Move To Front brings the selected item forward (super imposed over the top of what is already there).
  • Clicking Move To Back moves the selected item behind the image.
Using the Help Menu
Figure : Help menu
Using the items under the Help menu.
  • Clicking Help Topics opens the help file allowing searches through the index tab for a specific question or browsing through the contents of the help files.
  • Clicking About HP Image Editor displays the version and available information about the version of HP Image Editor in use.