This document is for HP Ink Tank 115, 116, 118, and 119 printers.
HP Ink Tank 110 Printers - Color or Black Ink Not Printing, Other Print Quality Issues
The quality of a printed document or photo is not as expected. The procedures in this document should help with streaked or faded printouts, color or black ink not printing, documents with blurred or fuzzy text, ink streaks or smears, and other print quality problems.
caution:While performing the following steps, do not lift the printhead latch.
Step 1: Use genuine HP printheads and ink
HP recommends that you use genuine HP ink. HP cannot guarantee the quality or reliability of non-HP ink. If you do not use genuine HP ink and HP printheads, the steps in this document might not resolve print quality issues.
note:Using non-HP ink contaminates any genuine HP ink added later. Because ink remains in the printhead when the ink is changed, the contaminated ink can remain in the system and affect print quality.
Purchase replacement ink and other supplies from the HP Store or local retailers.
|
Ink Bottle
|
Product Number
|
|
Black GT51
|
M0H57A
|
|
Black GT51XL
|
X4E40A
1VU32A
|
|
Cyan GT52
|
M0H54A
|
|
Magenta GT52
|
M0H55A
|
|
Yellow GT52
|
M0H56A
|
If you are using genuine HP printheads and ink, continue to the next step.
Step 2: Check the ink levels
Low ink levels can impact print quality.
caution:Damage to the printer as a result of improperly filling the ink tanks or using non-HP ink is not covered under warranty.
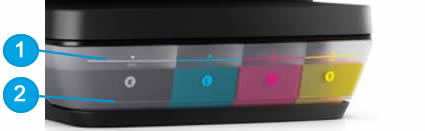
Visually check the printer ink levels using the ink tank window.
-
Look at the ink levels through the ink tank windows.
-
Make sure the ink stays between the maximum and minimum fill lines.
caution:When the ink level falls below the minimum line, refill the ink tank. Low ink tanks can affect print quality.Do not fill the ink tanks over the maximum fill line. Overfilling the ink tanks can cause ink leakage.
-
Maximum fill line
-
Minimum fill line
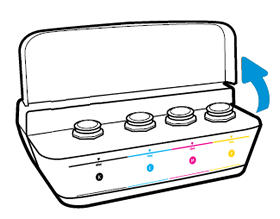
Step 3: Refill any low or empty ink tanks
Add ink to any of the tanks where the level is below or close the minimum fill line.
-
Open the ink tank lid.
-
Remove the plug from the ink tank you are refilling.
caution:
There might be ink on the underside of the plug. Place the plug upright to avoid ink transfer.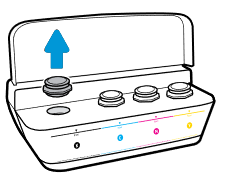
-
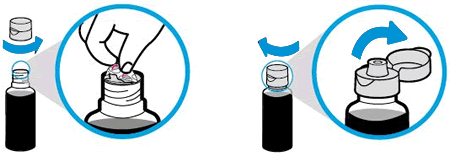
Remove the cap from the ink bottle, pull the seal tab off, replace the cap, and then flip open the lid.
-
Hold the ink bottle on the tank spout, gently push down, and then let the ink drain into the ink tank. Fill the ink tank to just below the maximum fill line on the tank.If the bottle does not start draining, remove and reinsert the bottle onto the tank spout.
caution:
Do not squeeze the bottle, and do not overfill the ink tank.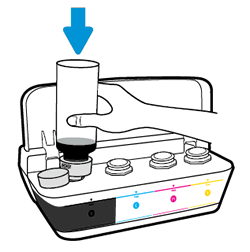
-
After the ink tank is filled, pull the ink bottle straight up. Close the lid and sent the bottle upright.
-
Push the ink tank plug into its slot on the ink tank.
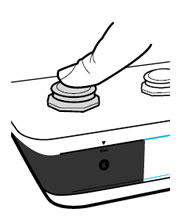 Make sure the ink tank plugs are pressed firmly into place.
 -
Repeat the previous steps to fill any other low or empty ink tanks.
caution:
Store any bottle with remaining ink in a cool, dry place for later use. -
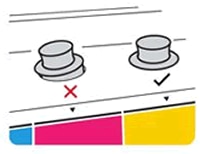
Make sure all ink tank plugs are pressed firmly into place.
-
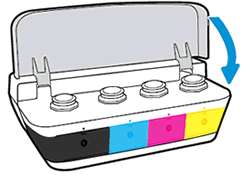
Close the ink tank lid.
Step 4: Make sure you are using the appropriate paper for your print job
Use the following guidelines to make sure the paper you are using is appropriate for the print job. If it is not, reload the printer with an appropriate paper type.
-
Load the paper print side down in the input tray. Many papers have printing and nonprinting sides, such as photo paper and envelopes. Usually, the smoother side is the "print side," and sometimes the non-print side has a logo of the paper manufacturer on it.
-
Do not use wrinkled or curled paper. Use only clean, wrinkle-free paper.
-
Use the correct paper type for your project.
-
For everyday text documents, plain paper with ColorLok technology works well. Paper with ColorLok technology is industry-standard paper that works well with HP ink.
-
For documents with dense printing, such as high contrast graphics or photos, use HP Advanced Photo Paper for best results.
-
Some paper might not absorb ink as well as others. If your prints smear easily, make sure you are using a recommended paper.
-
-
Store photo paper in its original packaging inside a resealable plastic bag. Store the paper on a flat surface in a cool, dry place. Load 10-20 sheets of photo paper only when you are ready to print, and then put the unused paper back in the packaging.
-
Try using a different paper. This determines if the problem is related to the paper.

After checking the paper, try to print again. If the print quality is unacceptable, continue to the next step.
Step 5: Check the print settings
Check the print settings to make sure they are appropriate for your print job.
note:Print settings vary by operating system and software application.
Try to print again. If the print quality is unacceptable, continue to the next step.
Step 6: Check for ink smears on the back of printouts
If there are smears of ink on the back of your printouts, use an automated tool to resolve the issue.
-
Load plain white paper into the input tray.
-
Press and hold the Power button
 , press the Cancel button
  3 times, press the Resume button
  8 times, and then release the Power button .
The printer feeds one page slowly.
8 times, and then release the Power button .
The printer feeds one page slowly. -
Wait until the page ejects from the printer before you remove it.
-
Examine the ejected page. There should not be any ink on either side.
-
If there are ink smears on the test page, wait 30 minutes and then repeat these steps.
Try to print again. If the print quality is unacceptable, continue to the next step.
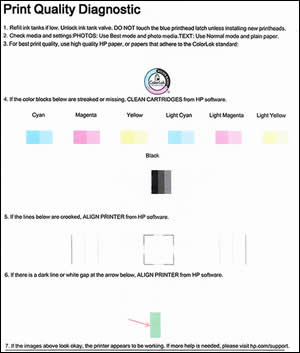
Step 7: Print a Print Quality Diagnostic page
To resolve many print quality issues, print a Print Quality Diagnostic page, and then evaluate the results.
caution:To protect the printheads from drying out, always turn the printer off using the Power button, and wait until the Power button light goes out before unplugging the printer.
-
Press and hold the Cancel button for 3 seconds, and then press the Power button once.
A Print Quality Diagnostic page prints.
-
Review the Cyan, Magenta, Yellow, and Black boxes, checking for missing colors, fading, and white lines.
-
If the color blocks do not show white lines, and are not faded or missing, the printer is working correctly. Check for image resolution problems, application errors, or other issues that might affect the printout.
-
If any of the color blocks show white lines, are faded, or are missing completely, continue to the next step.
-
Step 8: Use the HP Software to clean the printheads
HP provides an automated printhead cleaning utility that can unclog printhead nozzles.
caution:Clean the printheads only when necessary. Unnecessary cleaning shortens the life of the printheads and wastes ink.
Clean the printheads (Windows)
Clean the printheads using the HP software, and then evaluate the results.
-
Search Windows for HP, and then click your printer name from the list of results.HP Printer Assistant opens.
-
On the HP Printer Assistant window, click Maintain Your Printer.
-
Click the Device Services tab, and then click Clean Cartridges
 .
A Print Quality Diagnostic page prints.
.
A Print Quality Diagnostic page prints.
-
Examine the Print Quality Diagnostic page.
-
If the print quality is acceptable, click Done. You can stop troubleshooting.
-
If the print quality is unacceptable, click Second-level Clean when prompted to continue the next level of cleaning.
note:
If the printheads are badly clogged, it might require another cleaning cycle. If so, wait 30 minutes before you perform both levels of cleaning again.
-
Clean the printheads in (Mac)
Clean the printheads using the HP software for macOS and OS X, and then evaluate the results.
-
Search the Mac for Print, and then click Printers & Scanners in the list of results.
-
Click the name of your printer, and then click Open Print Queue.
-
Click Printer Setup or Settings, click Utility, and then click Open Printer Utility.
-
Click Clean Printheads.
-
Once the cleaning cycle completes, click Print.A Print Quality Diagnostic page prints.
-
Examine the Print Quality Diagnostic page.
-
If the print quality is acceptable, click Done. You can stop troubleshooting.
-
If the print quality is unacceptable, click Second-level Clean when prompted to continue the next level of cleaning.
note:
If the printheads are badly clogged, it might require another cleaning cycle. If so, wait 30 minutes before you perform both levels of cleaning again.
-
If the print quality is unacceptable, continue to the next step.
Step 9: Align the printheads using the HP software
Use the HP printer software to align the printheads.
Align the printheads (Windows)
Align the printer from the HP software.
-
Search Window for HP, and then click your printer name from the list of results.HP Printer Assistant opens.
-
On the HP Printer Assistant window, click Maintain Your Printer.
-
Click the Device Services tab, and then click Align Cartridges
 .
The printer prints an alignment page and an alignment window opens.
.
The printer prints an alignment page and an alignment window opens.
-
Follow the on-screen instructions to complete the alignment, and then click Done.
-
Recycle or discard the alignment page.
Try to print again. If the print quality is unacceptable, continue to the next step.
Align the printheads (Mac)
Align the printer in macOS or OS X.
-
Search the Mac for Print, and then click Printers & Scanners in the list of results.
-
Click the name of your printer, and then click Open Print Queue.
-
Click Printer Setup or Settings, click Utility, and then click Open Printer Utility.
-
Click Align.The printer prints an alignment page and an alignment window opens.
-
Follow the on-screen instructions to complete the alignment, and then click Done.
-
Recycle or discard the alignment page.
Try to print again. If the print quality is unacceptable, continue to the next step.
Step 10: Replace the printheads
If you have followed all the steps in this document and your printer is producing printouts with print quality issues, you might need to replace a defective printhead.
Contact HP Support to replace a printhead. If you already have a new replacement printhead available, go to Replacing Printheads for more information.
Step 11: Service the printer
Service or replace your HP product if the issue persists after completing all the preceding steps.
Go to Contact HP Customer Support to schedule a product repair or replacement. If you are in Asia Pacific, you will be directed to a local service center in your area.
To confirm your warranty status, go to HP Product Warranty Check. Repair fees might apply for out-of-warranty products.
Enter a topic to search our knowledge library
What can we help you with?

Need Help?