The following information describes how to load paper into the optional 2 x 550-sheet paper trays. These trays hold up to 550 sheets of 75 g/m2 paper.
note:The procedure to load paper for Tray 4 is the same as for Tray 3. Only Tray 3 is shown here.
note:The paper guides may be locked before use and may not be adjustable.
caution:Do not extend more than one paper tray at a time.

How to Load Paper to the 2x550-Sheet Tray for the HP Color LaserJet Enterprise M751, M856, MFP M776, and Managed E75245, E85055 Printers
No audio. Learn how to load paper to the 2x550-sheet tray for the HP Color LaserJet Enterprise M751, M856, MFP M776, and Managed E75245, E85055 Printers.
-
Open the tray.
note:
Do not open this tray while the printer is printing.Figure : Open the tray
-
Before loading paper, adjust the paper-width guides by squeezing the blue adjustment latches and sliding the guides to the size of the paper being used.Figure : Adjust the guides

-
Adjust the paper-length guide by squeezing the adjustment latch and sliding the guide to the size of the paper being used.Figure : Adjust the guides

-
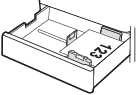
For any of the following paper sizes, also adjust the blue paper-stop lever in the left rear corner of the tray to the correct position, as indicated by the label in the tray:
-
12 x 18
-
RA3
-
11 x 17
-
A3
-
SRA3
Figure : Adjust paper stop lever
-
-
Load paper into the tray. For information about how to orient the paper, see 2 x 550-sheet paper tray paper orientation.
note:
To prevent jams, do not overfill the tray. Be sure that the top of the stack is below the tray full indicator.Figure : Load paper
-
Check the paper to verify the guides lightly touch the stack, but do not bend it.
note:
Do not adjust the paper guides tightly against the paper stack. Adjust them to the indentations or markings in the tray.Figure : Check paper guides
-
Close the tray.Figure : Close the tray

-
The tray configuration message displays on the printer control panel.
-
Press the OK button to accept the detected type and size, or select Modify to choose a different paper size or type.For custom-size paper, specify the X and Y dimensions for the paper when the prompt displays on the printer control panel.Figure : X and Y dimensions