At times, it is necessary to ship an Intermediate Transfer Belt (ITB) that has been used in a printer for a period of time. Most often, this is because HP has requested the part be returned for evaluation. For the CP5225 and CP5525 models, waste toner is collected inside the ITB first and then moved into the Toner Collection Unit. Prior to shipping an ITB, it is important to follow some steps to remove as much of the waste toner remaining in the ITB as possible to avoid this toner spilling inside the shipping box.
This document provides specific steps to follow prior to shipping an ITB to remove the waste toner. Please ensure all steps are followed.
ITB Preparation Instructions
-
Power on the device.
-
Temporarily remove the four print cartridges. Cover the cartridges with a sheet of paper to avoid excessive light exposure – taking care not to damage the green photosensitive drums.
-
Leave the front door open.
-
Perform the following steps to remove the ITB:
-
Open the upper right door of the device.
-
Use both hands to grasp the blue levers (callout 1), apply slight downward pressure, and pull the ITB toward you at a downward angle.
-
Blue levers
Figure : Removing the ITB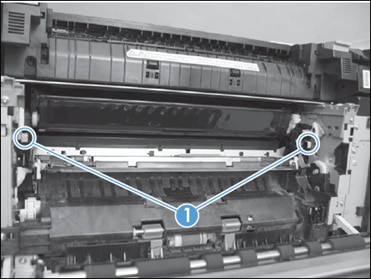
-
-
Pull the ITB out of the product until two large handles expand along the right and left sides.Figure : Pulling the ITB out of the product

-
Grasp the large handles on the ITB, pull it straight out of the product until it stops, and then pull up to remove it from the product.Figure : Removing ITB from the product

-
-
Spread out a few sheets of paper on a flat surface to collect the small amount of waste toner that may fall from the ITB.
-
Gently set the ITB vertically on these sheets of paper as shown below (with the handles up). Grasp the ITB by the two blue handles at the top. Lift the ITB and very lightly tap the end opposite the handles (the cleaning section) on the paper about 10 times. This will cause the waste toner to collect around the auger in the cleaning section. This waste toner will be removed when the ITB is reinstalled.Figure : Removing the waste toner

-
Perform the following steps to reinstall the ITB:
-
Grasp the large blue handles along the sides of the ITB and carefully position it in the product using the guides inside the product.Figure : Positioning the ITB

-
Push the ITB into the product until the large blue handles retract.Figure : Pushing the ITB into the product

-
Grasp the small blue handles at the end of the ITB (callout 1) and push the ITB into the product until it firmly sits in place.Figure : Pushing the ITB into the product

-
-
This will activate the Checking Printer sequence (the printer control panel will display Checking Printer). Wait until the printer motor noises stop and the Install Supplies message is displayed on the control panel (about 30-45 seconds).
-
Open and close the front door to activate the Checking Printer sequence again.
-
Wait until the printer motor noises stop and the Install Supplies message is displayed (about 30-45 seconds).
-
Repeat steps 9-10 one more time (for a total of three Checking Printer sequences).
-
Repeat steps 4–10 two more times (for a total of three times removing/tapping/replacing the ITB).
-
Place the ITB in a plastic bag big enough to hold it and tape the bag closed.
-
If a replacement ITB is on hand, place the used ITB in the same packaging as the replacement ITB. If a replacement ITB is not available yet, wrap the used ITB in several layers of bubble wrap and package it in a box. Push bubble wrap into the spaces around the ITB to provide extra padding and to avoid shifting of the ITB inside the package.
