note:
Samsung Laser Printers - Using Samsung Easy Printer Manager
Samsung Easy Printer Manager is an application that combines Samsung printer settings into one location. Samsung Easy Printer Manager combines device settings, as well as printing environments, settings/actions, and launching. All of these features provide a gateway to conveniently use your Samsung printer. Samsung Easy Printer Manager provides two different user interfaces for the user to choose from: the basic user interface, and the advanced user interface. Just click a button to switch between the two interfaces.
Understanding Samsung Easy Printer Manager
To open the program:
For Windows,
Select Start > Programs or All Programs > Samsung Printers > Samsung Easy Printer Manager.
-
For Windows 8From the Charms, select Search > Apps > Samsung Printers > Samsung Easy Printer Manager.
-
For Windows 10 / Windows Server 2016In the task bar, type in Samsung Printers in the Search input area. Press the Enter key, and then select Samsung Easy Printer Manager.ORFrom the Start
 icon, select All apps > Samsung Printers > Samsung Easy Printer Manager.
For Mac,
Open the Applications folder > Samsung folder > Samsung Easy Printer Manager.
note:The screenshot shown may be different, depending on operating system you are using.
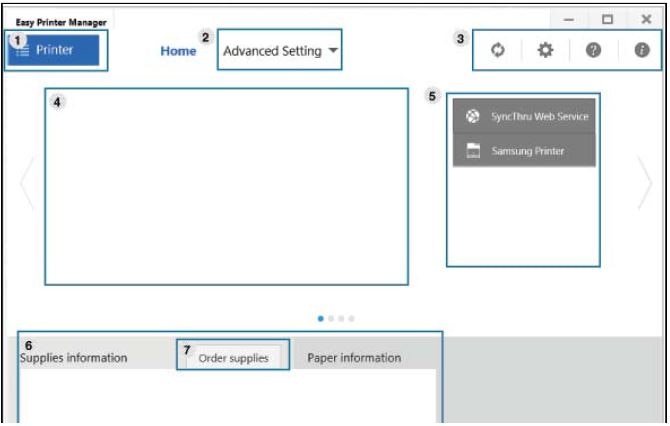
The Samsung Easy Printer Manager interface is comprised of various basic sections as described in the following table:
|
1
|
Printer List
|
The printer list displays printers installed on your computer and network printers added by network discovery (Windows only).
|
|
2
|
Advanced Settings
|
The advanced user interface is intended to be used by the person responsible for managing the network and the printers.
note:
|
|
3
|
Application Information
|
Includes links for changing to the refresh, preference setting, help, and about.
|
|
4
|
Printer Information
|
This area gives you general information about your printer. You can check information, such as the printer's model name, IP address (or Port name), and printer status.
note: |
|
5
|
Quick Links
|
Displays Quick Links to printer specific functions. This section also includes links to applications in the advanced settings.
note: |
|
6
|
Contents area
|
Displays information about the selected printer, remaining toner level, and paper. The information will vary based on the printer selected. Some printers do not have this feature.
|
|
7
|
Order supplies
|
Click on the Order button from the supply ordering window. You can order replacement toner cartridge(s) from online.
|
Enter a topic to search our knowledge library
What can we help you with?

Need Help?