Steps to set up the printer.
HP Photosmart C4600 All-in-One Printer Series - Setting up the All-in-One (Hardware)
Setting up the All-in-One
Step one: Unpack the All-in-One
-
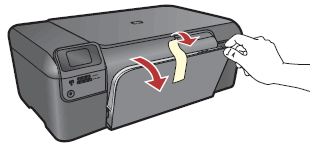
Lower both the paper tray and the cartridge door.Figure : Lower the paper tray
-
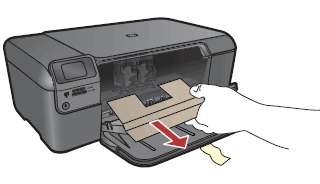
Remove all packing material and protective film from the product.Figure : Remove the packing material
-
Close the cartridge door.Figure : Close cartridge door

Step two: Check the contents of the box
The contents might vary by country/region. See the packaging for a list of items shipped in the box.
Step three: Connect the power cord and adapter
note:Do not connect the USB cable.
-
Connect the power adapter to the back of the product.
-
Connect the power cord to the power adapter.
-
Connect the other end of the power cord to an alternating current (AC) power outlet.
Figure : Connect the power cord and adapter

Step four: Turn on power
Press the Power button ( ) to turn on the
product.
) to turn on the
product.
) to turn on the
product.
Figure : Press Power

Tip: If the product does not turn on, it might be in sleep mode. To resolve, disconnect and then reconnect the power cord from the back of the product.
Step five: Select the language/region
Follow the instructions on the control panel display to set the default language and country/region for the product.
-
Press the colored buttons to the left of the display to select the up arrow (
 ) or down arrow (
 ) icons on the display until your language is selected.
-
Press OK to confirm.
-
Press the colored buttons to the left of the display to select the up arrow () or down arrow () icons on the display until your country/region is selected.
-
Press OK to confirm.
Step six: Install the cartridges
Leave the product turned on and follow these steps to install the cartridges.
-
Open the cartridge door. Make sure the carriage moves to the center. If it does not move to the center, turn the product off, and then turn it back on again.Figure : Open the cartridge door

-
Remove the cartridges from their packaging, and then remove the pink protective tape from both cartridges.
caution:
Do not touch the copper-colored contacts or re-tape the cartridges.Figure : Remove the pink tape Figure : Do not touch contacts
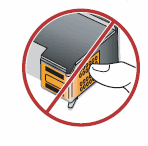
-
Hold the cartridges with the label on top.Figure : label on top

-
Insert the tri-color cartridge into the left carriage slot and insert the black cartridge into the right carriage slot.Figure : Tri-color cartridge in the left slot

-
Press the cartridges firmly into the carriage until they snap into place.Figure : Insert cartridges until they snap into place

-
Close the cartridge door.Figure : Close cartridge door

-
Press OK to confirm the installation of genuine HP cartridges, when prompted.
Step seven: Load plain paper

-
Pull out the tray extender, and then flip open the paper catch.Figure : Pull out tray extender

-
Load paper in the input tray with the short edge forward and the print side down. Slide the stack forward until it stops.Figure : Load paper

note:
Make sure all the paper in the stack is the same size and type and free from rips, dust, wrinkles, and curled or bent edges. -
Slide the paper-width guide inward until it stops at the edge of the paper.
-
Press OK.
Step eight: Align the cartridges
When you install a new cartridge, the product aligns the cartridges. You can also align the cartridges at any time using the product software. Aligning the cartridges helps produce high quality output.
-
Follow the instructions on the control panel display to print the alignment page.Figure : Alignment page prints

-
Lift the lid.
-
Load the alignment page face down in the front right corner of the glass.Figure : Load alignment page

-
Close the lid, and then press OK to complete the alignment.
Enter a topic to search our knowledge library
What can we help you with?

Need Help?