note:This document does not apply to HP PageWide printer models that end in a "+" symbol.
Follow these steps to install the optional 550-sheet paper tray (part number A7W99A).
-
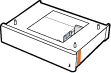
Take the new accessory tray out of the box, and make sure it matches this illustration.Figure : Verify contents of box
-
Remove any packaging material and exterior tape.
note:
HP recommends recycling packing materials whenever possible.Figure : Remove tape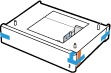
-
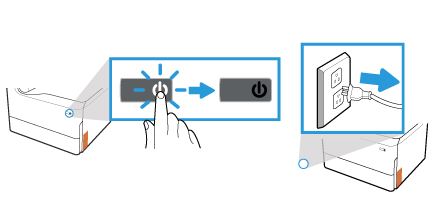
Press the Power button to turn off the printer and then disconnect the power cord.Figure : Turn off power and unplug
-
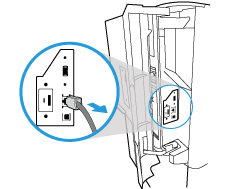
Disconnect the USB or network cable.Figure : Disconnect USB or network cable
-
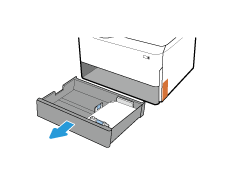
Open Tray 2 and remove it completely from the printer.Figure : Remove Tray 2
-
Place the accessory tray on a stable surface, and note where the alignment pins are located.Figure : Alignment pins

-
Lift and place the printer on top of the accessory tray, using the alignment pins on top of the tray to position the printer. Note that both the printer tray (Tray 2) and the accessory tray will open in the same direction when assembly is complete.
caution:
Check the weight of your printer in the following table before attempting to lift it.Printer ModelsWeight kg (lb)Recommended minimum people to lift765, P75250dn45.6 kg (100.5 lb)2E75160dn, E77650dn, E77650z, E77660dn, E77660z66.1 kg (145.7 lb)3P77940dn, P77950dn, P77960dn66.6 kg (146.5 lb)3P77440dn66.8 kg (146.9 lb)3785f, 780dn69.1 kg (152 lb)3P77940dns, P77950dns, P77960dns82.5 kg (181.5 lb)4780dns, E77650dns, E77660dns, E77650zs, E77660zts, E77660zs85.1 kg (187.3 lb)4785zs85.2 (187.8 lb)4Figure : Lower printer onto accessory tray
-
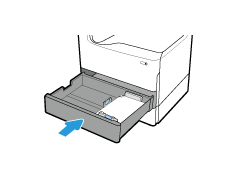
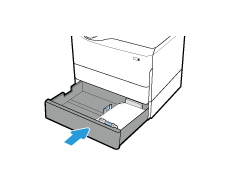
Insert Tray 2 back into the printer, and close the tray.Figure : Insert Tray 2
-
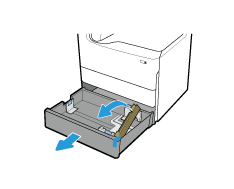
Open the accessory tray and remove the shipping restraint.Figure : Remove shipping restraint from accessory tray
-
Load paper into the accessory tray:
-
Adjust the paper-width and paper-length guides by squeezing the blue adjustment latches and sliding the guides to the size of paper being used.
-
Load paper into the tray.
-
Adjust the paper guides so that they lightly touch the edge of the paper stack.
Figure : Load paper
-
-
Remove the tray number cube from the back side of the accessory tray face plate, and reinsert it with the correct number facing outward.
note:
The number you need depends on your printer model and whether there any previously installed accessory trays. The bottom tray that is part of the original printer is always Tray 2. Check the packet of tray number cubes that came in the box for additional numbers.Figure : Example tray number configurations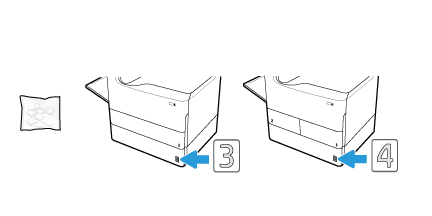
-
Close the accessory tray.Figure : Close the tray
-
Reconnect the power cord and press the Power button to turn on the printer.Figure : Reconnect power and turn on

-
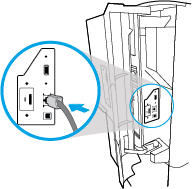
Reconnect the USB or network cable.Figure : Reconnect the USB or network cable
-
Configure the accessory: If you attached the accessory before installing the printer software, it is configured during the initial software installation. If you attached the accessory after installing the printer software, use the following steps to configure the accessory.macOS: The list of installed options should automatically update during the first print job after installing the accessory. If not, perform the following steps:
-
From the Apple
 menu, click System Preferences.
-
Select Print & Scan (or Printers & Scanners).
-
Select the printer, click Options & Supplies, and then click the Options tab.
-
Manually configure the accessory.
Windows® 8.0, 8.1 and 10: When attaching the accessory after installing the printer software, perform the following steps:-
Windows® 8.0 and 8.1: Scroll to the bottom-left corner of the screen, and right-click the window that displays.Windows® 10: Right-click the Start button in the lower-left corner of the open desktop.
-
Select Control Panel. Under Hardware and Sound, select View devices and printers.
-
Right-click the name of the printer, and then select Printer Properties.
-
Click the Device Settings tab.
-
Update the installed options. The steps vary according to connection type and print driver:
-
Network or USB connections with the HP Universal Print Driver (UPD): Select Update Now in the Installable Options section under Automatic Configuration.
-
Network or USB connections with the HP PCL 6 print driver: Select Update Now.
-
Network or USB connections with the HP PCL-6 version 4 print driver: Manually install the accessory by clicking the drop-down menu next to the tray to be installed. Select Installed.
-
Windows® 7: When attaching the accessory after installing the printer software, perform the following steps:-
Make sure the printer is turned on and connected to the computer or network.
-
Open the Windows Start menu, and then click Devices and Printers.
-
Right-click the name of the printer, and select Printer Properties.
-
Click the Device Settings tab.
-
Update the installed options. The steps vary according to connection type and print driver:
-
Network or USB connections with the HP Universal Print Driver (UPD): Select Update Now in the Installable Options section under Automatic Configuration.
-
Network or USB connections with the HP PCL 6 print driver: Select Update Now.
-
Windows® XP and Windows Vista®: When attaching the accessory after installing the printer software, perform the following steps:-
Make sure the printer is turned on and connected to the computer or network.
-
Open the Windows Start menu, and then click Devices and Printers (or Printers and Faxes for XP).
-
Right-click the name of the printer, and select Printer Properties (or Properties for XP).
-
Click the Device Settings tab.
-
Click the Installable Options section.
-
To update the installed options for a Network or USB connection, in the drop-down menu next to Automatic Configuration, select Update Now.
-
