solution Contentsolution Content

Samsung ProXpress Color SL-C4010, SL-C4012 - Replacing the Toner Cartridge

This document explains how to replace the toner cartridge.
The printer uses four colors and has a different toner cartridge for each color: yellow (Y), magenta (M), cyan (C), and black (K).
  • The status LED and the toner-related message on the display indicate when each individual toner cartridges should be replaced.
  • The computer's Samsung Printing Status program window appears on the computer and displays which color cartridge is empty on toner, see Using Samsung Printer Status.
Check the type of the toner cartridge for your machine, see Available supplies.
note:
  • Shake the toner cartridge thoroughly, it will increase the initial print quality.
  • Illustrations on this user’s guide might differ from your printer depending on its options or models. Check your printer type.
  caution:
  • To prevent damage to the toner cartridge, do not expose it to light for more than a few minutes. Cover it with a piece of paper, if necessary.
  • Do not touch the green area of the toner cartridge. Use the handle on the cartridge to avoid touching this area.
  • Do not use sharp objects such as a knife or scissors to open the toner cartridge package. They might scratch the drum of the cartridge.
  • If toner gets on your clothing, wipe it off with a dry cloth and wash clothing in cold water. Hot water sets toner into fabric.

Replacing the toner cartridge

Use these steps to replace the toner cartridge.
  1. Open the front door.
    Figure : Example of opening the front door
  2. Carefully grab the toner cartridge handle, and then gently pull out the toner tray.
    Figure : Example of removing the toner tray by the handle
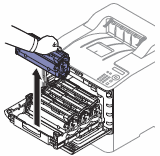
  3. Remove the desired toner cartridge by lifting straight up.
    Figure : Example of removing the desired toner cartridge
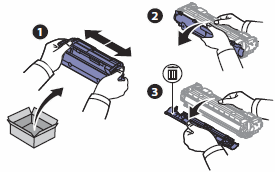
  4. Remove the new toner cartridge from the box (1). Remove all packaging materials from the new toner cartridge (2). Remove the protective plastic tab from toner cartridge before installing the new toner cartridge (3).
      Figure : Removing all packaging from new toner cartridge
    1. Remove new toner cartridge from box
    2. Remove packaging materials
    3. Remove protective plastic tab
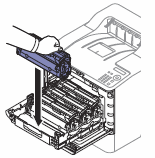
  5. Replace toner cartridge back into the toner tray.
    Figure : Replacing toner cartridge into toner tray
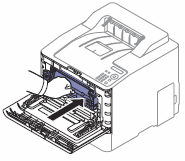
  6. Push the toner tray back into the printer.
    Figure : Example of pushing the toner tray back into the printer
  7. Close the front door.
    Figure : Example of closing the front door