solution Contentsolution Content

HP OfficeJet 6900 Printers - First Time Printer Setup

This document is for HP OfficeJet 6950, 6951, 6954, 6956, 6958, 6962 and OfficeJet Pro 6960, 6968, 6970, 6974, 6975, and 6978 All-in-One printers.
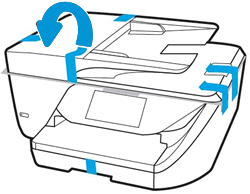
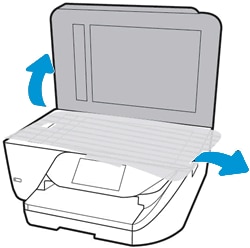
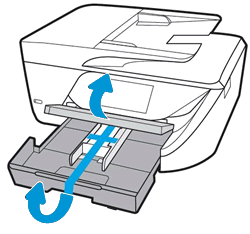
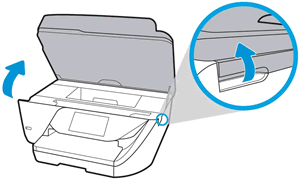
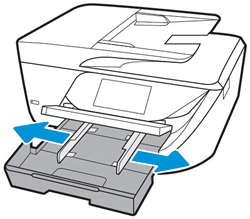
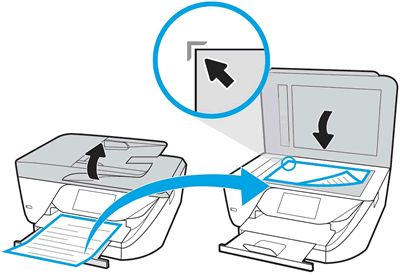
To start using your printer, remove it from the packaging, complete the setup steps, and then install the printer software.
note:
If you are looking for the printer software, go to: 123.hp.com

Step 1: Remove the printer from the box

Remove the printer from the box and all tape, stickers, and packing materials from the printer.
  1. Remove the printer from the box.
  2. Remove all tape and packing materials from the outside of the printer, and then remove the sticker from the printer control panel.
    Removing tape from the printer
  3. Lift the scanner lid, remove the packing material, and then close the lid.
    Removing packing materials from under the scanner lid
  4. Lift the output tray, pull the input tray toward you to open it, and then remove the packing material.
    Opening the input tray and removing the tape.
  5. Push the input tray forward until it snaps into place, and then lower the output tray.
  6. Recycle the packing materials.

Step 2: Connect the power cord and set your preferences

Plug the printer into a power source, turn on the printer, and then set your preferences.
note:
Do not connect a USB cable at this time. The connection to the computer is established during software installation.
  1. Connect the power cord to the rear of the printer, and then plug the other end of the power cord into an electrical outlet.
    Connecting the power cord
  2. Turn on the printer.
  3. To set your preferences on the printer control panel, touch your preferred language and country/region, and then touch Yes to confirm your choice.
  4. If prompted, select the date and time, and then touch Yes to confirm your choice.

Step 3: Install the ink cartridges

Install the SETUP ink cartridges that came in the box with your printer.
  caution:
Failure to install the SETUP cartridges that came with the printer causes a cartridge error.
  1. Raise the ink cartridge access door until it locks into place.
    Opening the ink cartridge access door
  2. Wait until the carriage is idle and silent before you proceed.
  3. Remove the packing material from the carriage.
    Removing the packing material from the carriage
  4. Remove an ink cartridge from its package, and then pull the orange pull-tab straight back.
      caution:
    Make sure that you remove the orange pull-tab and plastic wrap completely before you remove the orange cap in the next step. Otherwise, ink might leak from the ink cartridge. When you remove the plastic wrap, the paper label on the top of the ink cartridge tears slightly, which is necessary to properly vent the ink cartridge.
      Pulling the orange tab on the wrapper straight back
  5. Hold the ink cartridge by its sides, and then twist the protective orange cap counter-clockwise to snap it off the ink cartridge.
     Twisting the orange cap to snap it off the cartridge
      caution:
    Do not touch the copper-colored contacts or the ink nozzles. Touching these parts can result in clogs, ink failure, and bad electrical connections.
  6. Turn the ink cartridge so that the ink cartridge contacts face downward, and then match the label color with the color dot on the carriage.
  7. Slide the ink cartridge into its slot, and then gently press the ink cartridge down until it snaps into place.
    Installing the ink cartridges
  8. Repeat these steps to install all the new ink cartridges.
  9. Close the ink cartridge access door.

Step 4: Load paper into the input tray

Load plain paper in the input tray after you install the ink cartridges.
  1. Lift the output tray, and then pull the input tray toward you to open it.
    Opening the input tray
  2. Slide the paper-width guide to its outermost position.
    Adjusting the paper-width guides
  3. Load a stack of plain paper into the input tray.
      caution:
    To avoid printing issues, never load multiple types of paper in the paper tray or attempt to load paper while the printer is printing.
    Loading paper in the input tray
  4. Push the stack into the tray until it stops.
  5. Slide the paper-width guide until it rests against the edges of the paper.
    Sliding in the paper-width guides, then closing the input tray.
  6. Push the input tray forward until it snaps into place, and then lower the output tray.
    note:
    After loading paper, make sure to select the correct paper size and paper type settings when printing or copying.

Step 5: Align the ink cartridges

Aligning the printer is necessary to achieve the best print quality.
  1. After loading paper, the printer control panel displays a message to align the printer. Pull out the tray extender, and then touch OK.
    An alignment page prints.
  2. Wait for the alignment page to fully eject from the printer.
  3. Lift the scanner lid.
  4. Place the alignment page with the print side down on the scanner glass. Position it according to the engraved guides around the glass.
    Placing the alignment page on the scanner glass
  5. Close the scanner lid, and then touch Scan.
    The printer aligns the printer.

Step 6: Install the printer software

Your HP printer hardware is set up and you can install the printing software. Do not connect the printer to a computer until instructed to do so in the printing software.
Download the latest version of the printing software from the HP website123.hp.com.