solution Contentsolution Content

HP LaserJet Managed MFP - How to replace the staple cartridges

Introduction

The following information provides instructions to replace the staple cartridges in the printer inner finisher, the stapler/stacker finisher, and the booklet finisher.
Inner finisher
Stapler/stacker finisher
Booklet finisher

Remove and replace the staple cartridge in the inner finisher

View a video that shows how to remove and replace the staple cartridge in the each of the different output finishers:
the Booklet Maker Finisher (Y1G07A):
Load Paper Into Tray 2, 3, 4, and 5 HP Color LaserJet Enterprise M506
No audio. Load Paper Into Tray 2, 3, 4, and 5 HP Color LaserJet Enterprise M506.
Stapler/Stacker Finisher (Y1G18A) :
Inner Finisher (Y1G00A) :
note:
These videos are compatible for the following printers:
Hp LaserJet MFP E72425-E72430
HP LaserJet MFP E72525-E72535
HP Color LaserJet MFP E77822-E77830
HP LaserJet MFP E82540-E82560
HP Color LaserJet MFP E87640-E87660
  1. Open the inner finisher front door.
    Figure : Open the inner finisher front door
  2. Grasp the colored tab on the staple cartridge carriage, and then pull the staple cartridge carriage straight out.
    Figure : Remove the staple cartridge carriage
  3. Lift two tabs on the staple cartridge, and then lift up to remove the empty staple cartridge from the staple cartridge carriage assembly.
    note:
    Do not discard the staple cartridge carriage. It must be reused with the new staple cartridge.
    Figure : Remove the empty staple cartridge from the carriage
  4. Insert the new staple cartridge into the staple cartridge carriage.
    Figure : Insert the new staple cartridge into the staple cartridge carriage
  5. Reinstall the staple cartridge carriage into the stapler by pressing the colored handle inward until it snaps into place.
    Figure : Install the staple cartridge carriage
  6. Close the inner finisher front door.
    Figure : Close the finisher front door

Remove and replace the staple cartridge in the stapler/stacker finisher

View a video that shows how to remove and replace the staple cartridge in the stapler/stacker finisher:
HP LaserJet MFP E72525, E72530, E72535:
HP Color LaserJet MFP E77822, E77825, E77830:
HP LaserJet MFP E82540, E82550, E82560:
HP Color LaserJet MFP E87640, E87650, E87660:
  1. Open the finisher front door.
    Figure : Open the front door
  2. Rotate the knob counterclockwise to move the staple cartridge assembly all the way to the front.
    Figure : Rotate the knob to gain access to the staple cartridge
  3. Hold the knob to immobilize the staple cartridge assembly, grasp the colored tab on the staple cartridge carriage, and then pull the staple cartridge carriage straight out.
    Figure : Remove the staple cartridge carriage
  4. Lift two tabs on the staple cartridge, and then lift up to remove the empty staple cartridge from the staple cartridge carriage assembly.
    note:
    Do not discard the staple cartridge carriage. It must be reused with the new staple cartridge.
    Figure : Remove the empty staple cartridge from the carriage
  5. Insert the new staple cartridge into the staple cartridge carriage.
    Figure : Insert the new staple cartridge into the staple cartridge carriage
  6. Hold the knob to immobilize the staple cartridge assembly, insert the new staple cartridge into the assembly, and then press the colored handle inward until it snaps into place.
    Figure : Install the staple cartridge
  7. Close the finisher front door.
    Figure : Close the finisher front door

Remove and replace the staple cartridges in the booklet finisher

View a video that shows how to remove and replace the staple cartridge in the booklet finisher:
HP LaserJet MFP E72525, E72530, E72535:
HP Color LaserJet MFP E77822, E77825, E77830:
HP LaserJet MFP E82540, E82550, E82560:
HP Color LaserJet MFP E87640, E87650, E87660:
  1. Open the finisher front door.
    Figure : Open the finisher front door
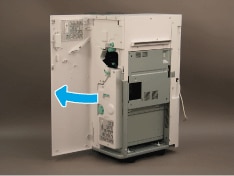
  2. Pull out the booklet finisher assembly until it stops.
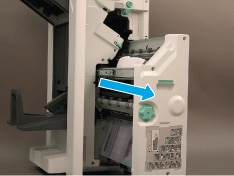
  3. Pull the colored tabs away from the assembly, and then pull them up remove the two staple cartridges.
    Figure : Remove the staple cartridges
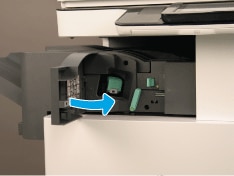
  4. Push in the two blue tabs, and then lift up to open the top of the staple cartridge carriage.
    Figure : Release the blue tabs
  5. Lift two tabs on each staple cartridge, and then lift up to remove the empty staple cartridges from the staple cartridge carriages.
    note:
    Do not discard the staple cartridge carriages. They must be reused with the new staple cartridges.
    Figure : Remove the empty staple cartridges from the carriages
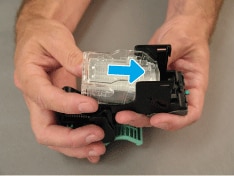
  6. Insert the new staple cartridges into the staple cartridge carriages.
    Figure : Insert the new staple cartridges into the staple cartridge carriages
  7. Reinstall the two staple cartridge carriages into the booklet maker by pressing the colored handles until they snap into place.
    Figure : Install the staple cartridge carriages
  8. Slide the booklet assembly into the finisher.
    Figure : Reinstall the booklet finisher
  9. Close the finisher front door.
    Figure : Close the finisher front door