This document explains how to set up the physical parts of the product. Complete these steps before you install the product software on your computer.
HP Officejet 4610 All-in-One, Officejet 4620, Deskjet Ink Advantage 4610, and Deskjet Ink Advantage 4620 e-All-in-One Printer Series - Setting up the All-in-One (Hardware)
Introduction
This document contains the following steps to set up the product:
-
Unpack the All-in-One
-
Install the output tray
-
Connect the power cord
-
Turn on the All-in-One
-
Set the control panel language and country/region
-
Install the cartridges
-
Load paper and align the product
-
Set the control panel date and time
Looking for the driver?
If you have not already set up the hardware, follow the steps in this document to do so first. But, if you have already installed the hardware and are just looking for the driver to download, click this link HP Software and Driver Downloads.
Setting up the All-in-One
Follow these steps in order.
Step one: Unpack the All-in-One
Follow these steps to unpack the product.
-
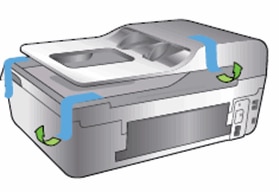
Remove all tape and packing materials from the front of the product.
note:
The output tray is taped to the top of the automatic document feeder (ADF) tray. Put it aside until you are ready to install it.Figure : Remove the packing materials from the front of the product
-
Turn the product around in order to access its rear side.
-
Remove all tape and packing materials from the rear of the product.Figure : Remove the packing materials from the rear of the product
-
Turn the product back around in order to access its front side again.
-
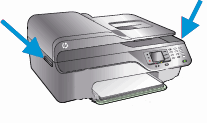
Locate the two slots on the left and right sides of the product.Figure : Locate the two slots on the sides of the product
-
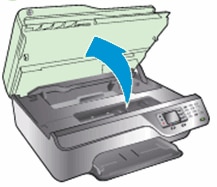
Slide your fingers into the two slots, and then lift up to open the cartridge access door.Figure : Open the cartridge access door
-
Remove all tape and packing materials from inside the product.
-
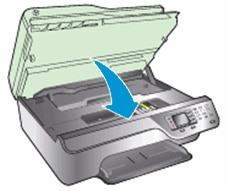
Close the cartridge access door.Figure : Close the cartridge access door
-
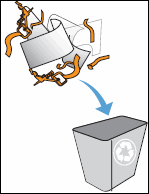
Recycle the packing material.Figure : Recycle the packing material
Step two: Install the output tray
-
Find the output tray that you set aside in Step one.
-
Slide the round pegs on the output tray into the product directly above the input tray.
-
Push the output tray into the product until it snaps into place.Figure : Snap the output tray into place

-
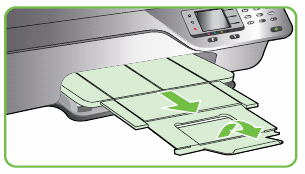
Pull out the output tray extender, and then lift the paper stop.Figure : Pull out the output tray extender
Step three: Connect the power cord
-
Turn the product around in order to access its rear side.
-
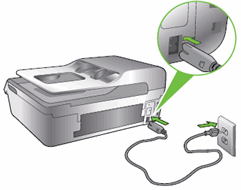
Connect the power cord into the rear of the product.
-
Plug the other end of the power cord into an electrical outlet.Figure : Connect the power cord
Step four: Turn on the All-in-One
-
Press the Power button (
 ) to turn on the product.
Figure : Press the power button
) to turn on the product.
Figure : Press the power button
-
Follow the prompts on the product control panel display.
Step five: Set the language and country/region
Follow these steps to set the language and country/region for the product.
-
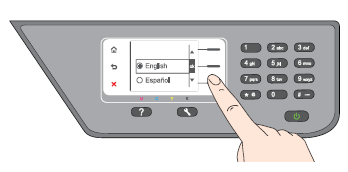
When prompted on the control panel, press the button (
 ) next to the Down Arrow (
 ) until the desired language displays next to OK, and then touch OK.
-
Press the button next to Yes to confirm your selection.Figure : Set the language
-
Press the button next to the Down Arrow () until the desired Country/Region displays next to OK, and then press the button next to OK.
-
Press the button next to Yes to confirm your selection.
-
Press the button next to OK to begin setting up your product.
Step six: Install the cartridges
Follow these steps to install the cartridges that shipped with your product.
Figure : Cartridges that shipped in the box

-
Locate the two slots on the left and right sides of the product.Figure : Locate the two slots on the sides of the product
-
Slide your fingers into the two slots, and then lift up to open the cartridge access door. The carriage moves into the cartridge access area.Figure : Open the cartridge access door
-
On one of the cartridges, pull the orange pull-tabstraight back to remove the plastic wrap.Figure : Remove the plastic wrap
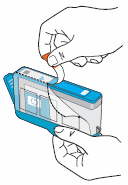
-
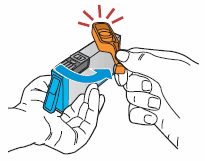
Twist the orange cap counterclockwise to snap it off the cartridge.Figure : Remove the orange cap
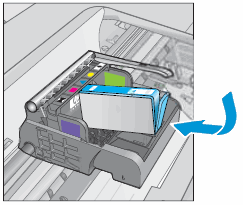
-
Slide the cartridge into the correct slot as shown. The color-coded icons on the cartridge and in the printhead must match.Figure : Insert the cartridge
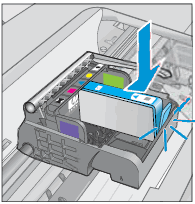
-
Press down on the cartridge until it clicks firmly into place.Figure : Press the cartridge into place
-
Repeat these steps for each cartridge.
-
Close the cartridge access door.Figure : Close the cartridge access door
Step seven: Load paper in the input tray

-
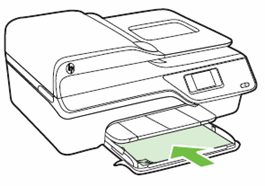
Pull out the input tray as far as possible.Figure : Pull out the input tray

-
Slide the paper width guides out as far as possible.
-
Check the paper to make sure it is not torn, wrinkled or damaged.
-
Tap one edge of the paper on a flat surface to make sure that the stack is even and aligned.
-
Insert the paper print-side down and short edge forward into the input tray. Make sure that the paper fits into the tray and is not higher than the notchesat the top of the tray.Figure : Load paper in the input tray
-
Adjust the paper width guides inward until they rest against the edges of the paper but do not bind the paper.
-
Press the button () next to OK to confirm that paper is loaded.
-
Wait while the product aligns the printheads and then prints an alignment page.
-
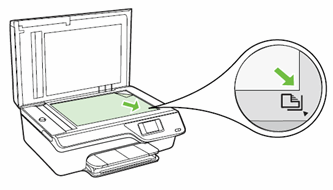
Lift the scanner lid.Figure : Lift the scanner lid

-
Load the alignment page print-side down in the right-front corner of the glass.Figure : Load the alignment page on the scanner glass
-
Close the scanner lid.
-
Press the button () next to OK, to scan the alignment page.
Step eight: Set the date and time
-
On the product control panel, press the Setup button (
 ).
).
-
Press the button () next to the Down Arrow () until Preferences displays next to OK, and then press the button next to OK.
-
Press the button next to OK to select Date and Time.
-
Press the numbers on the control panel keypad to set the date.
-
Press the numbers on the control panel keypad to set the correct time, and then press the button next to OK.
-
Press the Home button (
 ), to return to the main menu.
Enter a topic to search our knowledge library
What can we help you with?

Need Help?