During the printing process, the paper gets torn, wrinkled, or damaged inside the product.
HP LaserJet P1505 and P1505n Printers - The Paper Tears, Wrinkles, or is Damaged During Printing
Issue
Solution one: Check the paper and the product
Follow these steps in the order presented to resolve the issue.
Step one: Remove any loose paper from the tray
Remove any loose sheets of paper from the input tray and the output tray.
caution:Do not remove jammed paper at this stage. Trying to clear jammed paper from the front of the product can damage theprint mechanism.
Step two: Check the paper path for obstructions
-
Press the Power button (
 ) to turn off the product.
-
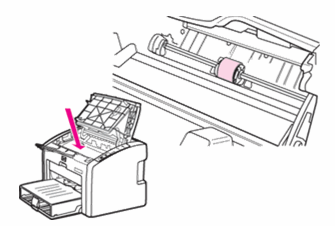
Open the print cartridge door, and then remove the print cartridge.
note:
Opening the print cartridge door and removing the print cartridge relieves tension on the product rollers, which prevents damage to the product and makes removing jammed paper easier.Figure : Remove the print cartridge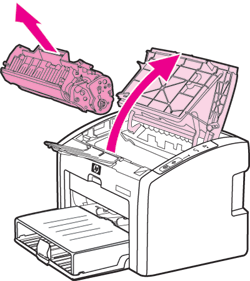
caution:
To prevent damage to the print cartridge, cover it with a sheet of paper to minimize exposure to direct light. -
Look inside the product for any torn pieces of paper or labels, and then remove them.
-
Gently pull any obstructions that you find out of the rollers.
caution:
If any paper tears while removing it from the rollers, check the rollers and wheels for torn pieces of paper that might remain inside the product.Figure : Check the product for bits of torn paper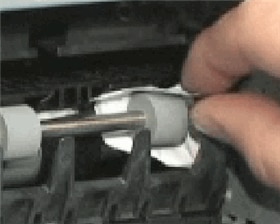
-
Remove any jammed paper from the tray, the priority feed slot, and the output bin. Grasp the paper with both hands and then carefully pull the paper straight out of the product.
-
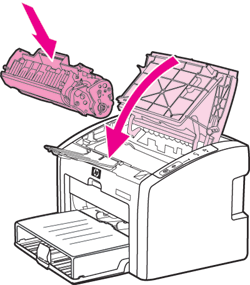
Reinstall the print cartridge, and then close the print cartridge door.Figure : Reinstall the print cartridge
-
Press the Power button (
 ) to turn on the product.
Step three: Check the paper type
Make sure that the paper loaded in the tray is compatible with the product. The recommended paper types and weights for most HP products include:
-
Plain paper, 75 to 90 gsm (20 to 24 lb)
-
Legal size paper, 75 to 90 gsm (20 to 24 lb)
-
Card stock, up to a maximum of 200 gsm (100 lb)
-
Envelopes, 75 to 90 gsm (20 to 24 lb)
-
Photo paper, 236 gsm (145 lb)
Step four: Load the paper
Follow these steps to load paper in the product:
-
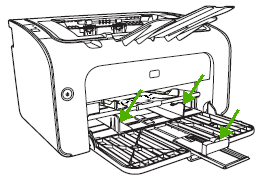
Slide the paper length and width guides to their outermost positions.Figure : Slide paper guides outward
-
Tap a stack of U.S. letter or A4 size, unused, plain white paper on a flat surface to align the edges.
note:
Do not fan the paper before you load it. To loosen the ream, hold it firmly in both hands, and then twist the media by rotating your hands in the opposite direction. -
Load the paper into the tray with the narrow edge first and the print side facing up. Slide the paper forward until it stops.
-
Slide the paper length and width guides inward until they stop at the edges of the paper.
Step five: Print a self-test report
Follow these steps to print a self-test report.
-
Press the Power button () to turn on the product.
-
Press and release the Go button (
 ). The self-test page prints.
-
If these steps resolved the issue, there is no need to continue troubleshooting.
-
If the issue persists, see the next step.
Step six: Clean the pickup roller
Follow these steps to clean the pickup roller.
-
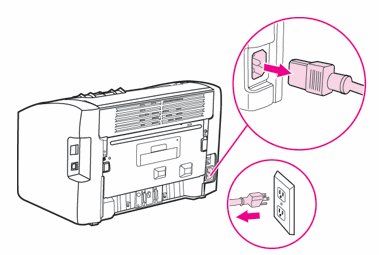
Press the Power button () to turn off the product, unplug the power cord from the electrical outlet, and then disconnect the power cord from the back of the product. Wait for the product to cool.
Figure : Disconnect the power cord
-
Open the print cartridge door, and then remove the print cartridge.
caution:
To prevent damage to the print cartridge, minimize its exposure to direct light. Cover the print cartridge with a sheet of paper.Figure : Remove the print cartridge
-
With a dry, lint-free cloth, wipe any residue from the paper path area and the print cartridge cavity.Figure : Clean the print cartridge cavity
-
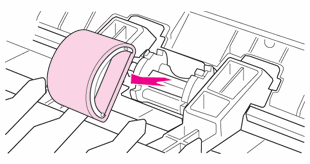
Find the pickup roller inside the product.Figure : Pickup roller
-
Release the small, white tabs on either side of the pickup roller, and then rotate the pickup roller toward the front.Figure : Release the tabs

-
Gently pull the pickup roller up and out.Figure : Remove the pickup roller
-
Dab a clean, lint-free cloth in rubbing alcohol (isopropyl alcohol) or clean water, and then scrub the pickup roller.
note:
Use only distilled, filtered, or bottled water to clean the pickup roller. Tap water might contain contaminants that can damage the pickup roller.warning:
Rubbing alcohol is flammable. Keep the rubbing alcohol and cloth away from any open flame or heat source. Before you close the product, allow the rubbing alcohol to dry completely. -
After you scrub the pickup roller with the cloth dipped in rubbing alcohol or clean water, use a dry, clean, lint-free cloth to dry the pickup roller and remove loosened dirt.
-
Allow the pickup roller to dry completely before you reinstall it in the product
-
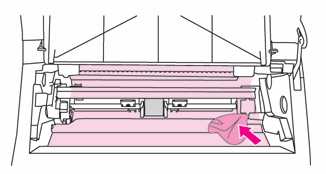
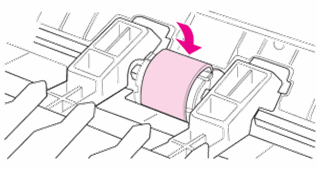
Position the pickup roller in the slot. The circular and rectangular slots on each side will prevent you from installing the roller incorrectly.Figure : Position the pickup roller in the slot

-
Rotate the top of the pickup roller away from you until both sides snap into place.Figure : Rotate the pickup roller into place
-
Reinstall the print cartridge, and then close the print cartridge door.Figure : Reinstall the print cartridge
-
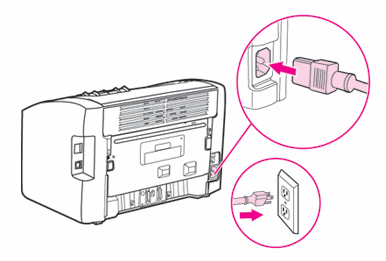
Reconnect the power cord to the back of the product, plug the power cord into the electrical outlet, and then press the Power button () to turn on the product.
Figure : Reconnect the power cord
Solution two: Service the product
Service or replace your HP product if the issue persists after completing all the preceding steps.
Go to Contact HP Customer Support to schedule a product repair or replacement. If you are in Asia Pacific, you will be directed to a local service center in your area.
To confirm your warranty status, go to HP Product Warranty Check. Repair fees might apply for out-of-warranty products.
Cause
This issue can be caused by any of the following:
-
Bits of paper might be obstructing the paper path.
-
Unsupported paper types and sizes might catch and tear in the printer mechanism.
-
Paper pushed too far into the tray when it is loaded might feed into the printer incorrectly.
-
Paper stacks loaded into the tray with too many or too few sheets of paper might feed into the printer incorrectly.
-
Paper stacks not correctly aligned when loaded into the tray might feed into the printer incorrectly.
-
The rollers on the rear access door and inside the rear access door might not be clean, in good condition, or freely rolling.
-
The starwheel assembly might be obstructed or have damaged or missing parts.
-
The rear access door might be damaged.
-
The wheels on the starwheel assembly might be damaged.
Enter a topic to search our knowledge library
What can we help you with?

Need Help?