While printing, the product does not pick up or feed paper from the input tray.
HP Deskjet F4100 All-in-One Series - The All-in-One Does Not Pick Up or Feed Paper
Issue
Video: Troubleshooting steps for paper feed issues
The following video demonstrates troubleshooting steps for paper feed issues.
note:This video shows the HP Deskjet F4180 printer. The outside of the printer might not look the same as your printer, but the steps are the same.

If you have trouble viewing the video or to the view the video in a different size, click here to play the video on YouTube.
Step one: Reset the printer
-
Press the power button (
 ) to turn off the product.
-
Disconnect the power cable from the back of the product.
-
Reconnect the power cable to the back of the product.
-
Press the power button () to turn on the product.
-
Try printing again.If the issue continues, proceed to the next step.
Step two: Check the condition of the paper and reload it
Follow these steps to make sure that the paper is loaded in the product correctly.
-
Replace any ripped, dusty, wrinkled, or bent paper. If the paper is curled, uncurl it by gently bending it in the opposite direction of the curl or replace the paper.
note:
Use plain paper in the product until the issue is resolved. -
Make sure that all the paper in the stack is of the same size and type.
-
Tap the stack of paper on a flat surface to align the edges.
-
Load 10 to 25 sheets of paper in the paper tray.
note:
Do not load too much paper in the product. -
Insert the stack of paper in the paper tray, and then gently push the paper guides snugly against the paper.
-
Make sure that the paper is pushed all the way into the product.
note:
If the paper is not pushed all the way in, the product will not be able to pick up the paper. If it is pushed in too far, the product will pick up multiple sheets of paper, which can result in a paper jam. -
Try printing again.If the issue continues, proceed to the next step.
Step three: Clear the paper jam
Clear the paper jam from the back of the printer
-
Make sure to remove any loose paper.
caution:
Do not remove jammed paper at this stage. -
Disconnect the power cable from the back of the product.
-
Press in the tab on the left side of the rear door to release the door.Remove the door by pulling it away from the product.
-
Pressing the tab on the left side
-
Removing the rear door
Figure : Removing the rear door
-
-
Gently pull the paper out of the rollers.
caution:
If the paper tears while removing it from the rollers,check the rollers and wheels for torn pieces of paper that might beremaining inside the product. If all of the pieces ofpaper are not removed from the product, more paper jams are likely to occur. -
Replace the rear door. Gently push the door forward until it snapsinto place.
-
Reconnect the power cable to the back of the product.
-
Press Cancel to continue the current job.
If the issue continues, open the top cover and clear the paper jam.
Open the top cover and clear the jam
-
Disconnect the power cable from the back of the product.
-
Lower the cartridge door to open it. If necessary, pull the input tray down to open it.Figure : Opening the cartridge door

-
Gently pull the paper out of the rollers.
caution:
If the paper tears when while removing it from the rollers, check therollers and wheels for torn pieces of paper that might be remaining inside thedevice. If all the pieces of paper are not removed from the product, morepaper jams are likely to occur. -
Close the cartridge door.Figure : Closing the cartridge door

-
Reconnect the power cable into the product.
-
Press the power button () to turn on the product.
-
Press Start Copy Black or Start Copy Color to continue the current job.
If the issue continues, proceed to the next step.
Step four: Clean the rollers
-
Press the power button () to turn off the product.
-
Disconnect the power cable from the wall outlet.
-
Press in the tab on the left side of the rear door to release the door.Remove the door by pulling it away from the product.
-
Pressing the tab on the left side
-
Removing the rear door
Figure : Removing the rear door
-
-
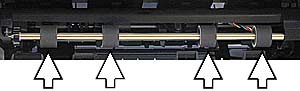
Dip a soft, lint-free cloth into purified or distilled water and squeeze any excess water from it.
-
Use the cloth to remove any dust or dirt buildup on the rubber rollers.Figure : Paper rollers
-
Replace the rear door by gently pushing the door toward the product until it snaps into place.
-
Reconnect the power cable into the wall outlet.
-
Press the power button () to turn on the product.
If the issue continues, proceed to the next step.
Step five: Make sure that the carriage can move freely
-
Make sure that the product is turned on and open the cartridge door. The carriage might try to move into the access area. If so, let it to move to that position.
-
Without turning off the product, disconnect the power cable from the back of the product.
-
Disconnect the power cable from the wall outlet.
note:
The power cable must be disconnected to move the parts by hand and to reset the paper feed mechanism without the risk of an electrical shock. -
Check to see if the carriage can move freely across the width of the product by gently pushing the carriage to the left and then to the right. Clear any obstructions found.
caution:
Be careful not to force the carriage. If the carriage is stuck, forcing it to move will damage the product. -
Close the cartridge door.
-
Reconnect the power cable to the back of the product.
-
Press the power button () to turn on the product.
Step six: Reload and test the printer
-
Reload the product with plain paper.
-
Press and hold the Resume button until the product starts printing. A self-test page should print.If the issue continues, proceed to the next step.
Step seven: Adjust the paper settings in the print driver
-
Adjust the paper settings in the print driver to match the paper in the paper tray. If this does not solve the issue, continue to the next step. Make sure that the paper is loaded correctly in the product before beginning the procedure.
-
In the software program from which you are printing, click File and click Print.
-
Click the button that opens the Properties dialog box.
note:
Depending on the software program, the button might be called Properties, Options, Printer Setup, Printer, or Preferences. -
Click the Features tab.
-
In the Paper Size Options area, click the appropriate paper size from the Size drop-down list to adjust the paper size.
-
Select the appropriate paper type by clicking More from the Paper Type drop-down list in the Basic Options area.
-
Click OK.
-
Click OK to try printing again.If the issue continues, proceed to the next step.
Step eight: Service the printer
Service or replace your HP product if the issue persists after completing all the preceding steps.
Go to Contact HP Customer Support to schedule a product repair or replacement. If you are in Asia Pacific, you will be directed to a local service center in your area.
To confirm your warranty status, go to HP Product Warranty Check. Repair fees might apply for out-of-warranty products.
Enter a topic to search our knowledge library
What can we help you with?

Need Help?