Follow the steps in this document to check for paper in all possible jam locations inside the right door and fuser area. When a jam occurs, the control panel might display a message and an animation that assists in clearing the jam.
-
13.Bx.yz
In addition to the instructions provided in this document, you can view the following video of how to clear a paper jam in the right door and fuser area.
note:The printer model referenced in the video is different, but the steps also apply to the M577, M578 models.

How to Clear a Paper Jam in Right Door and Fuser Area for the HP Color LaserJet Enterprise M553, M554, M555 and HP Color LaserJet Enterprise MFP M578 Printer
No audio. Learn how to clear a paper jam in the right door and fuser area in the HP Color LaserJet Enterprise M553, M554, M555 and HP Color LaserJet Enterprise MFP M578 printer.
caution:The fuser can be hot while the printer is in use. Wait for the fuser to cool before handling it.
-
Lift the latch on the right door to release it.Figure : Lift the latch

-
Open the right door.Figure : Open the right door

-
Gently pull out any jammed paper from the pick up area.Figure : Remove the jammed paper

-
Close the transfer assembly.Figure : Close the transfer assembly

-
Push down on the green levers to release the jam-access cover.Figure : Press down on the green levers

-
Gently pull out any jammed paper. If the paper tears, make sure to remove all remnants.Figure : Remove the jammed paper

-
Close the jam-access cover, and then lower the transfer assembly.Figure : Close the jam-access cover

-
If paper is visible entering the bottom of the fuser, gently pull downward to remove it.
caution:
Do not touch the foam on the transfer roller. Contaminants can affect print quality.Figure : Remove the jammed paper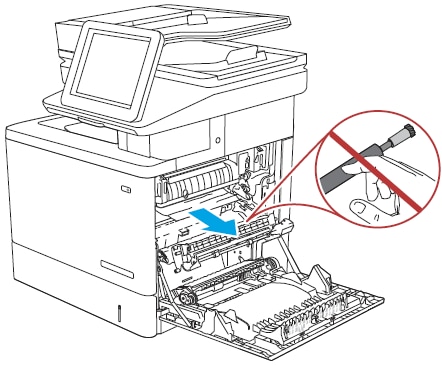
-
If paper is jammed as it enters the output bin, gently pull the paper out to remove it.Figure : Remove the jammed paper

-
Paper could be jammed inside the fuser where it would not be visible. Grasp the fuser handles, lift up slightly, and then pull straight out to remove the fuser.
caution:
The fuser can be hot while the printer is in use. Wait for the fuser to cool before handling it.Figure : Remove the fuser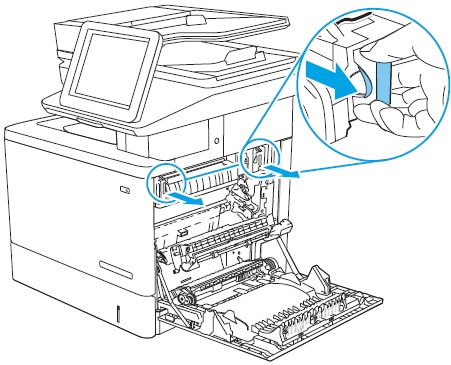
-
Open the jam-access door. If paper is jammed inside the fuser, gently pull it straight up to remove it. If the paper tears, remove all paper fragments.
caution:
Even if the body of the fuser has cooled, the rollers that are inside could still be hot. Do not touch the fuser rollers until they have cooled.Figure : Remove the jammed paper
-
Close the jam-access door, and push the fuser completely into the printer until it clicks into place.Figure : Install the fuser

-
Check for jammed paper in the duplex path inside the right door, and remove any jammed paper.Figure : Remove the jammed paper

-
Close the right door.Figure : Close the right door

