solution Contentsolution Content

HP DeskJet 3630, 4729 Printers - First Time Printer Setup

This document is for HP DeskJet 3630, 3631, 3632, 3633, 3634, 3635, 3636, 3637, 3638, 3639, DeskJet Ink Advantage 3635, 3636, 3638, and Deskjet Ink Advantage Ultra 4729 All-in-One printers.
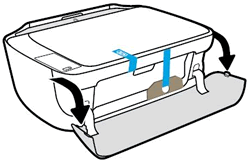
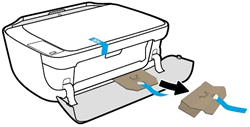
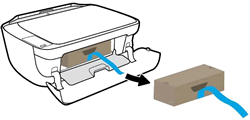
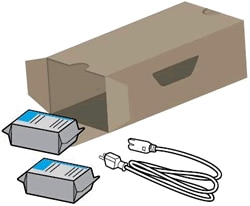
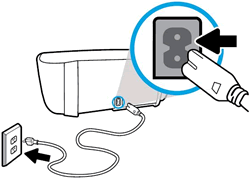
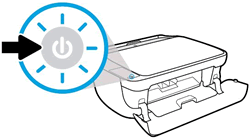
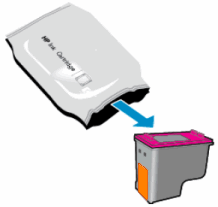
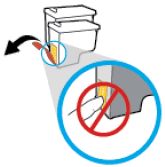
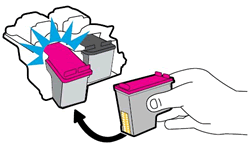
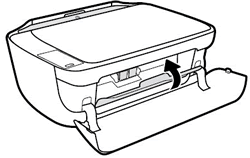
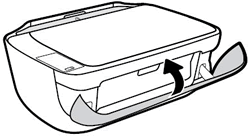
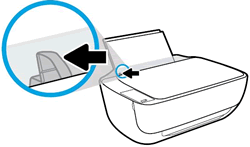
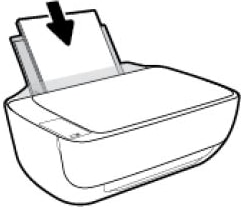
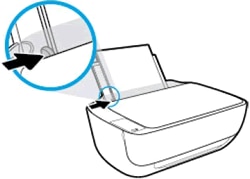
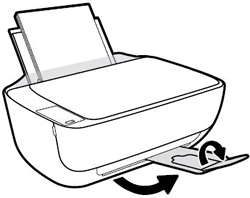
To set up a printer for the first time, remove all packing materials, connect the power cable, install the cartridges, and then load paper into the input tray.
note:
If you are looking for the printer software, go to:

Step 1: Unpack the printer from the box

Remove the printer from the box, and then remove all tape, stickers, and packing materials from the printer.
  1. Remove the printer from the box.
  2. Remove all tape and packing materials from the outside of the printer, and then open the exterior door.
    Figure : Remove the tape, and then open the exterior door
    Image: Remove the tape and packing materials from outside the printer
  3. Remove the tape and packing material from under the ink cartridge access door.
    Figure : Remove the tape and packing material from under the ink cartridge access door
    Image: Remove packing material
  4. Open the ink cartridge access door, and then remove the tape and cardboard box from inside the printer.
    Do not discard the box.
    Figure : Remove the tape and packing materials from inside the printer
    Image: Remove the box from  the printer
  5. Open the box, and then remove the ink cartridges, power cord, and USB cable.
    Figure : Remove the contents of the box
    Image: Remove the content of the box
    note:
    The contents might vary by country/region. See the packaging for a list of items shipped in the box.
  6. Connect the power cord to the rear of the printer, and then plug the other end of the power cord into an electrical outlet.
    Figure : Connect the power cord
    Image: Connect the power cord
  7. Press the Power button to turn the printer on.
    Figure : Press the Power button
    Image: Press the Power button

Step 2: Install the ink cartridges

Install the HP ink cartridges that shipped in the box with your printer.
  1. The printer completes the startup process, and then the carriage moves to the center of the printer.
    Wait until the printer is idle and silent before continuing.
    Figure : The printer carriage moves to the center of the printer
  2. Remove one of the ink cartridges from its package. Be careful to only touch the black plastic on the ink cartridge.
    Figure : Remove the ink cartridge from its package
    Image: Remove the ink cartridge from its package
  3. Pull the orange tab to remove the protective tape.
      caution:
    Do not touch the copper-colored contacts or the ink nozzles. Do not replace the protective tape on the contacts. Handling these parts can result in clogs, ink failure, and bad electrical connections.
    Figure : Remove the tape and avoid touching the ink cartridge contacts or ink nozzles
    Image: Remove the tape and avoid  touching the ink cartridge contacts or ink nozzles
  4. Slide the new ink cartridge at a slight upward angle into the empty slot, and then gently push up on the ink cartridge until it snaps into place.
    • Insert the tri-color ink cartridge into the left slot.
    • Insert the black ink cartridge into the right slot.
    Figure : Insert the new ink cartridge
    Image: Insert the new ink cartridge
  5. Repeat these steps to install the other ink cartridge.
  6. Close the ink cartridge access door.
    Figure : Close the ink cartridge access door
    Image: Close the ink cartridge access door
  7. Close the exterior door.
    Figure : Close the exterior door
    Image: Close exterior door

Step 3: Load paper into the input tray

Load plain white paper in the input tray after you unpack the printer from the box.
  1. Raise the input tray.
    Figure : Raise the input tray
    Image: Pull up the input tray
  2. Slide the paper width guide all the way to the left.
    Figure : Slide the paper width guide left
    Image: Slide the paper width guide left
  3. Load plain white paper into the input tray, and then slide the stack of paper down until it stops.
    Figure : Load plain white paper
    Image: Load plain white paper
  4. Slide the paper width guide to the right until it stops at the edge of the paper.
    Figure : Slide the paper width guide right
    Image: Slide the paper width guide right
  5. Pull out the output tray, and then raise the tray extender.
    Figure : Pull out the output tray, and then raise the tray extender
    Image: Pull out the output tray and tray extender

Step 4: Install the printer software

Your HP printer hardware is now set up and you can install the printing software. Do not attempt to connect the printer to a computer until instructed to do so in the printing software.
Download the latest version of the printing software from the following HP websites:
note:
For print quality purposes, the printer prints an alignment page after five pages are printed. Follow the instructions on the alignment page to complete the ink cartridge alignment.