This document is for the Designjet T610, T1100, T620, T1120, T770, T1200, T790, T1300, T2300, Z2100, Z3100, Z3200, Z5200, and Z5400.
HP Designjet T-Series Printers - System Error 86:01 and System Error 42:10
Environment
-
Designjet T610
-
Designjet T1100
-
Designjet T620
-
Designjet T1120
-
Designjet T770
-
Designjet T1200
-
Designjet T790
-
Designjet T1300
-
Designjet T2300
-
Designjet Z5400
-
Designjet Z5200
-
Designjet Z2100
-
Designjet Z3100
-
Designjet Z3200
Questions/Symptoms
-
System Error 86:01
-
System Error 86:10
-
System Error 86:11
-
System Error 42:10
-
Possible Paper Jam
Cause
Unknown at this moment
Answer/Solution
Introduction: This document explains the general procedure to follow when the printer shows continuous or intermittent System Error 86:01 (also 86:10 or 86:11) or 42:10 when initializing or printing. This document can be used with the following printers:
HP Designjet T-Series Printers: T610/T620/T1100/T1120/T1200/T770/T2300/T790/T1300/Z2100/Z3100/Z3200/Z5200/Z5400.
Generally, System Error 86:01 refers to paper jams or obstructions (problems moving the carriage) in the Scan Axis area. On the other hand, System Error 42:10 refers to a Scan Axis Motor Failure (electrical problem caused by difficulties moving the carriage – too much force needed to move it due to obstructions, high friction or restrictions). However, it is important to understand that System Error 86:01 is not always a real visible paper jam and it should never be confused with System Error 81:01 (Paper Axis). On the other hand, System Error 42:10 is not always a problem with the Scan Axis Motor. Troubleshooting for both errors, consequently, is basically the same.
In simple terms, ANY restriction or obstruction preventing the carriage from freely moving will cause the printer to stop working and show any of these errors.
The best and easier way to diagnose the problem is to locate the spot where the carriage stops when the printer shows the error (in case of no real paper jam). Most likely the main possible cause of the issue will be there.
If service onsite is needed, a proper diagnosis of the failing component is indispensable. Even if one component looks like the obvious cause of the problem, it is important to check other Scan Axis components.
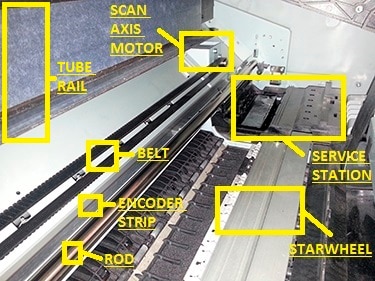
Check the following picture to better identify the main Scan Axis components:
In case no visible obstructions are found in the Scan Axis area, here there are some of the most common causes of these errors.
Possible hardware causes:
-
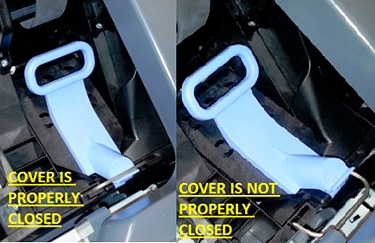
Carriage: With the printer unplugged and no paper loaded, MANUALLY move it from side to side, check for general obstructions. It must move freely across the entire Scan Axis area. If the carriage is locked by the Service Station (right hand side) it will not be possible to manually take the carriage out. If so, the recommendation is to restart the printer, wait for the carriage to come out and then unplug the printer. The Carriage Cover MUST be properly closed (blue latch must engage the metal piece in front of the carriage). If required, for ideal troubleshooting, it is recommended to remove all printheads (PHs) from the carriage to look for pieces of paper under the PHs. Also, check if they are delaminated (thin plastic strip at the bottom) as this may make them crash with the paper. Keep them out during the rest of the diagnosis.
-
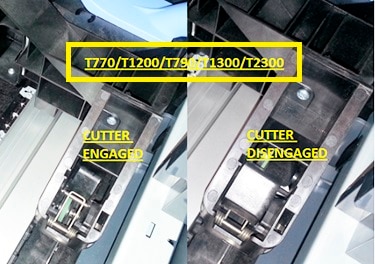
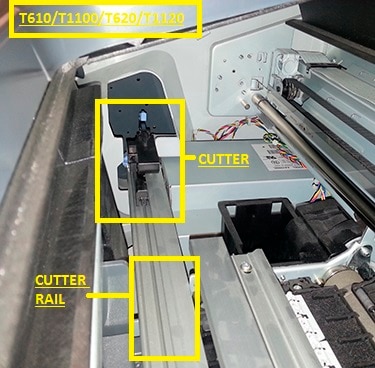
Cutter: For printers with the cutter NOT attached to the carriage (T610/T1100/T620/T1120/Z2100/Z3100/Z3200/Z5200), make sure it is completely toward the left hand side of the printer (when facing it). No pieces of paper must be obstructing its movement. It must engage and disengage correctly and it should freely move (with no friction) through its rail. For printers with the cutter attached to the carriage (T770/T1200/T790/T1300/T2300/Z5400), make sure that it slides freely when the carriage is manually moved from side to side. It must be deactivated (up position) and no pieces of paper must be obstructing its movement. It must engage and disengage correctly. For ideal troubleshooting (if the cutter is suspected as part of the problem) it is recommended to remove it. For any printer it is a Customer Self Replaceable part.
-
Belt: if it is loose, worn-out, shredded or broken, the Scan Axis Motor will not be able to grab it and move it. In some cases, the part of the belt being worn-out (missing teeth) or shredded will “slip” when it is grabbed by the motor. Noises are common when this happens. Because of this, it is important to closely check the entire belt, inch by inch. If it starts missing teeth, they will get either all over the Scan Axis or on top of the printouts. Also, check (if possible) the Belt Tensioner (left end of the belt when facing the printer), it may be broken or out of place. Depending on the printer series, the tensioner may not be included with the belt.
-
Carriage rod: It must be properly oiled. The carriage must slide freely through it, if not; clean and oil the rod using synthetic oil.
-
Encoder strip: It must not be scratched, bent or damaged. If dirty, proceed to clean it using a non-abrasive liquid and a lint-free cloth. Hold the cloth in an inverted “U” shape around the Encoder Strip. Wipe until no ink residue appears on the cloth.
-
Service station: Pieces or paper may have fallen in it. Check for obstruction, especially if the carriage stops on it when it shows the System Error. If so, it is important to also remove all PHs.
-
Starwheel assembly: If there are pieces of paper under it, it will not be able to move up and down correctly. If it remains only in the up position, the carriage may touch it when it moves from side to side. When the lever on the left is up, paper must be able to manually pass under the Starwheel Assembly and through the complete Paper Axis area (from the back to the front) with no problems.
-
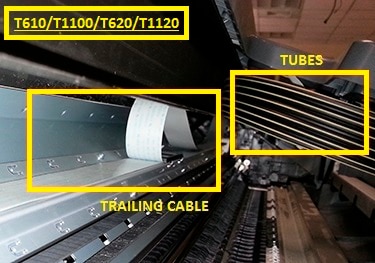
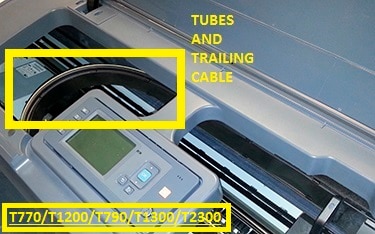
Trailing Cable/Ink tubes: The Ink Tubes must freely move and follow the movement of the carriage. They must also slide freely through the Tube Rail. The Trailing Cable must freely move and follow the movement of the carriage and tubes. On the T610/T1100/T620/T1120/Z2100/Z3100/Z3200/Z5200 the Trailing Cable is located separate from the Ink Tubes. On the T770/T1200/T790/T1300/T2300/Z5400 the Trailing Cable is attached to the Ink Tubes.
-
Scan Axis Motor: Check if it is able to move the carriage while initializing (if the error is continuous), if so the motor is OK. Scan Axis Motor issues can be easily mistaken with encoder reading issues (Carriage Encoder Sensor is not able to read the Encoder Strip). If the motor is not apparently moving it is a good idea to restart the printer with the Window Sensor is blocked and check if the carriage moves at least a couple of millimeters (pay close attention). If it moves then most likely the motor is not the problem. In this case the issue has to do with encoder reading; service will be needed.
note:
If any issue persists, it will be necessary to run some internal tests. For more information about this or if any further assistance is needed, contact HP Technical Support.
Enter a topic to search our knowledge library
What can we help you with?

Need Help?